Skip to content
  • Solutions
    By Role
    • For Developers
    • For Content Managers
    • For Agencies
    • For IT Admins
    • For Web Hosters
    • For Developers
    • For Content Managers
    • For Agencies
    • For IT Admins
    • For Web Hosters
    By Infrastructure
    • Overview
    • AWS
    • Microsoft Azure
    • Alibaba Cloud
    • Google Cloud Platform
    • Vultr
    • Overview
    • AWS
    • Microsoft Azure
    • Alibaba Cloud
    • Google Cloud Platform
    • Vultr
    • Digital Ocean
    • Linode
    • Upcloud
    • Oracle
    • OVH
    • Digital Ocean
    • Linode
    • Upcloud
    • Oracle
    • OVH
  • Product
    • Plesk Features
    • Plesk Editions
    • What’s new
    • Pricing
    • Roadmap
    • Lifecycle Policy
    • Extensions Catalogue
  • Pricing
  • Extensions
    Featured Extensions
    • SocialBee
    • WP Toolkit
    • Sitejet Builder for Plesk
    • SEO Toolkit
    • Joomla! Toolkit
    • Premium Email
    • Email Security
    • SocialBee
    • WP Toolkit
    • Sitejet Builder for Plesk
    • SEO Toolkit
    • Joomla! Toolkit
    • Premium Email
    • Email Security
    Bundles and packs:
    • Business and Collaboration Edition
    • WP pack
    • Hosting pack
    • Power pack
    • Language pack
    • Business and Collaboration Edition
    • WP pack
    • Hosting pack
    • Power pack
    • Language pack

    See all Extensions

  • For Partners
    • Plesk Contributor Program
    • Plesk Partner Program
    • Affiliate program
    • Plesk University
  • Help Center
    • Documentation
    • Professional Services
    • Support
    • Contact Us
    • Wiki
    • Forum
  • Plesk 360 login
  • Free Trial
  • Pricing
  • Solutions
    • By Role
      • For Developers
      • For Content Managers
      • For Agencies
      • For IT Admins
      • For Web Hosters
    • By Infrastructure
      • Overview
      • Plesk on Amazon Web Services (AWS & Lightsail)
      • Microsoft Azure
      • Alibaba Cloud
      • Google Cloud Platform
      • Vultr
      • DigitalOcean
      • Linode
      • UpCloud
      • Oracle
      • OVH
  • Products
  • Pricing
  • Extensions
    • Featured Extensions
      • SocialBee
      • WP Toolkit
      • Sitejet Builder for Plesk
      • SEO Toolkit
      • Joomla! Toolkit
      • Premium Email
      • Email Security
    • Bundles and packs:
      • Business and Collaboration Edition
      • WP pack
      • Hosting pack
      • Power pack
      • Language pack
      • See all Extensions
  • For Partners
    • Plesk Contributor Program
    • Plesk Partner Program
    • Affiliate Program
    • Plesk University
  • Help Center
    • Documentation
    • Professional Services
    • Support
    • Contact Us
    • Wiki
    • Forum
  • Plesk 360 login
  • Free Trial
Plesk 360 login
Free Trial

Knowledge Base

Configuring DNS via Domain Connect

 
configuring dns for a domaincustomer guidedomains and dnswebsites and domains11

Configuring DNS settings manually can be a difficult task. Instead, you
can use the Domain Connect
extension
,
which helps you configure DNS automatically via Domain
Connect
, an open standard.

Domain Connect helps you configure DNS if you want to:

  • Put a website online when DNS hosting is configured externally.

    You have a domain name, web hosting in Plesk, and DNS hosting at
    another DNS hosting provider. Now you need to put your website online
    by pointing the domain name to your Plesk server.

  • Add third-party services to your website.

    Your website is running and DNS hosting is configured in Plesk. Now
    you want to add additional third-party services (for example, mail or
    an e-commerce platform) to your website. To bind the service to your
    website, the service provider needs to configure DNS records in
    Plesk.

Putting a Website Online via Domain Connect

The procedure may vary depending on your DNS hosting provider. Below, we
will take GoDaddy and
1&1 as examples.

To put a website online via Domain Connect:

  1. Once you have created a new domain in Plesk, click the “Connect the
    domain to Plesk” message.

    Note: Even if you have closed the message, you can always find it in the domain’s DNS settings.

  2. Enter the credentials of your DNS hosting provider account, log in,
    and then click Connect.
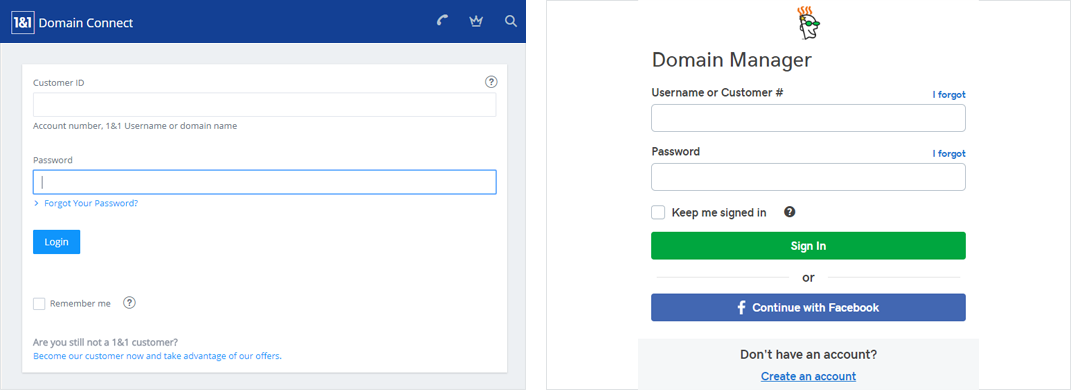
    image 79641

  3. There is usually an option to see the changes Domain Connect will
    make to the DNS configuration. Click Connect to proceed.
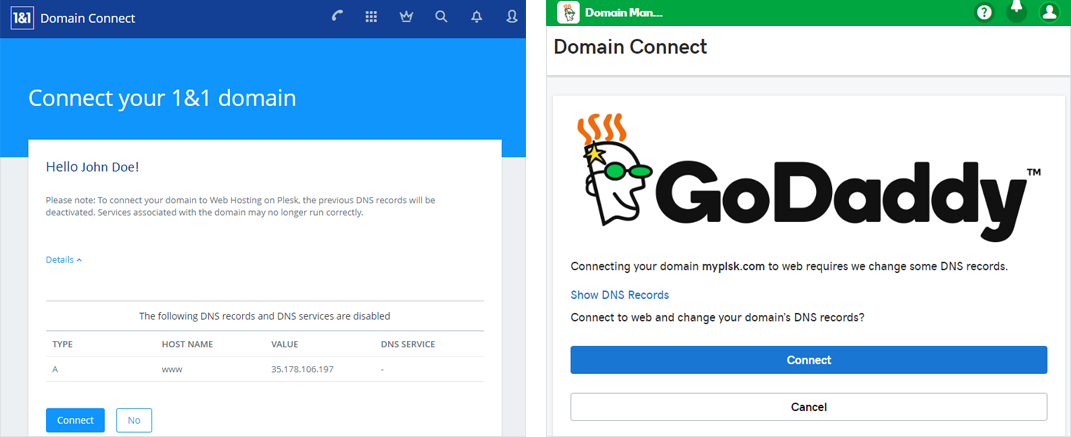
    image 79642

  4. Click Close.

Domain Connect has pointed the domain name to your Plesk server. Once
the DNS changes propagate on the Internet, your website will be online.

Adding additional third-party services

The procedure may vary depending on the third-party service you want to
add. Below, we will take Office 365 as an example.

  1. Log in to the Office 365 account.

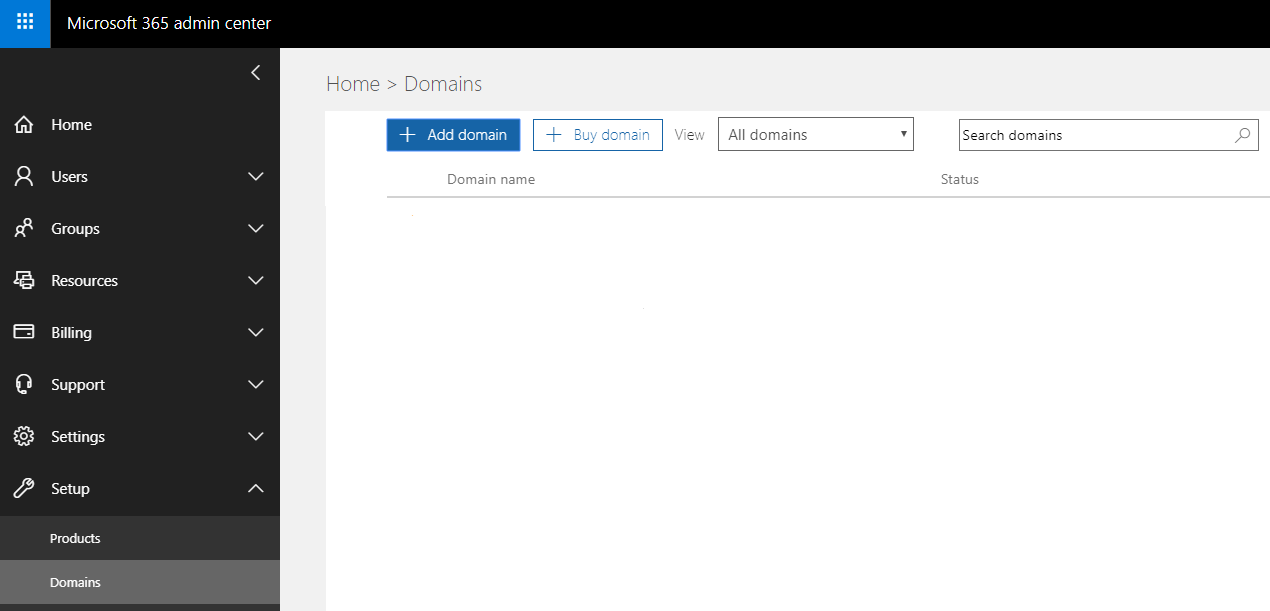
  2. Go to Admin > Setup > Domains, and then click Add
    domain
    .

    image 79643

  3. Enter the name of the domain you want to connect Office 365 services
    to (the domain must be created in Plesk), and then click Next.

  4. Office 365 needs to verify your domain. Keep the recommended
    verification method, and then click Next.
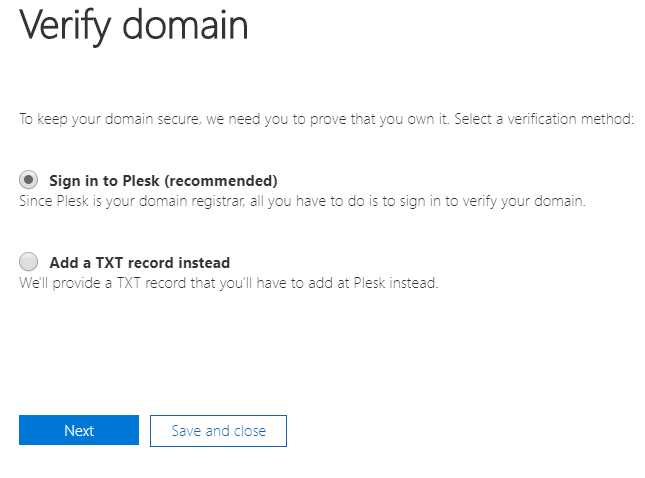
    image 79644

  5. Log in to Plesk and then click Connect.
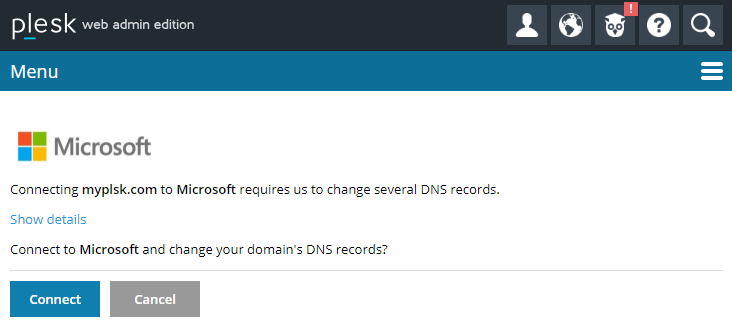
    image 79645

  6. Office 365 will change the DNS configuration in Plesk to add
    additional services. Keep the “Add the DNS records for me
    (recommended)” option, and then click Next.
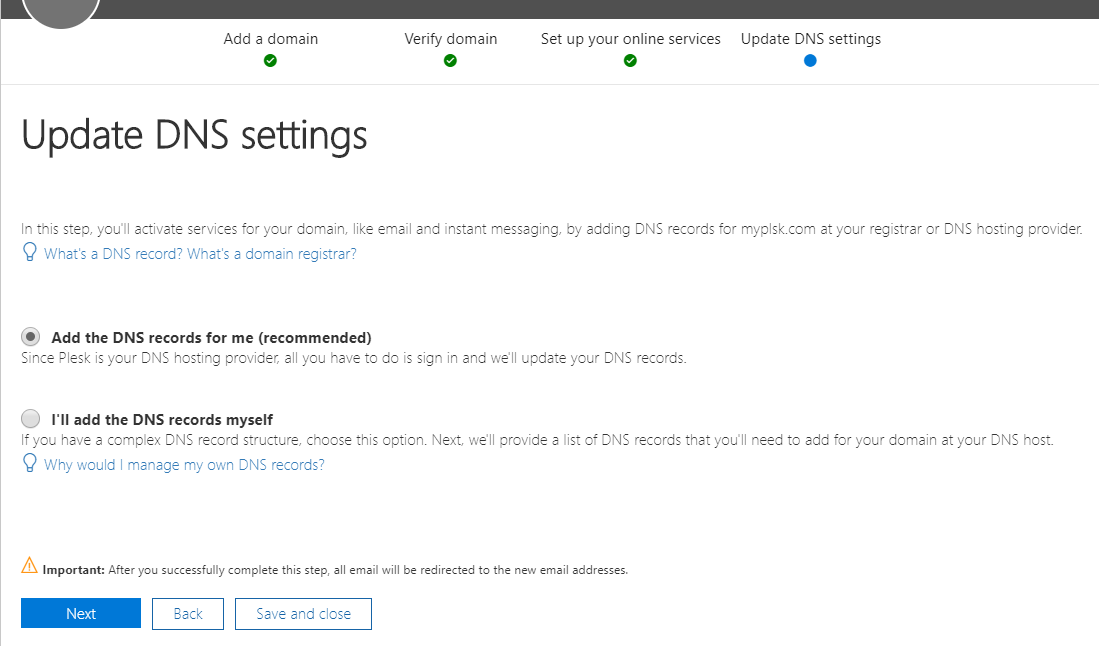
    image 79646

  7. If desired, click “Show details” to see how Office 365 will change
    DNS configuration in Plesk. Click Connect to proceed.

  8. Office 365 will show you which DNS records were added to Plesk. Click
    Next to proceed.
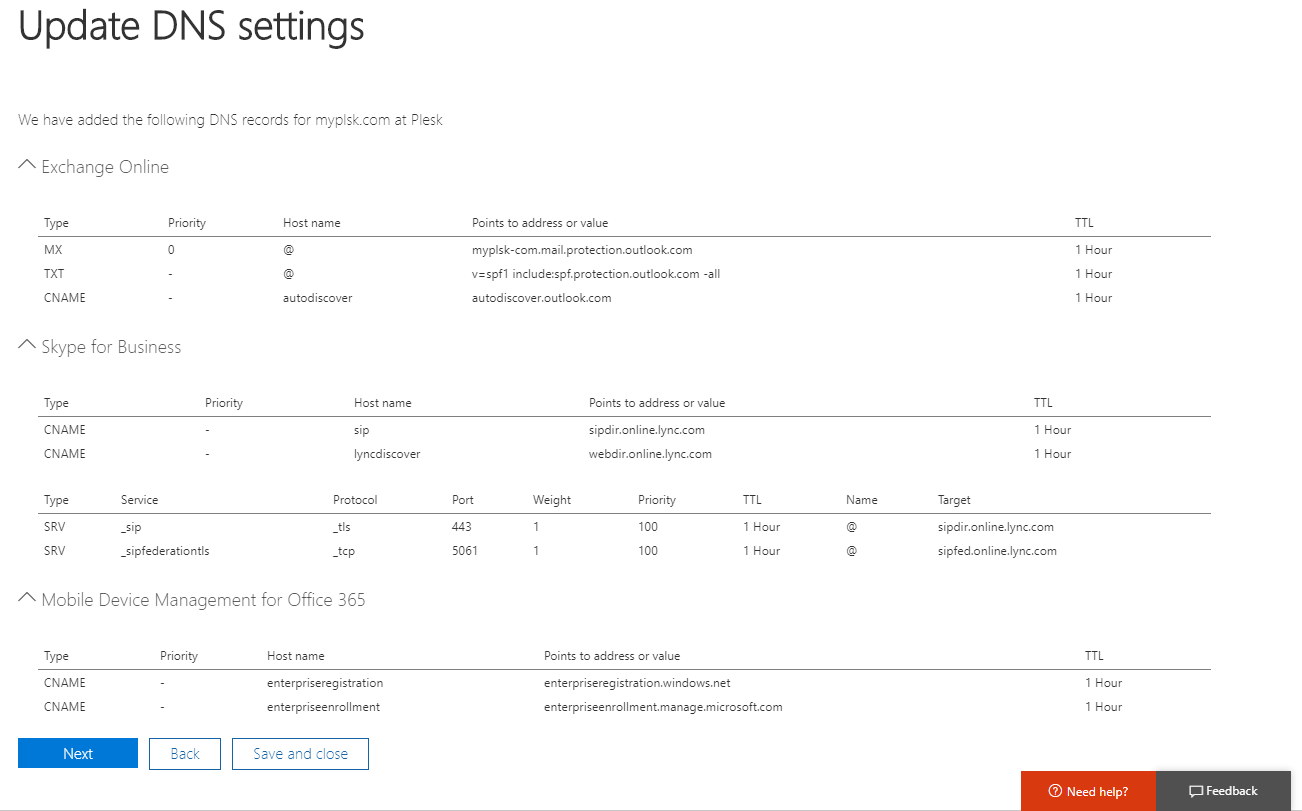
    image 79647

  9. Click Finish.

You have connected Office 365 services to your website.

Tweet
Share
Share
Email
0 Shares
Read the full article
Related Posts
Knowledge Base

Managing Web Hosting – Setting MIME Types

Read More »

Managing Web Hosting – Adding Domain Aliases

Read More »

Managing Web Hosting – Setting the Default Homepage

Read More »

Managing Web Hosting – Configuring PHP Settings

Read More »

Hosting Wiki

  • Server Redundancy
  • QMAIL
  • Sendmail
  • AMP
  • Bare Metal Server
  • Oracle VM Server
  • Server Virtualization Software
  • Windows Server
  • Domain
  • Hosting Control Panel
  • Plesk
  • Web Server
  • Static DNS
  • DNS Server
  • DNS Forwarding
  • Reverse DNS
  • Colocation Hosting
  • Reseller Hosting
  • Cloud Hosting
  • VPS Hosting
  • Dedicated Hosting
  • Shared Hosting
  • Free Hosting
  • Managed Hosting
  • Email Autoresponder
  • Mailing Lists
  • Email Alias
  • Email Virus Protection
  • Email Forwarding
  • Webmail
X-twitter Linkedin Youtube Reddit Github
  • Product
  • Login
  • Pricing
  • Editions
  • For Partners
  • Partner Program
  • Contributor Program
  • Affiliate Program
  • Plesk University
  • Company
  • Blog
  • Careers
  • Events
  • About Plesk
  • Our Brand
  • Resources
  • User and Admin guides
  • Help Center
  • Migrate to Plesk
  • Contact Us
  • Hosting Wiki
  • Forum
  • Legal
  • Legal
  • Privacy Policy
  • Imprint

© 2025 WebPros International GmbH

Part of the WebPros®  Family