
Two-thirds of small businesses haven’t even invested in their own WordPress business website. Depending on your type of business, site complexity, and in-house expertise, it can be costly and time-consuming to set up and manage. You may know how to create a WordPress website. However, the more time you spend on website admin and management, the less you have to code or create content. Or execute tasks that directly grow your business.
To help build, secure and manage WordPress sites, apps and instances, Plesk introduced the WP Toolkit. We have continual updates and a close partnership with WordPress. Making the Plesk WP Toolkit one of the most complete, secure, and versatile WordPress platforms available today. In this guide, we’ll explore the key benefits of using the WP Toolkit to create a WordPress website.
What is the WP Toolkit?
We created the Plesk WP Toolkit for developers, hosters and small business owners. We learned about their workflows, requirements, and their biggest time wasters. Thus, the main purpose of the Toolkit is to save you precious time. Whether you’re a beginner or a pro, the Toolkit simplifies a variety of development workflows, automates tasks, and manages instances. All from one dashboard.
As an extension to the Plesk platform, it allows you to:
- Deploy a new WordPress instance
- Apply common security measures to a WordPress instance
- Install plugins and themes on a WordPress instance
- Update a WordPress instance and enable automatic updates
- Create a staging/acceptance sandbox from a production WordPress website
- Sync code and/or database changes from a staging/acceptance sandbox to a production WordPress website
The Toolkit requires a Plesk Web Host or Web Pro Edition license to enable all its features. But the Web Admin addition license does enable features such as one-click deployment, plugin/theme management, and manual updates.
How to create a WordPress website using WP Toolkit
One of the most loved features is the ability to deploy a new website with a one-click installation in three ways:
- You can create a brand-new website by deploying a new instance;
- Import an existing WordPress website from another server; or
- deploy a WordPress website manually.
Deploying a new instance
If you have an existing WordPress website on another server, you can easily import it to your new site. You’ll need the free Site Import extension installed on the Plesk server and the FTP login details of your old site. This video below shows the simple five-step process for using the WP Toolkit to import a website from another server:
- Go to Website Importing found in the Plesk control panel. Important: You must have the free Plesk Migrator extension
- Enter your old website’s URL, FTP username and password. ClickOK.
- Select the WordPress instance and click Start Import.
- After the import is complete, go to the imported instance’s settings and reset the WordPress admin password. This is necessary to log into WordPress directly from the Plesk interface.
- Click Log Inand your site is now ready to use.
Deploying a WordPress website manually
You can also manually deploy a WordPress website from a ZIP archive or via Git. You can find out more information about manually installing and detecting a WordPress installation here. Go to section “Adding existing WordPress Installations to WP Toolkit”.
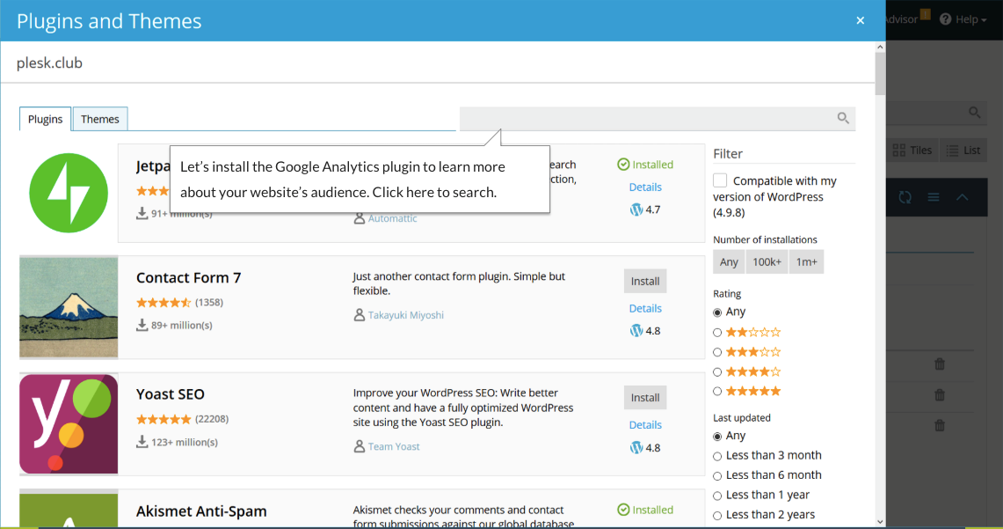
Installing Plugins with the WP Toolkit
Once you’ve created/installed your WordPress website, the next step is installing plugins which facilitate site or content management. Within the Toolkit, there’s a powerful plugin and theme engine that lets you find, filter, and install WordPress plugins. As you can see in the screenshot below, we’ve decided to install Google Analytics to learn more about the audience visiting our website.
If you want to use custom plugins or themes that aren’t available in the WordPress catalog, you can upload them. Then use them from the Plugins tab/Themes tab. If you want to update them, you can simply upload a new version. The old version will indicate a new version is available, and you can update all plugin instances at once.
Security and Updates
Many web pros spend hours monitoring and updating their websites to ensure they’re secure against vulnerabilities and threats. WP Toolkit automates this process, so you don’t have to worry about potentially losing your business data and credibility. All installations you deploy using WP Toolkit have critical security improvements applied already. You can also apply essential updates to your WordPress installations with one click so that they’re always secure.
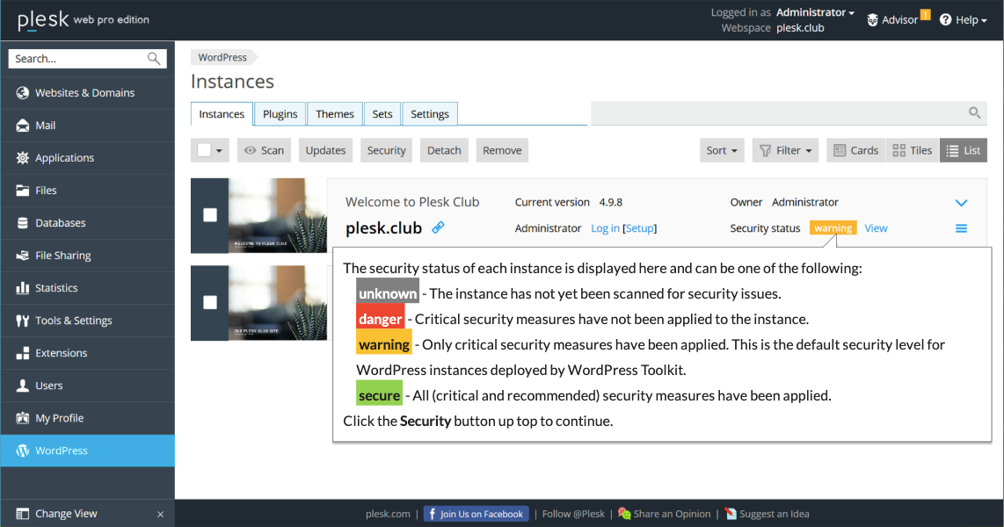
One of the ways the WP Toolkit helps you manage security is with the security status feature. Four labels indicate the following:
- Unknown: The instance has not yet been scanned or security issues
- Danger: Critical security measures have not yet been applied to the instance
- Warning: Only critical security measures have been applied. This is the default security level for WordPress instances deployed by WP Toolkit
- Secure: All (critical and recommended) security measures have been applied.
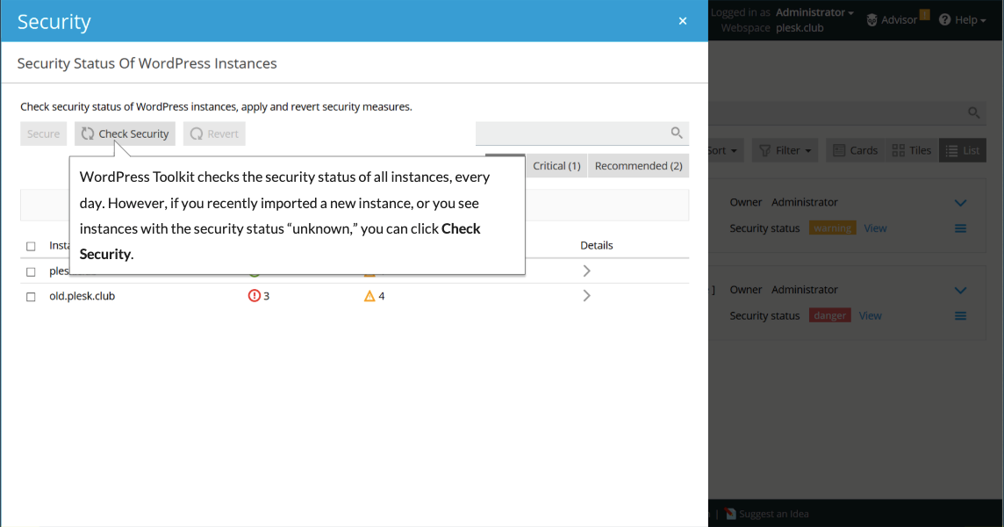
We then check the security status of all instances every day, so you don’t have to. If you recently imported a new instance, or you see instances with status “unknown”, you click Check Security to update. Timely updates are the most important aspect of security. This is why we pay so much attention to monitoring your WordPress websites and keeping them updated.
An exciting extension of the Toolkit is the Smart Update feature which uses AI to enhance your website security further. Smart Updates is available from Plesk 17.8 onwards and is now included in WP Toolkit Deluxe.
How Smart Updates Works
- Runs a trial update of a cloned WordPress website and then comparing the before and after results to calculate the change score. If the change score is within the selected threshold, the update is considered safe.
- For additional safety, WP Toolkit creates a pre-update restore point. If something goes wrong, you can always roll back to the working version of your website. WP Toolkit keeps only one restore point for each installation. This restore point will be replaced by a new one on the next update.
- Once you make sure that the website works perfectly after the update, you can remove the restore point by clicking delete.
Starting from WP Toolkit 3.4, you can update multiple WordPress instances simultaneously. With Smart Updates enabled, the update will only install if the number of changes detected is below the configured threshold.
Staging and Production
Every business needs to make changes and updates to their website. For example, updating the website’s theme, installing and testing a new plugin, or redesigning the home page. Usually, this means taking your production site offline and putting it into maintenance mode, resulting in lost business and a negative experience for new and existing customers.
But it also typically means a lot of time and work. To safely edit and update a production website, you need a staging environment. Basically, a full copy of your production website where you can experiment without the risk of breaking your public website. Creating a staging environment and syncing changes across your production site is complex. But WP Toolkit has single-click cloning so you can do it with zero hassle.
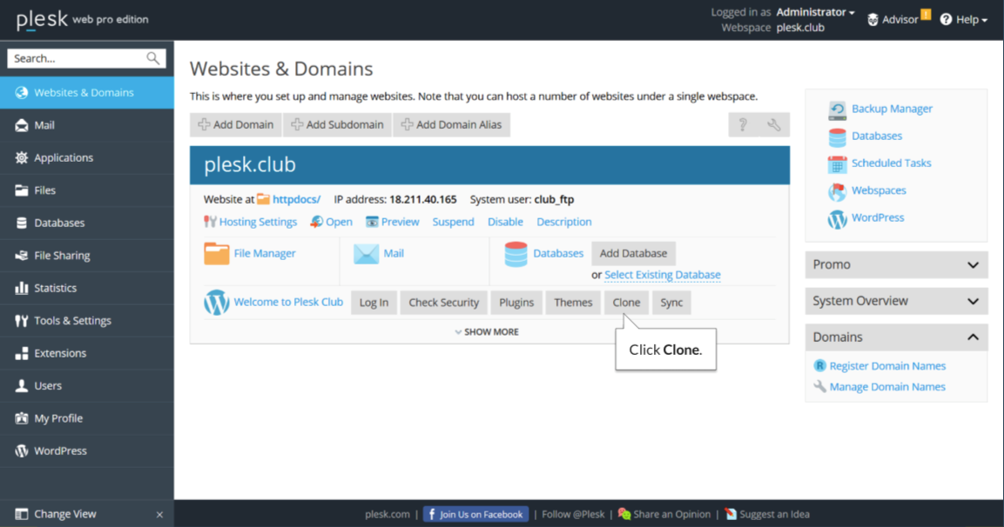
To make a copy of a WordPress instance using the Toolkit, simply click Clone in the Websites & Domains overview dashboard.
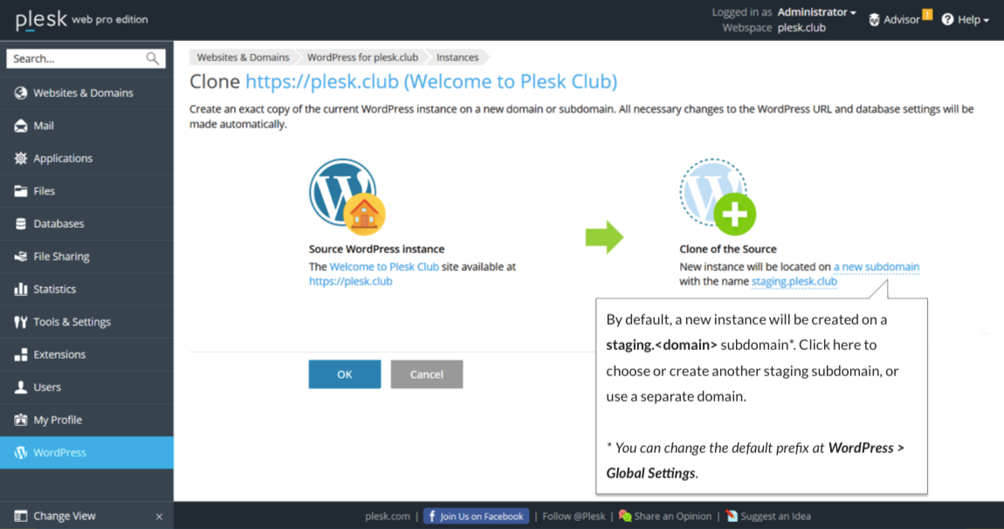
You will then see a loading screen showing that the files and database are copying, and the configuration files are updating.
Next, you’ll be able to edit the new staging instance’s properties. From WP Toolkit 3.4, search engine indexing is automatically disabled on all new cloned instances. You can change this on the WP Toolkit > Global Settings screen. Here you can also change the default prefix of the subdomain.
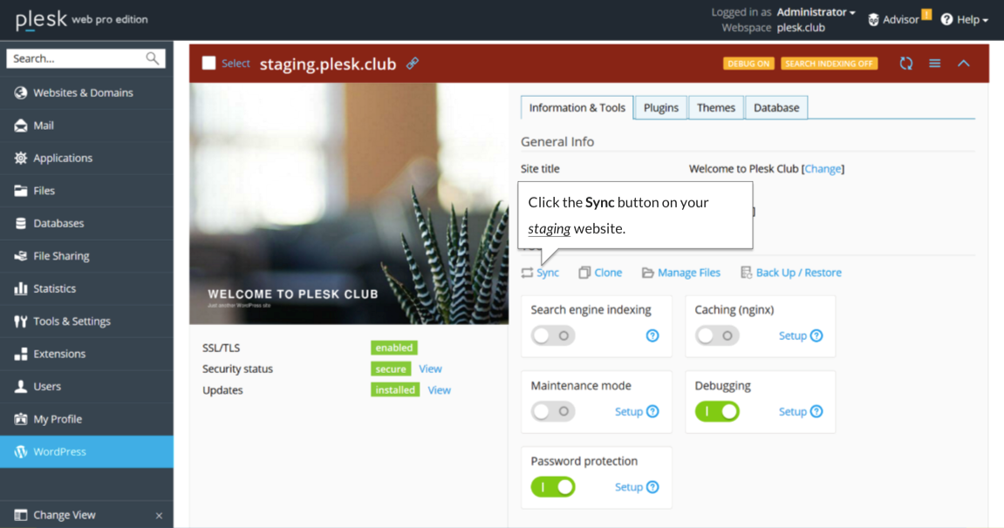
It’s also a good idea to password protect your staging environment to limit access to new and experimental content and settings. And if you’re testing a new plugin or piece of code, you might need to enable debugging. As well as using the cloning feature to create a staging environment to safely update your WordPress website, you can also use it to do the following:
- Publish a website you were developing to the public after reaching a development milestone
- Create multiple versions of a single website so a client can choose the best option
- Clone an existing website to use it as a template for a new project
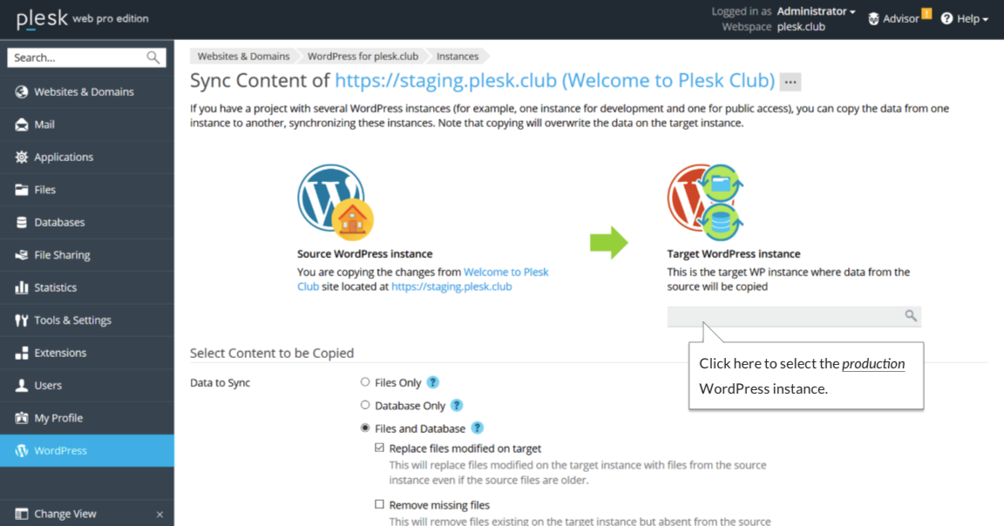
Once you’re satisfied with your changes to the staging environment, you need to apply them to your production site. Thankfully, you can use the WP Toolkit to do this with a single click.
Apply changes on your staging site to your production site with these simple steps:
Click Sync on your staging website.
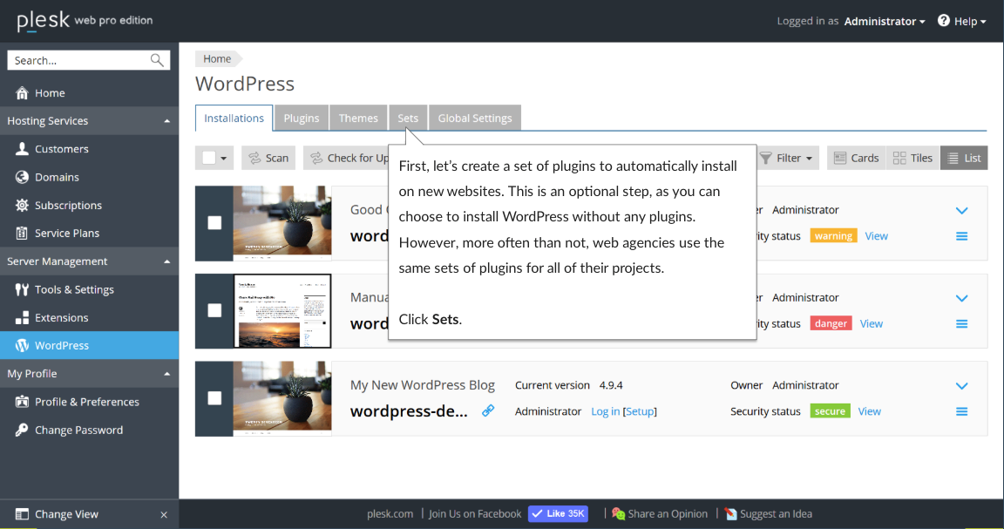
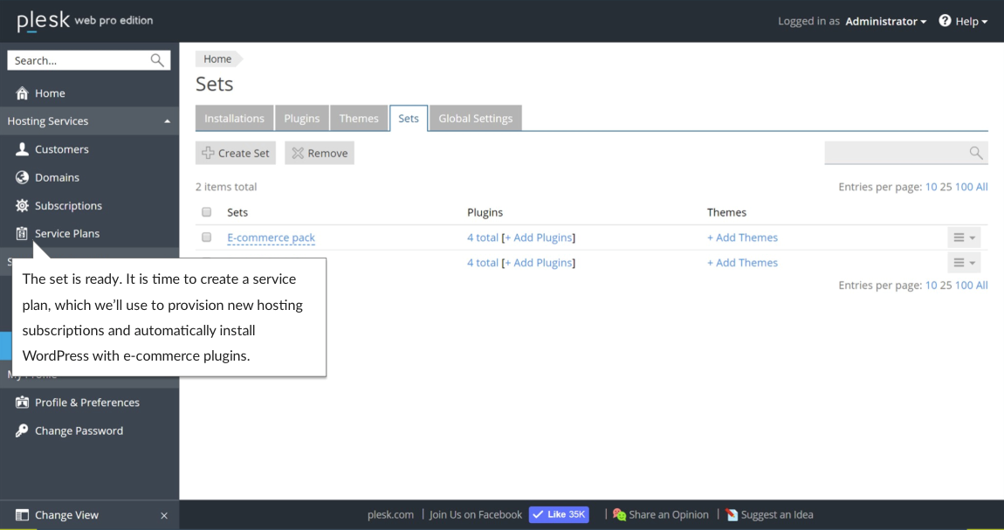
Click Sets on the WordPress Home dashboard. Click Create Set. The set is now ready. You can click to add some plugins to the set. Sets can include both plugins and themes.
Service Plans
It’s now time to create a service plan, which you can use to provision new hosting subscriptions and automatically install WordPress with plugins.
Click Service Plans in the left-hand panel.
Click Add a Plan.
Now all that remains is to create a new subscription based on your new service plan. Once you create the subscription, two background tasks will start working immediately. The first task will install the latest version of WordPress on the site, and the second will install all plugins in the set.
Note: WordPress and plugin sets are provisioned only on new subscriptions. Switching an existing subscription to a new service plan will not install WordPress or your selected plugins on the website
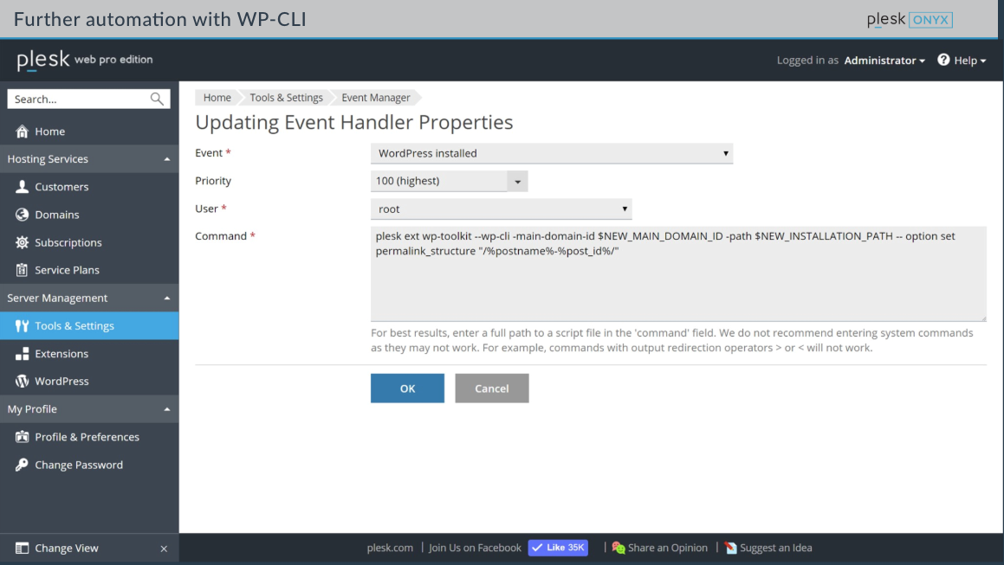
You can further automate configuration and post-deployment actions of a WordPress instance by using Plesk’s event handlers and the WP CLI. For example, you can define the following event handler to set a custom permalink structure for all new WordPress installations.
And there you have it! You have learned how to use the WP Toolkit to create a safe, secure, and efficient WordPress website in just a few quick and easy steps.
Do you find the WP Toolkit helps save you time and resources in creating and managing your WordPress websites? Let us know in the comments below.

6 Comments
Thank you for this article. i m a newbie. this article has helped me lot
Great article. Thanks for the detailed information. Your blog is by far the best source I’ve found. Thanks!
for me it is very difficult to understand it
I only create free website on WordPress so I haven’t really tried the toolkit but I am interested now since I have seen an instruction on how to do so
Hi, I am planning to start a managed WordPress hosting with domain selection and WordPress installation from the front-end. Can you please explain if it is possible with Plesk Toolkit. Thank you.
Hi Shams, the Toolkit is available on both Plesk and cPanel.