Before you start working on website content, we suggest that you select
the appropriate website language in Settings tab > Languages >
Website language menu.
The website language is a site-wide setting that defines the language in
which you will be adding content to your website. It affects the
following:
- The language in which certain website elements (in particular those
provided by third-party services), such as Google Search and
navigation buttons in image galleries, will be shown. Note that not
all third-party services and modules provided by the editor support
all available languages. - The direction in which you will type text in the editor (from left to
right or from right to left). If you select a right-to-left language,
your website content and design will be RTL-enabled.
Note: Changing a website language does not reload the currently selected
website topic in a different language. The topic language will remain
unchanged, however, the text orientation will change.
To add text, lists, tables, or images to a page:
- Go to the Modules tab, select Text & Images, and drag the
module to the page. - Type the text on the screen and use the icons on the module’s toolbar
to format the text, add tables, hyperlinks, and images.
The toolbar and panels of the Text & Images module provide access to
the following tools and functions.
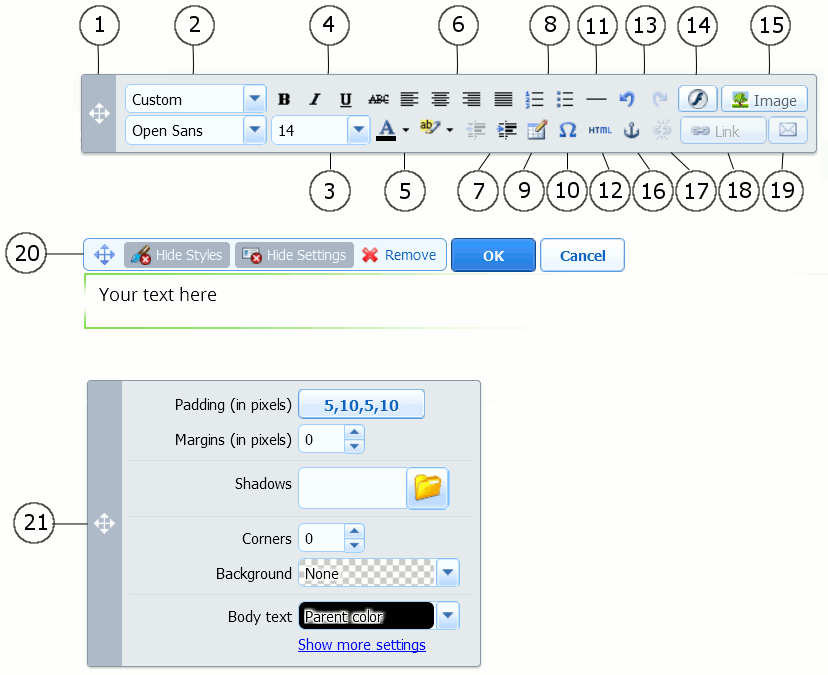
Move the toolbar.
Select the paragraph style and font face. Note that the Terminal font
is not supported by Google Chrome.Select the font size.
Select the font style: bold, italics, underlined, and strikethrough.
Select the text and background colors.
Select text alignment: left, center, right, or justified (aligned to
both the left and right margins with added extra spaces between
words).Increase and decrease the indent level of the paragraph.
Start a numbered or bulleted list.
Insert a table and specify the number of rows and columns.
After you insert a table, a number of additional icons become
accessible from the toolbar. Use them to change the properties of the
table…