This article describes how to setup a development environment for creation of Plesk extensions.
Creation of a new Plesk extension can be started from generating a new stub. To do this log in to a machine with Plesk installation and type the following command:
# plesk bin extension --create my-extension
Here is an example of output:
The extension was successfully created.
The path to extension's entry points: /usr/local/psa/admin/htdocs/modules/my-extension/
The path to PHP classes: /usr/local/psa/admin/plib/modules/my-extension/
The path to installation scripts: /usr/local/psa/admin/plib/modules/my-extension/scripts/
The path to the directory with run-time data: /usr/local/psa/var/modules/my-extension/
This command will create a new extension named “my-extension”. It will also provide information about where extension parts are located on the file system.
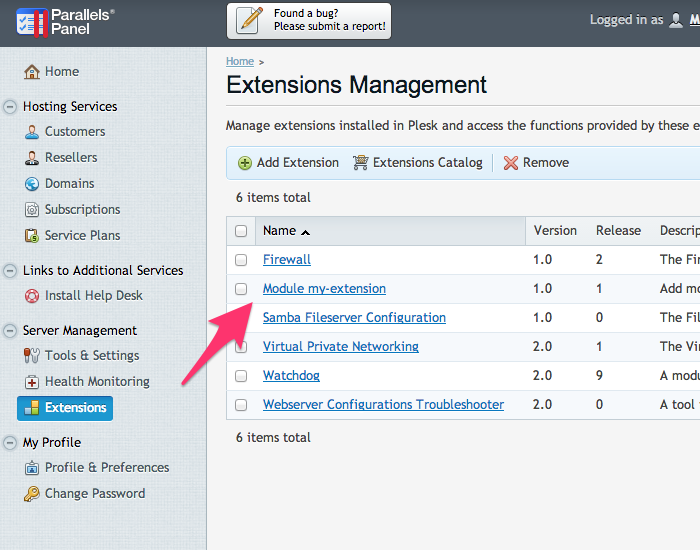
The next step is to register the extension in Plesk:# plesk bin extension --register my-extension
After that, the extension should appear in the list of extensions in Plesk UI:
It is possible to continue the development on the machine where Plesk is installed. But more common way is to develop on you own machine and sync the source code with the Plesk installation on a regular manner.
To start the development on your own machine (instead of the machine with Plesk installation) you need to obtain the source code of the extension. This can be done by creating a package and transferring it to your development machine. To create a package, do the following on the machine with the Plesk installation:
# plesk bin extension --pack my-extension
Copy the created ZIP archive to your machine. For example, by using this command:
# scp my-extension-1.0-1.zip [email protected]:
Create a directory for the extension on your machine. For example, “my-extension”. Extract the contents of the my-extension-1.0-1.zip archive there. The directory structure should look as follows:
htdocs/
  index.php
plib/
  controllers/
  scripts/
  views/
meta.xml
Once you have a directory with extension contents you can start editing the source code using your favorite editor. PhpStorm is highly recommended for this purpose.
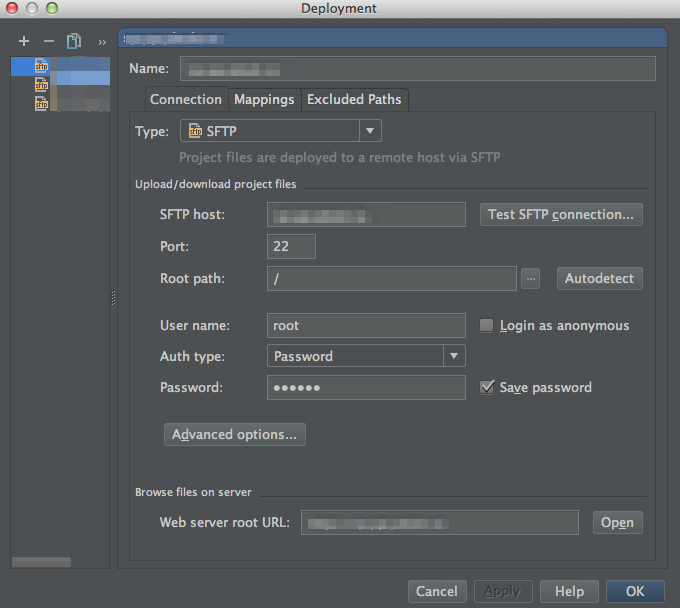
The next step is to sync the source code with the Plesk installation after code changes. PhpStorm allows to set up files upload to remote server (some other IDEs also provide this option). To set up files upload, go to Tools > Deployment > Configuration, and add a new server:
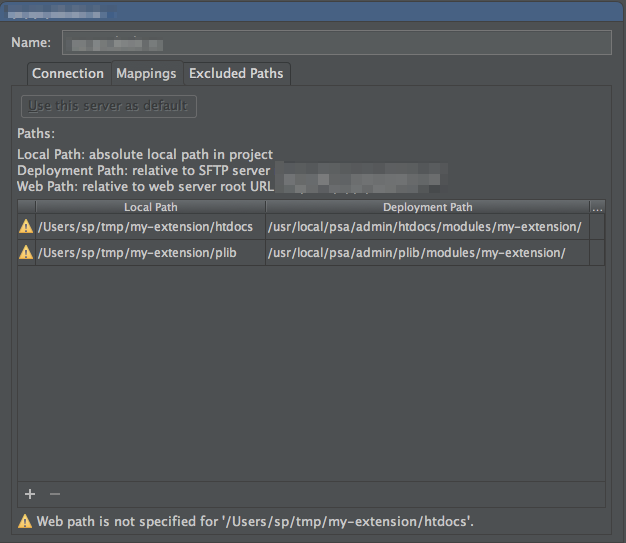
Also, set up the mapping of directories because the directories layout on the development machine and on the Plesk installation is different. Here is an example:
After that you can upload files to a remote server by clicking Tools > Deployment > Upload to your-server.dom PhpStorm also provides an option for automatic files upload. Select Tools > Deployment > Automatic Upload and PhpStorm will re-upload files every time a file is created or modified in the IDE.
If you prefer to edit files in VI or another editor that does not provide the option for uploading files to remote servers, you can use the following script published on GitHub:
https://github.com/sibprogrammer/plesk-sdk-tools/blob/master/msync.sh
To use this script you need to have rsync installed and put your SSH key on the destination machine to avoid re-typing of the password on every synchronization.

One comment
Hi Alexei,
Great article, thanks for sharing. I’ve used a similar script to write my first extension with Dreamweaver – but PHPStorm looks like a great solution for folder mapping. I’ll check it out.
I’ve also described how to create an extension, including a quick example of a global CSS tweak – perhaps it’s helpful:
http://wpguru.co.uk/2014/02/how-to-create-an-extension-in-plesk/