

Our web blog is now meeting the latest security standards and making it HTTP2-ready is easier than you think. Here’s how we switched our web blog ( https://devblog.plesk.com ) running on Plesk + NGINX to HTTPS and made it HTTP/2-ready with a free, SSL certificate from Let’s Encrypt. Before we get into the details a few things to start with.
Protocol enhancements like SPDY and HTTP/2 have narrowed the performance gap between encrypted and un-encrypted web traffic, with encrypted HTTP/2 outperforming un-encrypted HTTP/1.1 in some cases. Even more importantly, encryption is now kind of mandatory as Google announced that HTTPS is used as a ranking signal in search results, with HTTPS-enabled sites ranking above their plaintext counterparts. ‘Yes, HTTP/2 is awesome,’ I hear you saying, ‘but it requires HTTPS which, in turn, requires an SSL certificate – and those things cost money, you know?’ Well, here comes the sales pitch: Plesk, together with Let’s Encrypt, makes HTTPS setup a breeze and brings you a faster Web with HTTP/2.
Let’s see how we did it.
HTTPS & Let’s Encrypt
First, issued a free trusted certificate from Let’s Encrypt with automatic renewal and set it up for devblog.plesk.com, hosted on Plesk 12.5.
There are many manuals available online talking about how to install an SSL certificate on Linux so you might have already seen rows upon rows of command line calls, lists of changes to configuration files, and even instructions for building additional utilities. Well, we decided to make our life easier and just used the Plesk “Let’s encrypt” extension that enables Plesk users to issue and install certificates with auto-renewal functionality in the Plesk UI with just a few clicks.


You can find the details in one of our previous blog posts here: https://www.plesk.com/2015/12/lets-encrypt-plesk/. After a few clicks we were done and had a free, trusted SSL certificate installed on devblog.plesk.com. Let’s enable HTTP/2 next.
HTTP/2
HTTP/2 is the second major version of the HTTP network protocol used by the world wide web.
Ratified in May 2015, HTTP/2 was created to address some significant performance problems with HTTP 1.1 in the modern web era.
- HTTP/2 is supported in NGINX web server starting from version 1.9.5.
- Currently, HTTP/2 is supported by all major web browsers.
- Your sites do not require any changes to get the HTTP/2 advantages.
Now, HTTP/2 is available out-of-the-box for all Plesk 12.5 customers!
Sounds good, doesn’t it? Let’s move on.
First, you need to make sure that the latest Plesk update, Plesk 12.5.30 Update#28, is installed. We don’t, because we have auto-updates enabled on the server and recommend you enable them too. Then, we logged in to the server via SSH as root, and ran the following command line utility:
#/usr/local/psa/bin/http2_pref enableThat’s all it took to empower our HTTPS sites with HTTP/2! If you’re not sure about your websites go to https://tools.keycdn.com/http2-test to check for HTTP/2 compliance.


Detailed User Instructions for enabling HTTP/2 in Plesk can be found here: https://kb.plesk.com/en/128733
If you’d like to get a second opinion, you are welcome to use the “HTTP/2 and SPDY indicator” extension for Google Chrome, found here.
WordPress
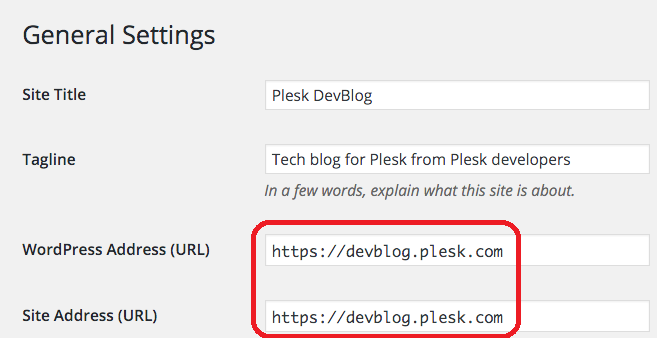
We have now secured the connection between the server and the website. Next step is to configure our WordPress site to only use HTTPS. This required a re-configuration of WordPress settings to replace all http:// links inside the WordPress database with https://. If you fail to do so you will continue to receive “Mixed content warnings” for previously uploaded content:
- Go to the WordPress administrative interface and change both “WordPress Address” and “Site Address” to use https://
- Set-up a redirect for all http:// requests to https:// for the respective website.

Next step was to change the links inside the WordPress database. There are a lot of possible ways to do it, starting from direct SQL queries to wp-cli. We decided to do it via the WordPress interface using the “Better Search & replace” plugin, which can either be installed from the Plesk interface or from the WordPress Administrative interface.
This plugin helped us to find all matches for “https://devblog.plesk.com” in the WordPress database and replace it with “https://devblog.plesk.com“. This plug-in allows you to only find but also find and replace if you with to do so.
Last but not least we had to redirect all http:// requests to the https:// counterpart of our blog using the Plesk interface. We went to Websites & Domains , selected devblog.plesk.com, and then “Apache and nginx Settings”
to set-up the redirect in the “Additional nginx directives” section, like this:
if ($scheme = http) {
return 301 https://$server_name$request_uri;
}


That’s it! Now, all browser requests to https://devblog.plesk.com are redirected with the 301 code to https://devblog.plesk.com, and that’s just what we wanted.
On a separate note…. .
Load speed test with https://www.webpagetest.org/ shows that the transition from non-SSL HTTP to HTTPS + HTTP/2 has little impact to the site load speed.
In return, we now have a secure connection with a nice green trusted SSL certificate, including better indexing from Google for free 🙂
By the way, we did not stop with the DevBlog – actually, the new Plesk website (https://www.plesk.com – check it out!) was built on Plesk 12.5 [+ WP Toolkit] + WordPress.
Have a nice day 🙂