

In the latest Magic Quadrant report for Cloud Infrastructure as a Service, Worldwide, for the 6th straight year, Gartner placed Amazon Web Services in the “Leaders” quadrant and named AWS as having both the furthest completeness of vision and the highest ability to execute. Today, AWS provides a highly reliable, scalable, low-cost infrastructure platform in the cloud that powers hundreds of thousands of businesses in 190 countries around the world.
What is AWS?
Amazon web services is the cloud computing platform by Amazon.com. Building and running your business starts with computing, whether you are building mobile apps, or running massive clusters to sequence the human genome. AWS has over 70 infrastructure services, such as computing power, storage options, networking and databases, delivered as a utility: on-demand, available in seconds, with pay-as-you-go pricing.
Amazon Elastic Compute Cloud (EC2)
Amazon Elastic Compute Cloud (EC2) forms a central part of Amazon Web Services, by allowing users to rent virtual computers on which to run their own computer applications. EC2 encourages scalable deployment of applications by providing a web service through which a user can boot an Amazon Machine Image (AMI) to configure a virtual machine, which Amazon calls an “instance”, containing any software desired.
A user can create, launch, and terminate server-instances as needed, paying by the hour for active servers – hence the term “elastic”. EC2 provides users with control over the geographical location of instances that allows for latency optimization and high levels of redundancy.

AWS Global Infrastructure
AWS placed its data centers across 42 availability zones within 16 regions around the world: US West (Oregon, Northern California), AWS GovCloud, US East (Northern Virginia, Ohio), Canada (Central), South America (Sao Paulo), Europe (Ireland, Frankfurt, London), Asia Pacific (Singapore, Sydney, Tokyo, Seoul, Mumbai) and China (Beijing). Each availability zone has at least one data center that has redundant power for stability, networking and connectivity.
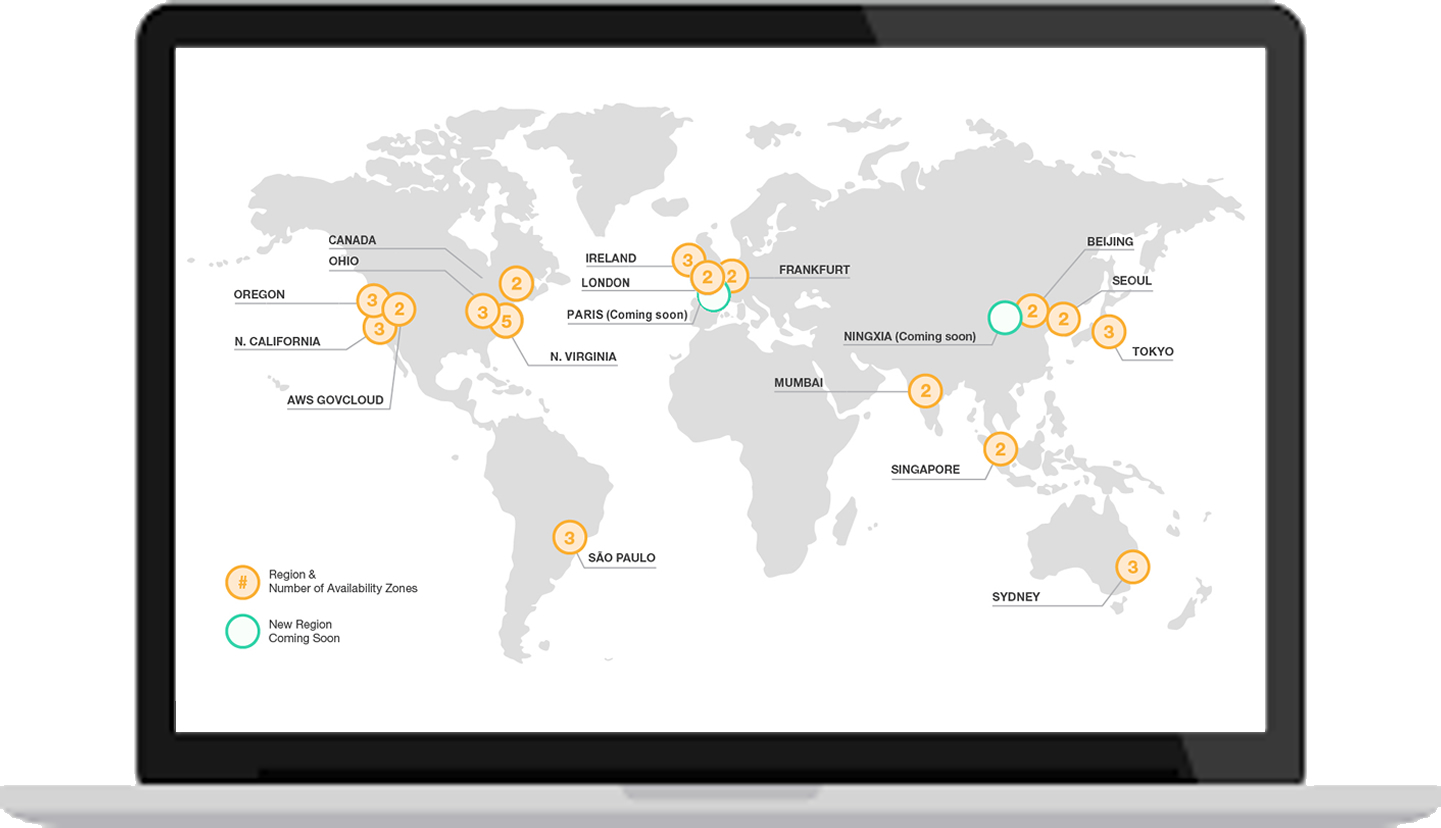

Throughout the next year, the AWS Global Infrastructure will expand with at least five new Availability Zones in new geographic Regions: Ningxia in China and Paris in France.
Run any application
If you need to run any application, for example a WordPress website or control and manage server or cluster level functions such as scaling and deployment, well then AWS EC2 is the best! It is designed to make web-scale cloud computing easier for developers.
- You provision, scale, and manage server capacity. EC2 offers a wide selection of instance configurations optimized for every use case
- You control the server, OS, and deployment software
- You have flexible payment options to meet your business needs, including enabling BYOL
Benefits
-
- Inexpensive
Amazon EC2 passes on to you the financial benefits of Amazon’s scale. You pay a very low rate for the compute capacity you actually consume. See Amazon EC2 Instance Purchasing Options for a more detailed description.
- Elastic Web-Scale Computing
Amazon EC2 enables you to increase or decrease capacity within minutes, not hours or days. You can commission one, hundreds or even thousands of server instances simultaneously. Of course, because this is all controlled with web service APIs, your application can automatically scale itself up and down depending on its needs.
- Designed for use with other Amazon Web Services
Amazon EC2 works in conjunction with Amazon Simple Storage Service (Amazon S3), Amazon Domain Name System (Amazon Route 53), Amazon Relational Database Service (Amazon RDS), Amazon SimpleDB and Amazon Simple Queue Service (Amazon SQS) to provide a complete solution for computing, query processing and storage across a wide range of applications.
Tip: Should you decide to make the move to the cloud with the Amazon Route 53 service, we recommend that you use the Plesk Onyx extension for automated provisioning of DNS zones to Amazon Web Services.
- Reliable
Amazon EC2 offers a highly reliable environment where replacement instances can be rapidly and predictably commissioned. The service runs within Amazon’s proven network infrastructure and data centers. The Amazon EC2 Service Level Agreement commitment is 99.95% availability for each Amazon EC2 Region.
- Secure
Amazon EC2 works in conjunction with Amazon VPC to provide security and robust networking functionality for your computing resources.
Simplify Server Administration
- Managing Infrastructure
For all server needs – small businesses and IT Pros that want to host a few websites, web developers and designers that need to host dozens of websites, shared web hosters that can grow to serve millions of websites – Plesk Onyx on AWS is the ideal solution for simplifying server administration, while scaling to meet your specific needs.
- Easy to Start
Quickly get started with Amazon EC2 by visiting AWS Marketplace to choose preconfigured software on Amazon Machine Images (AMIs). You can quickly deploy this software to EC2 via 1-Click launch or with the EC2 console.

What is Plesk Onyx?
Plesk Onyx is the new benchmark in control panels, and is the only tool you ever need to build, secure and run websites and applications in the Cloud!
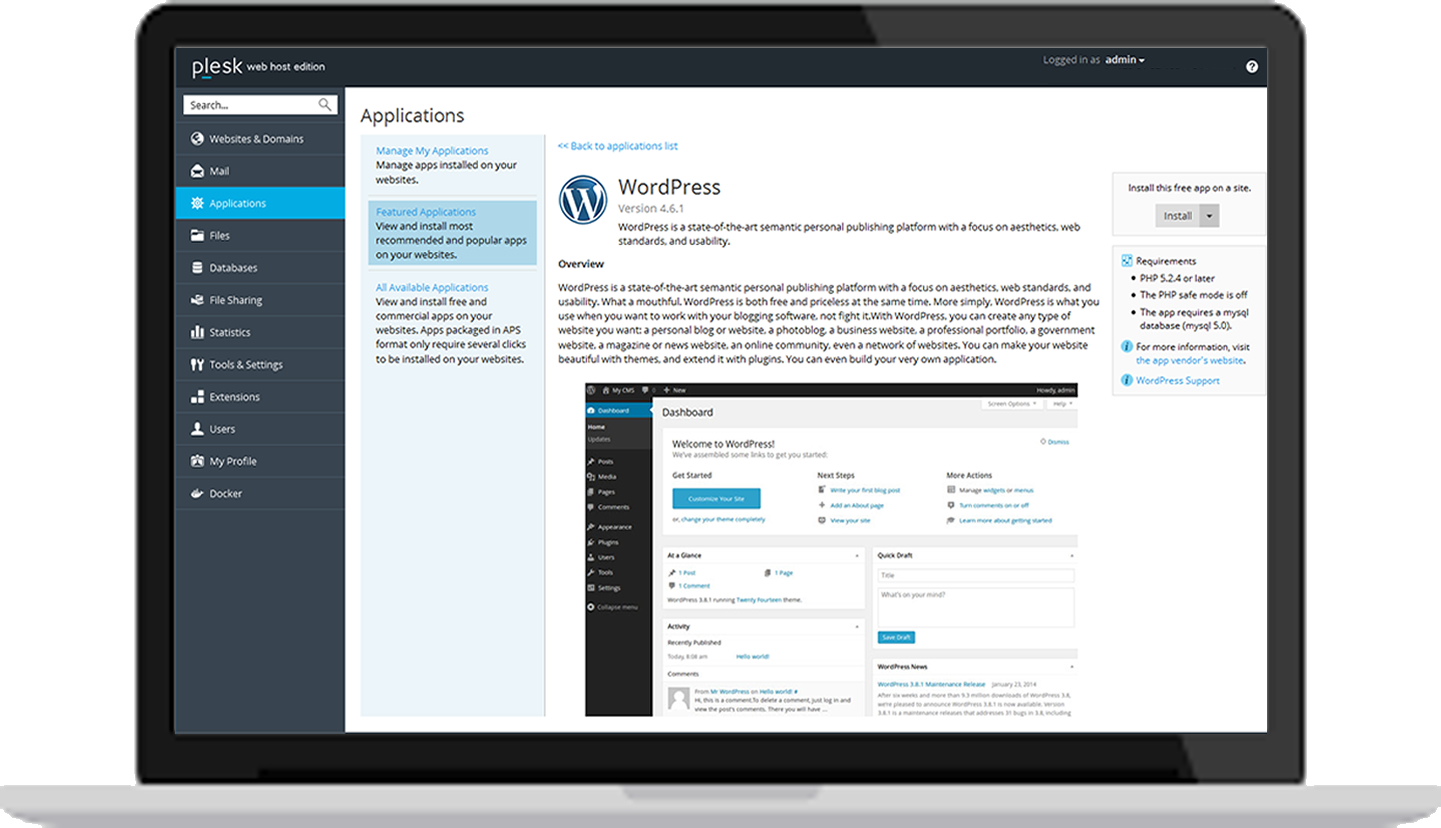
Plesk Onyx allows server administrators to set up new websites, manage accounts and e-mail, and oversee DNS entries and other relevant networking data and specs through an intuitive web-based interface. It is an intuitive control panel that any customer can easily use. The latest version of Plesk Onyx supports multiple Windows and Linux distributions, for example Debian, Ubuntu, CentOS, and many more – meaning you have even less to worry about if you have a customized network setup or if you are unsure about compatibility.
Gain time, gain freedom.
Our biggest release to date simplifies the lives of Web Professionals by fully integrating Docker and Git. Server related tasks and components are automated to run and scale web projects as well as providing one-click web server security. The ultimate answer for Web professionals who work with SMB’s (small to medium-sized businesses), we like to think of Plesk Onyx as a tool which empowers end users to easily deploy their web projects and get their MVP’s to market sooner.
What are the benefits/features?
-
Build: Plesk’s easy-to-use intuitive interface provides an environment for web professionals to code directly in. This allows developers and designers to focus on their business and develop web apps and sites that scale in the cloud.
-
Secure: It is not uncommon to have well-functioning websites that do not take security concerns into consideration. Such an approach can have huge negative consequences as your services continue to run and be exposed. An estimated 90% of web developers realize specific security concerns or loopholes in their application only after it is too late. Plesk will handle all security protocols and take necessary measures for you, automatically.
-
Run: Manage your WebOps: In the past, a team of tech specialists was needed to ensure that everything worked together throughout the running and deployment of any given web application. This meant that you had to have someone dedicated to ensuring that everything from the deployment, running, maintenance and security to the patching and repairing of your app or system, runs smoothly and successfully. However, with the progress of time, these tasks have become more and more automated, to the point where you do not need the same expensive technical resources you needed a few years ago.
Plesk Onyx also includes a tightly integrated set of mass-management and security tools that can be used to protect and automate WordPress. All Plesk-powered systems come with built-in server-to-site security, promising more reliable infrastructure and reduced support costs.
Now that you’re familiar with AWS EC2 and Plesk you’re ready to take the next steps. There’s no better way of finding out about the powerful capabilities of AWS than by trying out the platform.
Getting started with Plesk Onyx and AWS EC2
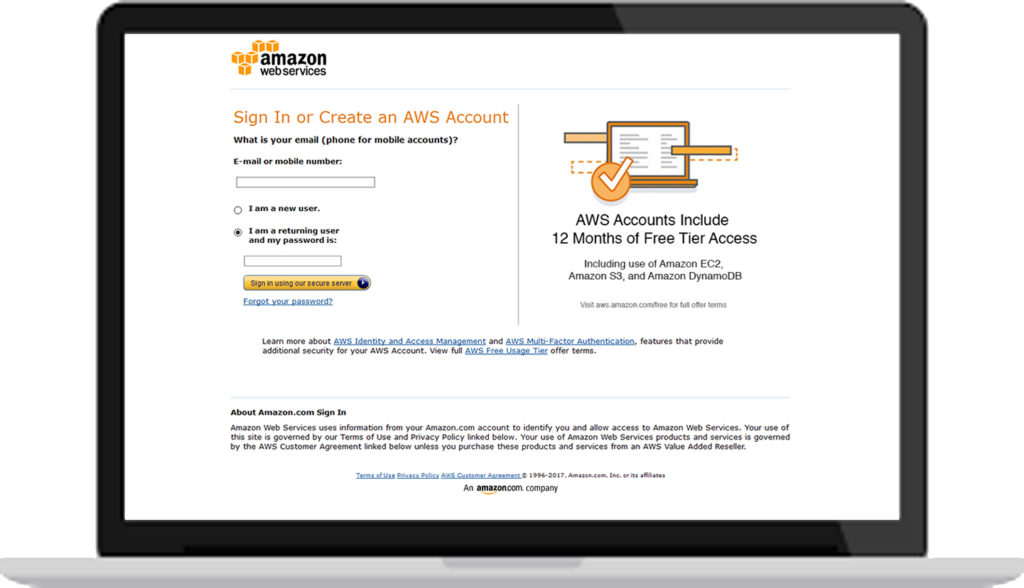
1. Creating an AWS Account
To access any web service AWS offers, you must first create an AWS account. An AWS account is simply an Amazon.com account that is enabled to use AWS products. You can use an existing Amazon.com account login and password when creating the AWS account.
From your AWS account you can view your AWS account activity, view usage reports, and manage your AWS Security Credentials.
To set up a new account
1. Open https://aws.amazon.com/, and then choose Create a Free Account.
2. Follow the online instructions.
3. Part of the sign-up procedure involves receiving a phone call and entering a PIN using the phone keypad.
Note: You will not be charged unless your usage exceeds the free tier limits, which is great to explore the services and even host a real app without being charged.
2. Go to the AWS Marketplace
AWS Marketplace is a new way to find and buy software that runs in the AWS Cloud. In order to simplify installing on Amazon, Plesk provides a variety of AMIs (Amazon Machine Images) with the most popular configurations.
Thus, no actual installation is required. In Amazon terminology, the user needs to launch the instance from the appropriate AMI. All available AMIs can be found at AWS Marketplace.
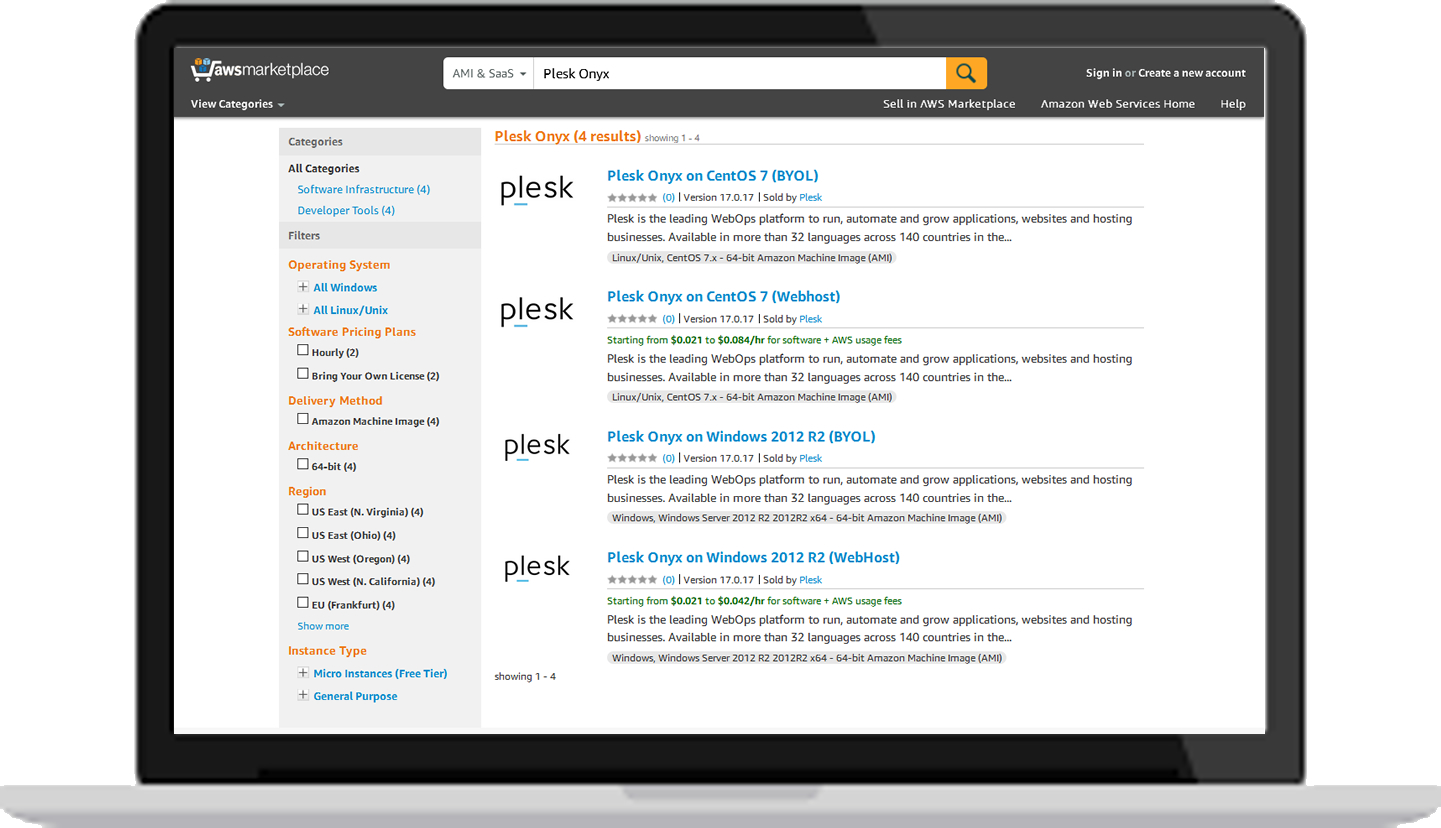
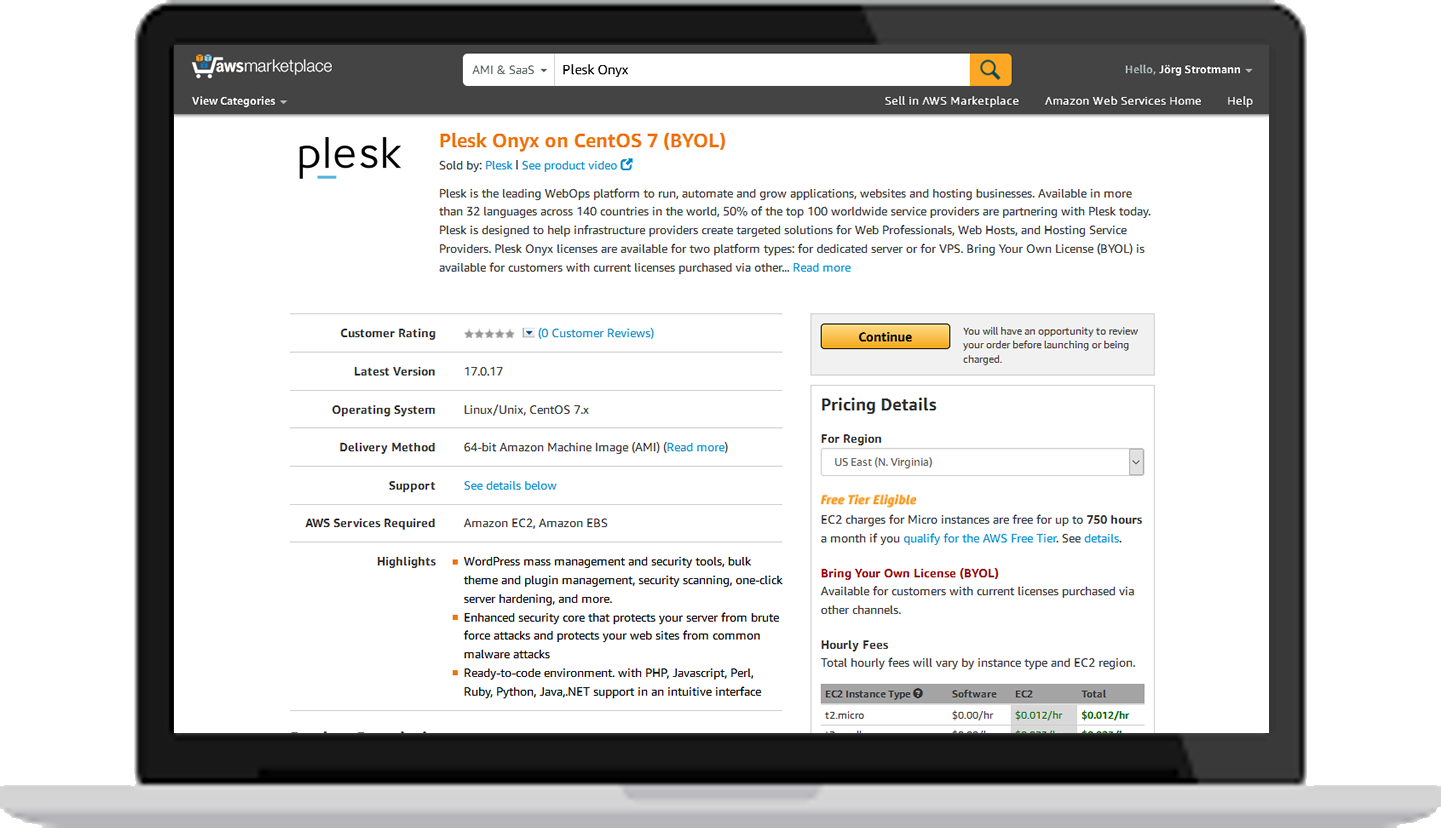
Note: In this How-to we use the ‘Bring Your Own License’ (BYOL) instance of Plesk Onyx CentOS 7 which allows you to use your own Plesk license. If you don’t have one yet, you can get a free trial license here.
Bring Your Own License
1. Click on Plesk Onyx ‘Bring Your Own License’ (CentOS 7), read the product description to make sure that it suits your needs.
2. Expand Region, and select the region you want from the list. The price is different for different regions.
3. Click the Continue button.
4. On the next site choose 1-Click Launch which uses predefined settings for Plesk Onyx.
5. Choose the configuration on the EC2 instance type. You will see the pricing information change under Pricing Details to match your selection. You can also review the Monthly Estimate in the right pane.
6. Create new Security Group based on seller settings. The Security Group created by AWS Marketplace based on recommended settings for Plesk ‘Bring Your Own License’ CentOS 7 version 17.0.17.
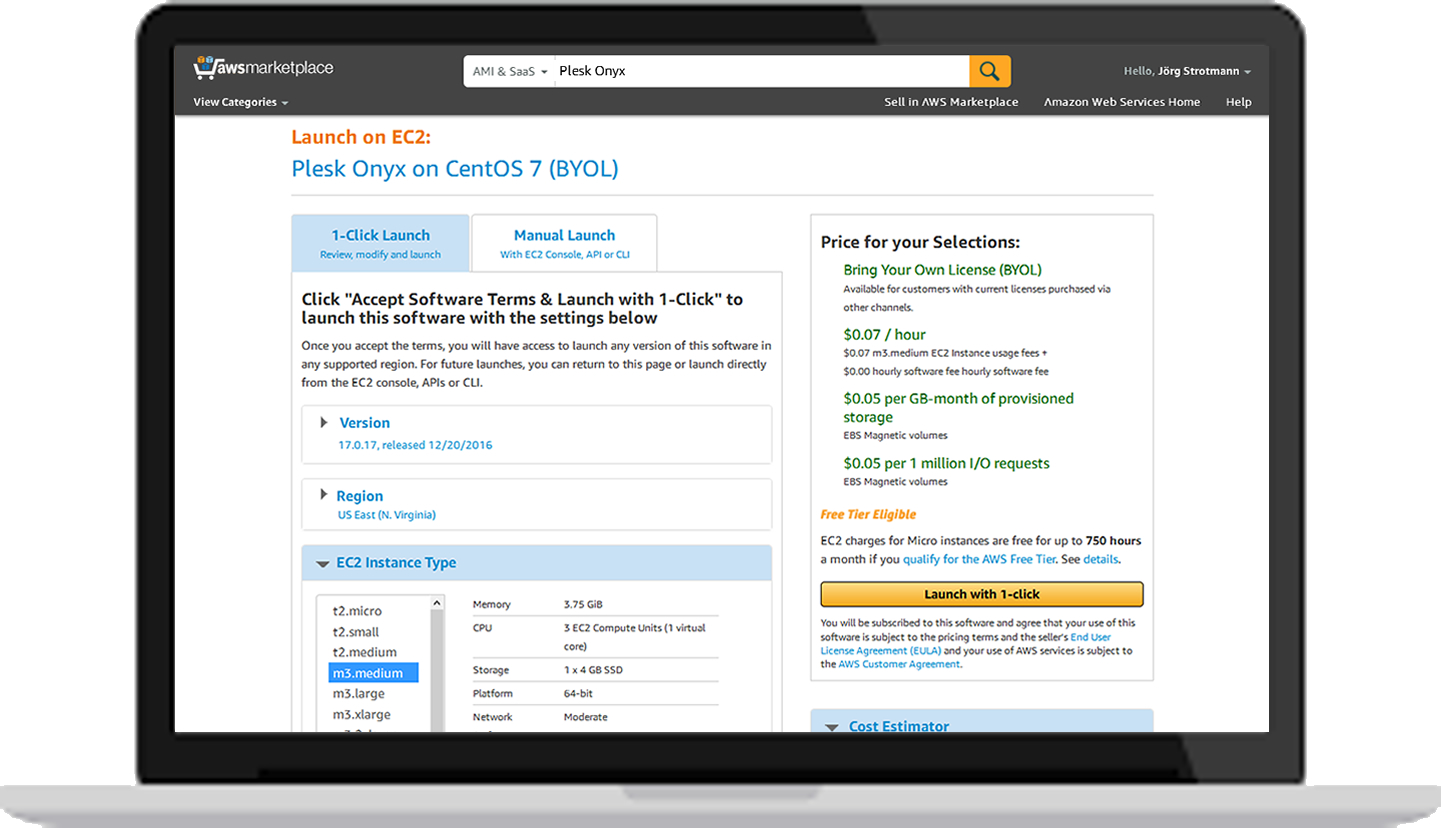
7. Select the Key Pair to be used for connection to the instance (an existing Key Pair is required for connection to the Plesk instance). A Key Pair can be generated in the AWS Management Console.
8. Read the User End License Agreement (EULA) and AWS Customer Agreement and click Launch with 1-click button.
9. An instance of this software is now deploying on EC2. Software and AWS hourly usage fees apply when the instance is running and will appear on your monthly bill.
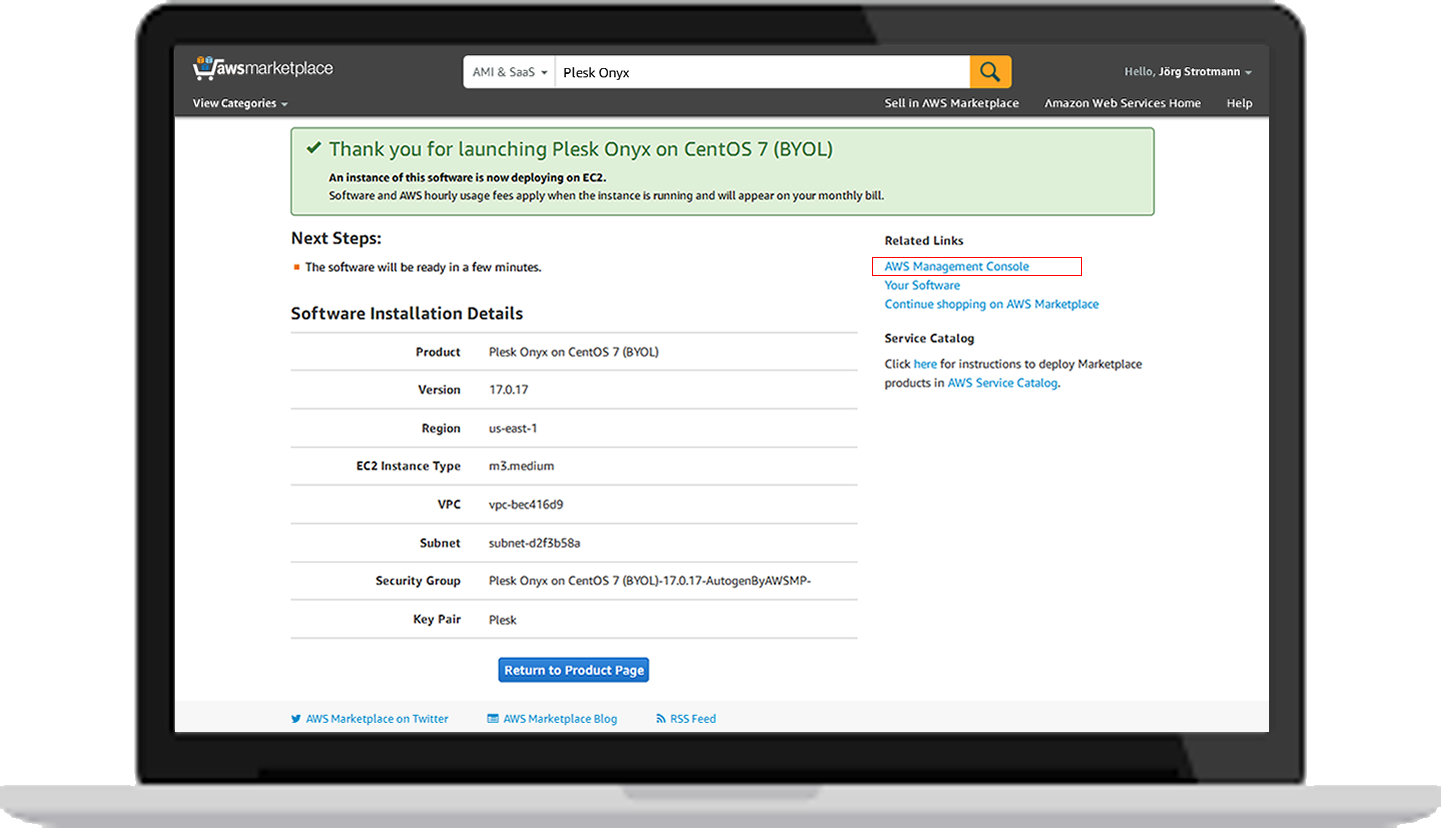
10. Click on the AWS Management Console link in the right pane to get your instances list.
3. Connecting the instance via SSH
When Plesk is installed on an Amazon EC2 instance, the admin password is generated automatically. You need to obtain the generated password in order to access Plesk GUI for the first time.
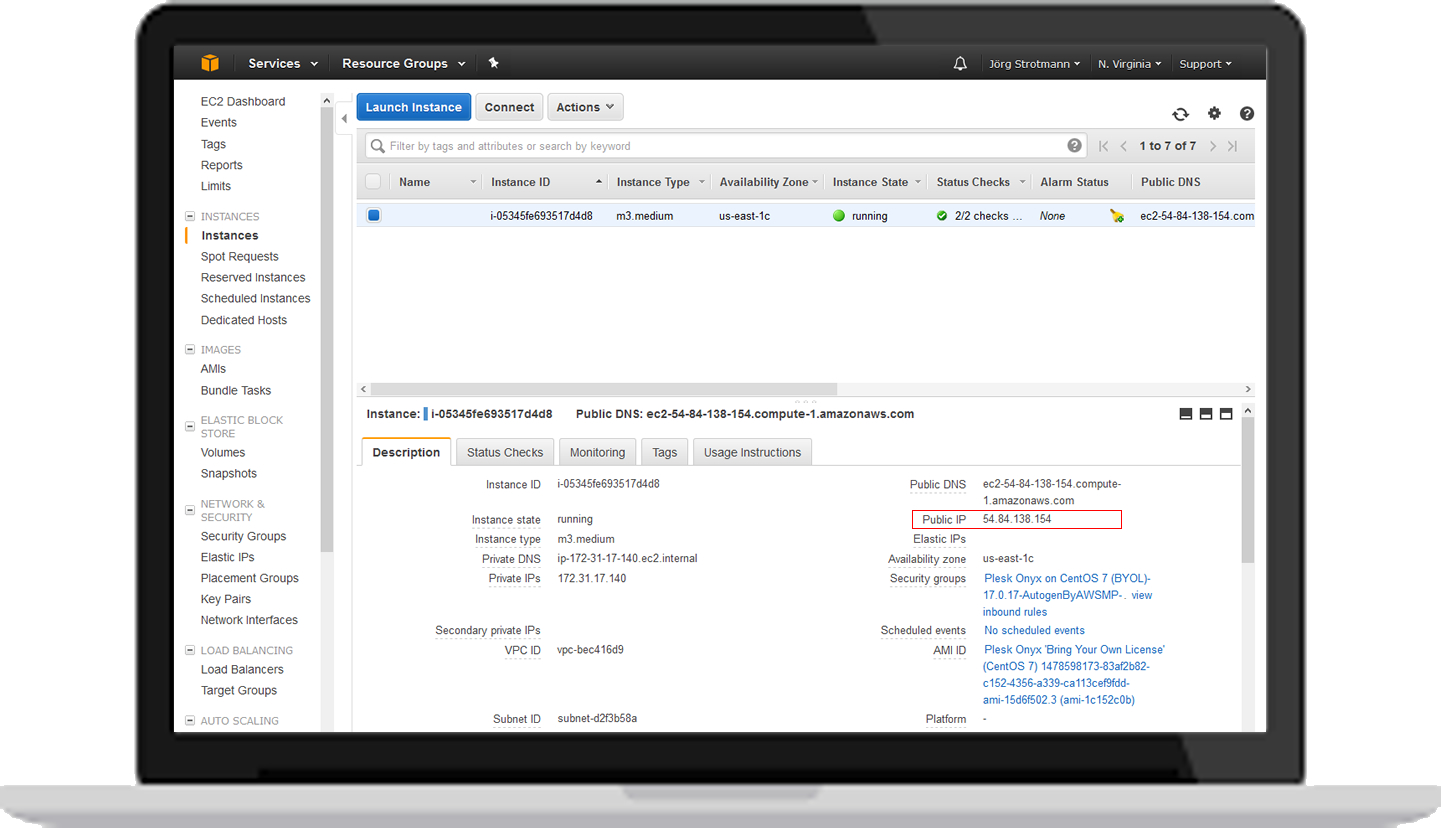
1. Open up your favorite SSH client application and connect to the instance utilizing the public IP address assigned to the instance, that can be found in the right pane of the instances description.
2. User name: The remote user to log in as. The default admin user, or Superuser, is centos for Centos, ubuntu for Ubuntu.
Note: If you added a public SSH key to your instance when you created it, you must have the private SSH key of the key pair (and passphrase, if it has one).
3. Generate a one-time login for logging in to Plesk Onyx.
Run the following command:
# sudo plesk login | grep -v ec2.internal
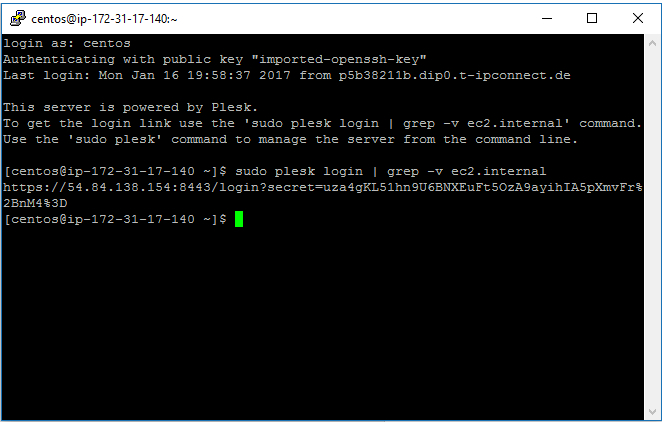

4. Copy the generated link into your browser.
4. Running the Installation/Configuration wizard
1. When you log into Plesk Onyx, you will see the View Selector page. On this page, you can choose the appearance of the panel as per your requirements.
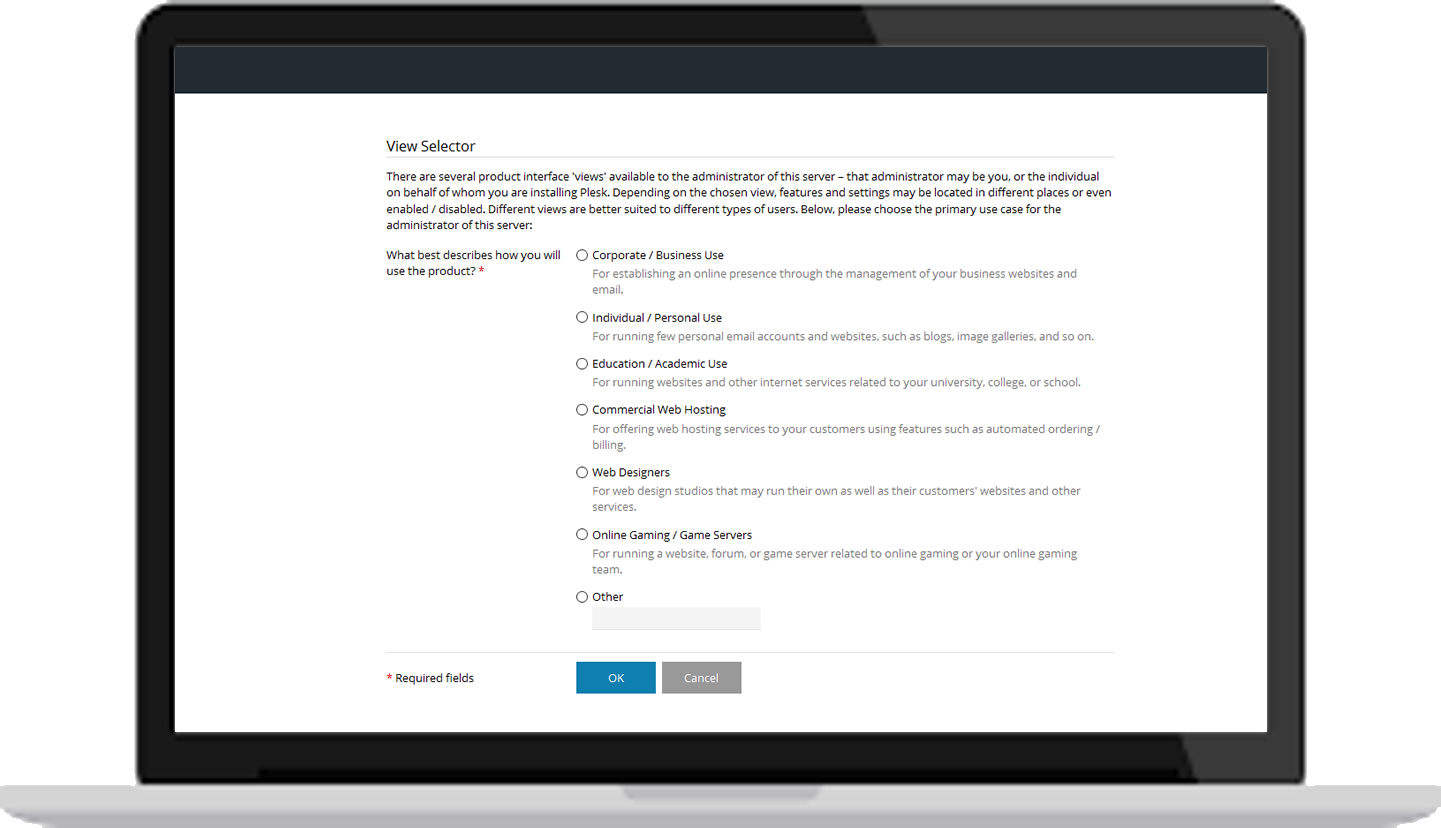
Once your purpose has been identified, a second drop-down menu will emerge asking you select your preferred layout. This can be changed later.
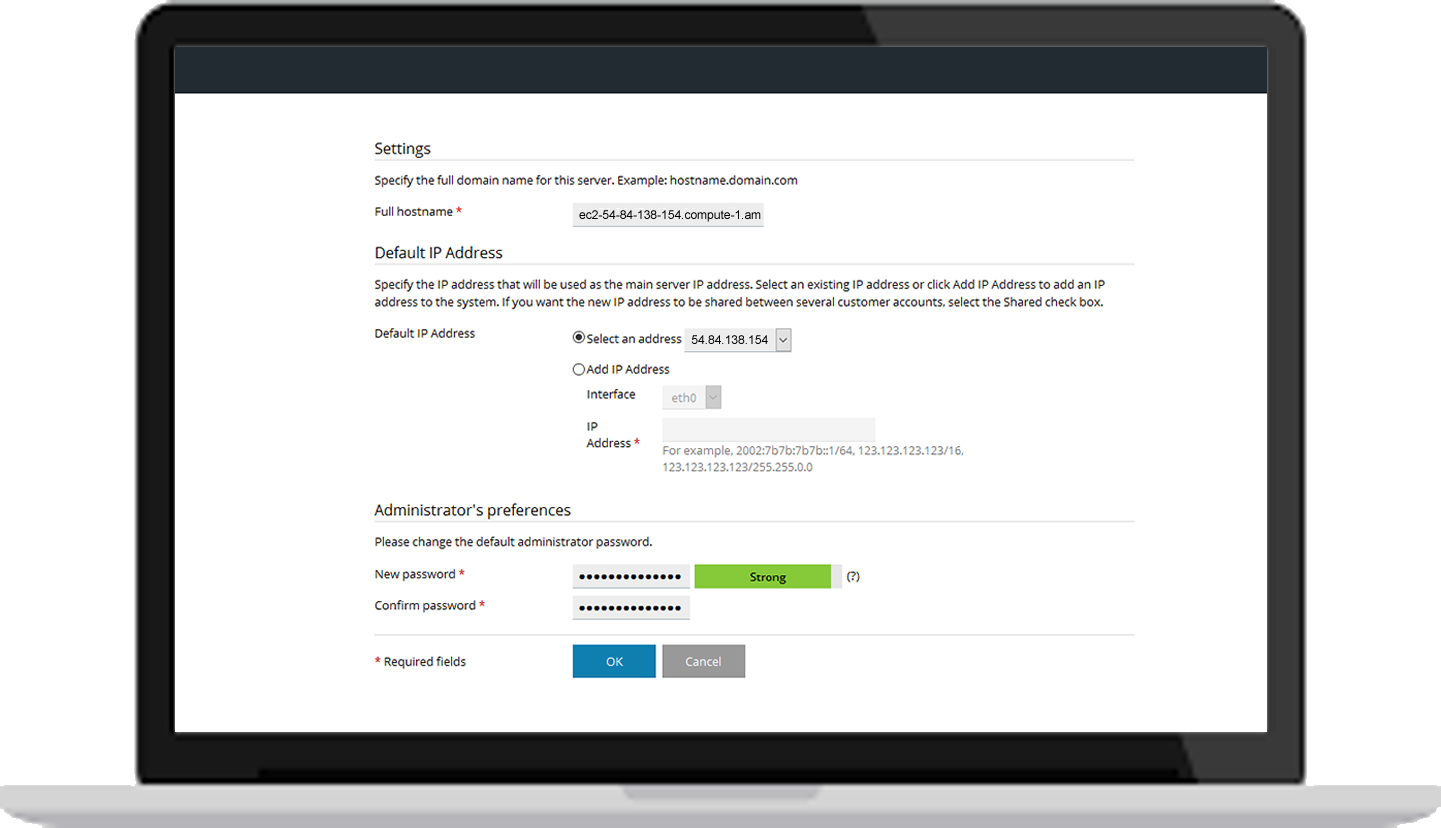
2. Then comes the Settings page. Here you need to fill in your hostname, IP configuration, and admin password.
- New hostname: Fill in your hostname (Public DNS).
- Default IP Address: Select your IP address
- New password: Change the default administrator password.
3. Next is the Administrator information page. Just fill in the information asked and proceed to the next page.
4. After that comes the license key install page. You can order, retrieve and install a 14-day full-featured trial license from this page. Since you have already purchased a license key, proceed with installing the license key.
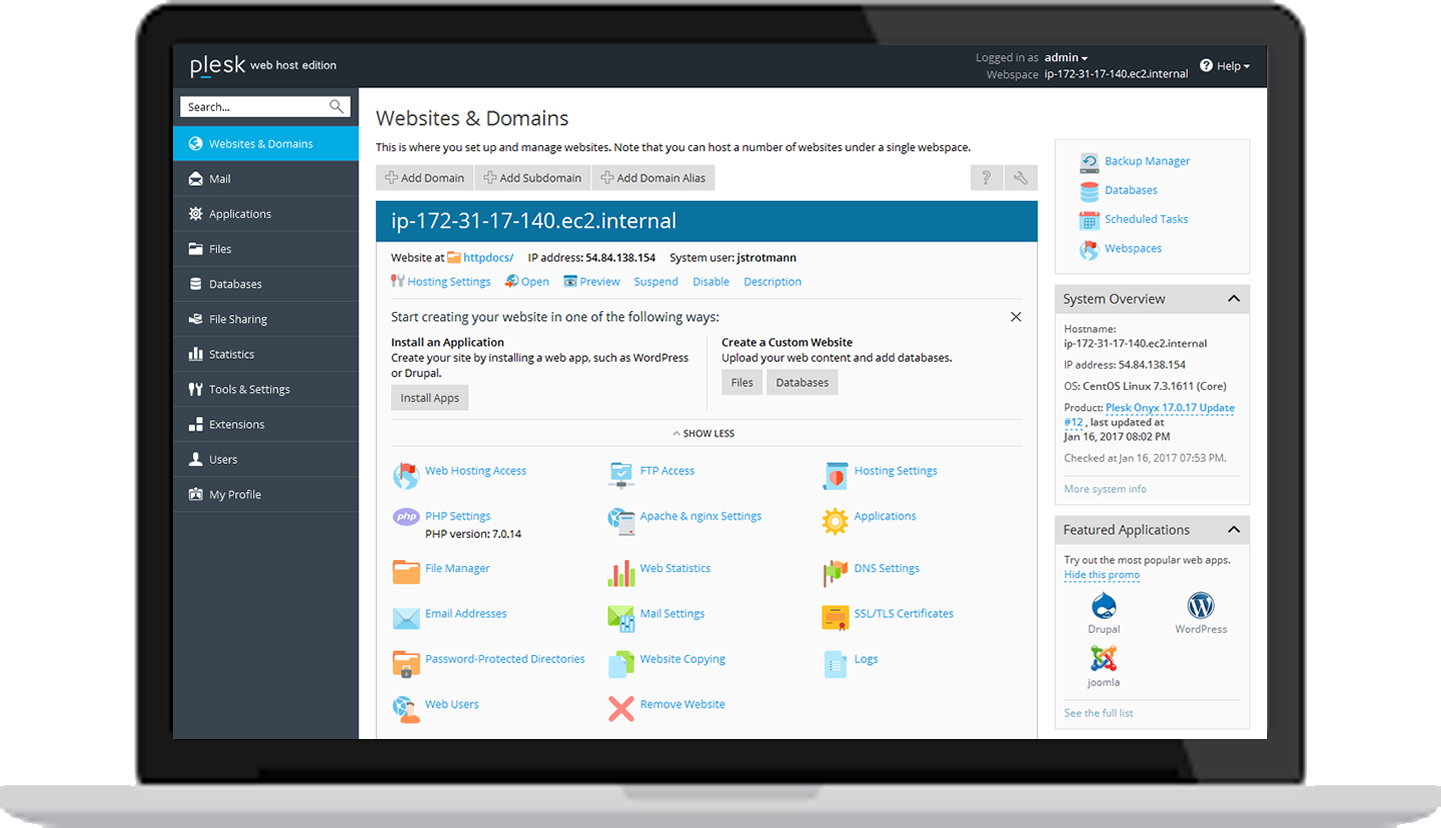
5. On the Create your Webspace page you can specify the domain name of your first subscription, and system user account username and password that you will use to manage it. This will create a subscription for hosting multiple sites.
6. Woohoo! Plesk is now configured!
Thank you to the whole Amazon team for co-authoring this write-up and for providing feedback and technical insights on Amazon Elastic Compute Cloud (EC2).
Be well, do good, and stay Plesky!