
Do you run your website with WordPress? Ask yourself: “How many concurrent visitors can it handle?” What if your site is an e-Commerce?
According to Amazon you lose 1% of sales with every extra 100ms load time. Today, customers expect your page to load in less than 3s – in their browser – not on your server.
Can you make your site faster?
Making your website fast for one visitor is relatively easy – use NGINX with php7-fpm, cache static content (e.g. with varnish or Memcached). And if latency is an issue, because your visitors come from all over, use a CDN (Content-Delivery-Network) like CloudFlare or AKAMAI. Thus bringing your site as close to your users as possible.
All the above will substantially increase your website speed since pictures and videos will display immediately. Without having to travel long distances through the web. Bear in mind though, that JavaScript and CSS files also need to be loaded within milliseconds to make your website look sexy from the very start.
Pssst, now’s when we add the fact that the Plesk platform includes all these technologies. Enabling you to run your sites with unparalleled performance, – and in a few simple clicks too.
But if you expect lots of visitors on your website at the same time – which is what will ideally happen once your site becomes popular and successful – one server just might not be enough to handle all the requests.
Multiple server requests – what do you do?
You know when you’re at the supermarket and the line at the checkout is huge? If they’re service-oriented in any way, they’ll open a new checkout to distribute the load. What happens on a crowded Saturday when every last checkout is chock-a-block? People roll their eyes, sigh in despair and are suddenly very likely to visit a competitor next time. Not what we want, is it?
What about giving our customers a fast and reliable service? One which makes them leave with a smile and come back frequently, because they felt oh-so-well-served? Now we’re talking!
But how to tune WordPress to be able to handle massive parallel requests? That obviously requires several servers – like the checkout desks in the supermarket. But as seen in our crowded Saturday shopping experience, it might not be enough to simply add one or two servers. And adding 10 servers from the start could turn out tremendously expensive and ruin your business case.
Scaling your website works a lot like consuming straight from the power supply! If you have low traffic, you have low costs. When your traffic increases, infrastructure should automatically scale to handle the load. Ahhh bliss.
This procedure leads to correlated costs, which shouldn’t cause you any headaches, as more traffic means more business. In other words, if you play your cards right and scale, increased costs for your servers shouldn’t hurt your revenues. In fact, quite the opposite. And if your traffic decreases, your server-related costs will magically disappear too.
Excited to learn how all this funky stuff works?
Great! In order to make WordPress as fast as a bullet, we need to accomplish the following steps.
- Set up your own database server with enough power on a separate machine.
- Move all static files to a file storage which is faster in delivering files.
- Create a CDN in front of your site to bring at least static files close to your end users.
- Set up multiple servers with the exact same WordPress site (including configuration).
- Get a load-balancer and have it distribute the load between these WP servers.
- Depending on how you want to make updates on your site, you can either.
- redeploy all instances to ship all your changes (better performance).
- or you use a shared filesystem that all instances use (slower, but easier to update).
Ramp up new instances automatically
But the king’s class is to actually ramp up new instances automatically driven by demand and ramp them down again when not needed.
How to accomplish that?
We need an infrastructure that allows, managed via APIs and with the capability of auto-scaling based on events (e.g. “high CPU consumption alarm”).
In our example, we use Amazon AWS since it is the most popular Cloud Service Provider based on amount of web-facing servers with the largest ecosystem. But Microsoft Azure and Google Compute Platform also have their strengths and can easily compete with AWS. Just pick one and you’re good to go. Again, Plesk runs smoothly on all major Cloud Service Providers and is available as an app on the AWS Marketplace.
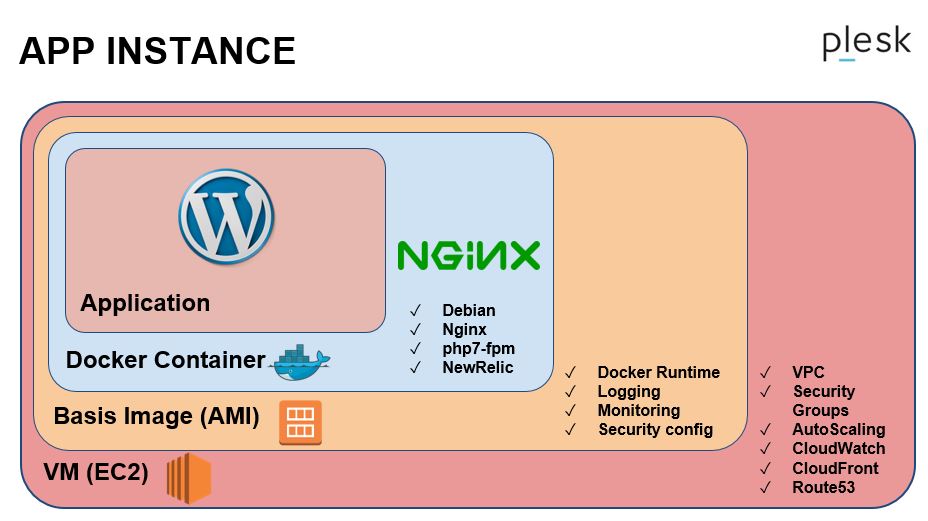
Before going into the APIs, we should decide how we want to deploy WordPress on the servers. We do not want to deploy manually – we want to let the infrastructure auto-scale for us instead – which means the auto-scaling component decides when to add or remove servers. We could use Chef, Puppet, Ansible or simple bash scripts for this task, but our preference is to use Docker to simply package our WordPress including our website content and configuration fully separated from the infrastructure. And then just put this Docker image on each server and run it as a container. With this approach it is super simple to configure all we need once and reproduce deployments as often as we want with no effort.
How to build a Docker Image
To build a Docker image you first need to describe it in a Dockerfile. You can see the Dockerfile we’re using here. But to sum up, we build our image with the latest WordPress version by running:
$ docker build -t janloeffler/wordpress-aws-scaler:latest . After building it, we need to push it to a Docker Registry – which is a file storage for Docker images. We use the official Docker Hub here:
$ docker push janloeffler/wordpress-aws-scaler:latest You can easily run your image containing the WordPress locally to test it out. Be aware that you need to specify parameters, like database hostname and credentials.
$ docker run -p 80:80 -p 443:443 -it janloeffler/wordpress-aws-scaler:latest Now we need to get more provider-specific since AWS, Microsoft Azure and Google Compute all have different APIs. And they all call their services slightly different. But in the following example, we’re using AWS.
Scaling – It’s all about APIs
AWS offers tons of REST APIs while each of them provides tons of API calls with again lots of parameters. Most of them are optional and can be used for flexible configuration. You can access these APIs either directly via REST http calls or by using the AWS CLI directly on your shell. For now. we’ll use the CLI in this example. Which is a wrapper for the REST API and thus easier to use for debugging.
For our super-fast auto-scaling WordPress we need the following APIs:
- EC2 (to manage virtual servers)
- S3 (to upload files to the file storage)
- S3api (to manage the file storage)
- RDS (to manage the database)
- ELB (to manage the load-balancer)
- AutoScaling (to configure auto-scaling)
- CloudWatch (to monitor load on our servers; required by auto-scaling)
- CloudFront (set up the Content-Delivery-Network)
- SNS (notification channel between monitoring and auto-scaling)
- Route53 (manage domains and DNS entries)
- IAM (manage access permissions of the infrastructure)
To give you an idea of the complexity – the EC2 API alone provides 210 API calls to manage compute resources on AWS.
To list all your EC2 instances in your AWS account you can simply run:
$ aws ec2 describe-instances The result if all API calls is always represented as a JSON response. To automate AWS, you simply have to LOVE parsing JSON 😉
Since describing all required API calls would fill approximately 20 pages, we skip that and provide a solution to you that does the whole job of managing and auto-scaling WordPress with just 1!!! single command. Sounds awesome?
Plesk WordPress AWS Scaler is OpenSource
So good news – you can check out the Plesk WordPress AWS Scaler on our git! Here’s how you do it:

Just download the repo to your local machine by cloning it:
$ git clone https://github.com/plesk/wordpress-aws-scaler.git $ cd wordpress-aws-scaler Now execute the Plesk WordPress AWS Scaler script to see its options:
$ sh manage-wordpress.sh 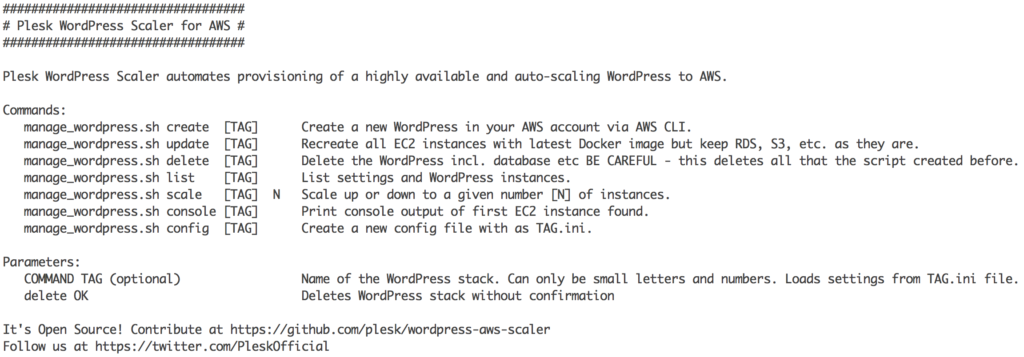
You can adjust the configuration to your needs
- WordPress Site Title
- WordPress Admin Credentials
- E-Mail Address
- Domain Name
- New Relic License Key (for application performance management)
- EC2 & RDS configuration e.g. server sizes (here: instance types)
- And much more
All these parameters are optional. And you can also create multiple config files for several WordPress sites in the same AWS accounts. To create a new Auto-Scaling WordPress, simply execute:
$ sh manage-wordpress.sh create To update all instances with a new version of your site:
$ sh manage-wordpress.sh update To delete it incl. its data and all depending resources:
$ sh manage-wordpress.sh delete And if you’re interested in the technical details, just open the file manage-WordPress.sh in your preferred IDE and have a look.
Don’t have Plesk yet?
Get your free download here and try it out. You’ll get a code you can use for 14 days and an email with all the juicy details. After that, our team will be there to support you as you make your next steps for your workload or business. Happy scaling and stay Plesky!


13 Comments
Good Guidance in a easy & simply way, These tools are a great in help,
Thanks For help !
Great! The Plesk plugin would really make things even easier.
Nice article, keep rocking the world.
Do you know what would be awesome?! If we could auto-scale Plesk!
Thanks, Nice article, The plugin is awesome.
The idea sounds great! I pulled down the GIT repository and started running the manage wordpress script. There were some errors. I fixed these so that it identifies when you already have the VPC, allows creation of ELB/ASG in the VPC instead of ec2 classic, allows the addition of subnets, changes the AZ to use regions other then eu-west-1, allows you to specify a different keypair, etc.
After that, I was able to build all the pieces and the instance autoscaled up the wordpress instance. At this point, it appears that the health check fails and so the instance goes down, the ASG starts it back up, it fails the health check, goes down, …..
I think the problem is with the docker image. In fact, when I log onto the autoscaled box and run docker ps, it basically doesn’t have docker.
So, at what point is the docker installed on the box or do I need to create an ami to use that already has docker set up and installed?
Bob
So it turns out that I did need to install the docker on the box and set up an AMI with it. Now when I autoscale, docker ps shows the wordpress task running. However, I can’t seem to connect to it. How do I test the docker image to figure out what needs to be fixed?
When I try to connect to the ELB, it doesn’t do anything, no connection. However, when I tried:
curl 10.10.175.82
Database Error
Error establishing a database connection
You can see it at least told me I had a db connection. I then installed mysql client onto the same box where docker is and tried to connect to the database with mysql and it connected just fine.
Bob
Hi Bob, seems you’ve already solved the traps, right? Regarding the AMI, you’re right that it needs to have docker already installed. That’s how I did it. But of course you can also install it yourself via EC2 User Data (ec2-user-data.sh) and specify something like “apt-get install docker-ce”. Same is true for your Dockerimage. It needs to contain everything your WordPress installation requires. If something is missing, just add it to the file. You should definitely not use “FROM debian:testing” for production as you never know what was changed in the underlying image. If you want to make changes on the public repo of the wordpress-aws-scaler, feel free to create pull requests.
Best, Jan
It really saved a lot of my time. Each and every step is well explained. Thanks
Well explained, This plugin is really useful.
Great work
Thank you for writing this guide and providing the auto scaling script. This has been an invaluable resource for me. One thing you might want to update though is the “get your free download” link at the end of your post. It doesn’t seem to work anymore, and instead redirects to the homepage.
Hi Juan,
Glad to hear this guide has been valuable to you. The link has been updated. Thank you kindly for the feedback, it is much appreciated.