
Is your website experiencing heavy traffic? Are you looking for a solution that will reduce server load and will improve website speed? Varnish might just be what you need. Varnish listens for duplicate requests and provides a cached version of your website pages, mediating between your users’ requests and your server.
So how do you activate Varnish? In this article, I will show you how you can easily increase your website speed by using Varnish as a one click Docker container. I will demonstrate how using a website caching solution like Varnish can easily improve both page response times and the maximum number of concurrent visitors on your website.

What is Varnish and why should you use it?
Varnish caching service is an open-source web application that operates as an HTTP reverse-proxy. While it creates a cache after serving a request, it uses it to serve the other visitor’s request in case the similar one was cached earlier. Hence, generally, there are the following benefits of such a solution:
- Performance. The main advantage of Varnish, since even most of the dynamic content can be served using cache and thus avoid any backend processing time.
- Less load on the server. Lower number of requests served to avoid using the backend functions.
- Configuration flexibility. VCL(Varnish configuration language) allows the administrator to perform additional fine-tuning of the caching environment.
Now speaking of the “HTTP Reverse-proxy” part, which is the method Varnish uses. In Plesk we already have NGINX operating as a frontend webserver, so how can we simultaneously run Varnish? That is where a Docker container with its proxy rules comes in.
Running Varnish in a Docker container
Docker is an open-source project that makes deploying service applications, including their native environment, incredibly simple. In Plesk, we have this software implemented as an extension, which is thoroughly described in this Plesk documentation. Hence, instead of installing Varnish on the Plesk server, we are going to deploy the official Varnish Docker container:
Activate Varnish in Plesk and test it on a static page
Alright, now the theoretical questions are settled, let’s get to the practical part. In default Plesk configuration we have Apache2 listening on 7080/tcp(HTTP), and 7081/tcp(HTTPS), and NGINX, which acts as a proxy and actually serves the content via 80/tcp and 443/tcp.
Meanwhile, we will now also have a Varnish container in between those two. Hence, the Varnish container would receive a request from NGINX and pass back the content from Apache2. But don’t worry, it’s simpler than it sounds!
Before we proceed, first we need to make sure that the Docker extension is installed. In the Plesk panel, Navigate to Extensions > Extensions catalog, and in the search bar type “Docker”. Then, click “Get it free” if it is not installed, or “Open” if it is.
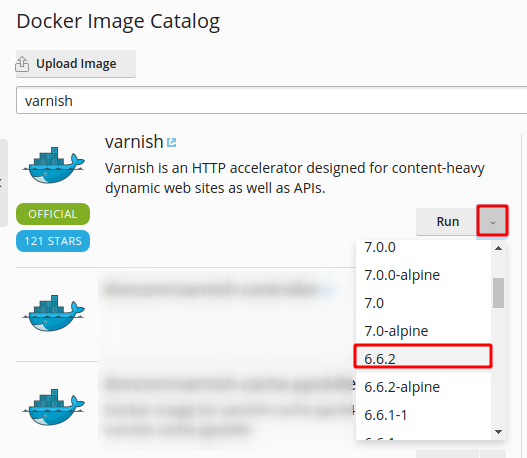
In the images catalog, find the official Varnish image and select a stable version of the container (6.6.2) to install and run the Varnish container:
On the page that opens, edit the container’s settings. Uncheck the “Automatic Port Mapping” function and apply the following manual mappings instead:
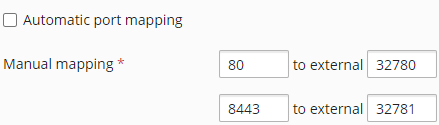
That means that all HTTP requests that are sent to the 32780/tcp of the server would be redirected to the port 80/tcp of the Varnish Docker container. Even though we are not going to use the 32781 rule, it is necessary to set it up by design.
Click “Ok” to run the container.
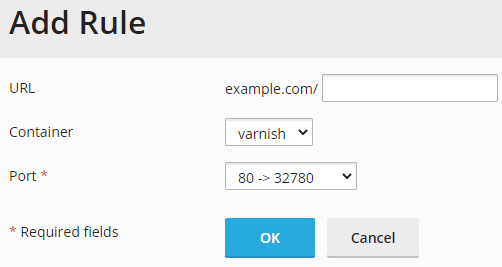
Once this is done, it is now required to configure the domain. Navigate to Domains > example.com > Docker Proxy Rules and create the following proxy rule:
Then, navigate to Domains > example.com > Hosting Settings and disable the “Permanent SEO-safe 301 redirect from HTTP to HTTPS” option, since we want to test the Varnish functionality over HTTP first.
Now we need to permit access to the Apache2 port from the local Docker subnet (172.17.0.0/24). This can be achieved by means of IPtables using the following command:
# iptables -I INPUT -p tcp --dport 7080 -s 172.17.0.0/24 -j ACCEPT
Once added, save the IPtables ruleset with this one:
# iptables-save
However, in case there is a Plesk Firewall extension installed on the server, it is required to add the rule using Plesk Firewall GUI via Tools & Settings > Security(Firewall) > Add Custom Rule:

Once we have the firewall configured, it is time we configure Varnish itself to address the IP:Port of the local Apache2 server.
Important note: In the below commands, it is required to replace 203.0.113.2 with the actual IP address of the domain as well as the container’s name (Varnish) if it was set to a custom one.
Now to edit the /etc/varnish/default.vcl within the container, run the next 2 commands:
# docker ps | grep varnish | awk {'print $1'} | xargs -i docker exec -t {} sed -i '/.port/c\ .port = "7080";' /etc/varnish/default.vcl# docker ps | grep varnish | awk {'print $1'} | xargs -i docker exec -t {} sed -i '/.host/c\ .host = "203.0.113.2";' /etc/varnish/default.vclAfter the configuration changes are applied, restart the container:
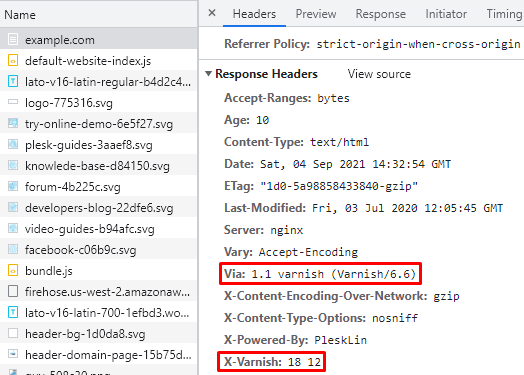
# docker ps | grep varnish | awk {'print $1'} | xargs -i docker restart {}Now when we open our website, http://example.com, and check it via the browser’s developer tools (Headers), we can see that after the initial request the page was loaded using Varnish cache:
Configuring Varnish in Plesk to serve a WordPress instance
At this point, we already have WordPress installed on our example.com domain.
First of all, let’s download the WordPress configuration preset and put it into the Docker’s configuration catalog:
# curl -o /tmp/default.vcl --silent https://support.plesk.com/hc/en-us/article_attachments/4405703421586/default.vcl && docker ps | grep varnish | awk {'print $1'} | xargs -i docker cp /tmp/default.vcl {}:/etc/varnish/Once the configuration is copied, it’s time to adjust the config file to use the domain’s IP Address:
# docker ps | grep varnish | awk {'print $1'} | xargs -i docker exec -t {} sed -i 's/XXX.XXX.XXX.XXX/203.0.113.2/g' default.vclAnd restart the container to apply changes:
# docker ps | grep varnish | awk {'print $1'} | xargs -i docker restart {} Use a WordPress Plugin to activate support for HTTPS
Important: Do not use the option “Permanent SEO-safe 301 redirect from HTTP to HTTPS” within Plesk in “Hosting Settings” because this will lead to a redirect loop in our special environment constellation.
Instead, configure the next additional Apache2 HTTP/HTTPS directives at Domains > example.com > Apache & Nginx Settings:
SetEnvIf X-Forwarded-Proto "https" HTTPS=on

Header append Vary: X-Forwarded-Proto

<IfModule mod_rewrite.c>

RewriteEngine on

RewriteCond %{HTTPS} !=on

RewriteCond %{HTTP:X-Forwarded-Proto} !https [NC]


RewriteRule ^ https://%{HTTP_HOST}%{REQUEST_URI} [L,R=301]
That’s it! Now we have our WordPress website powered by a Varnish caching server. In the case that you would like to use Varnish for different CMS, you can check the official Varnish tutorials.
Summary: Varnish for WordPress within a Docker container on Plesk
Let me make a small checklist:
Varnish in Docker container? Yes.
Varnish in WordPress? Yes.
Varnish in Plesk? Yes.
Varnish for WordPress within Docker container in Plesk? Absolutely, yes!
Mission accomplished! 🙂
As you’ve seen, Varnish can greatly improve the performance of your WordPress website and reduce the CPU-load of your server. It’s relatively easy to setup a working environment using Varnish in a Docker container between Nginx and Apache within Plesk. The most important part is the correct configuration of Varnish for your specific CMS.


79 Comments
My website uses W3Total Cache and Super Cache plugin, will this not affect Varnish.
Why do you use 2 different cache plugins? It will not be too much to add varnish in front?
No, I have five websites, 3 uses w3Total Cache and 3 uses Super cache.
Please do you have guide on how to set up varnish on plesk for this plugin?
For this plugin no, but if you want to setup varnish on plesk, you have just to follow the official documentation : https://www.varnish-software.com/wiki/content/tutorials/wordpress/index.html
Also, My website are using “FPM application served by Apache” and FASTCGI
This is not mention in this article
First Thanks for this nice Solution. But if i am using https:// it just says to many Redirects.
Hi,
Did you find a solution? I have the same problem with https.
the file /etc/varnish/default.vcl is NOT created on server (folder and file are missing)
docker started ok, but i cant finf those files.
is something wrong on what i understad on this guide?
any help please?
same as me
After following the instruction in the article carefully, i keep on getting an “MISS” http://varnish.passnownow.com/
Console Log
bind(): Cannot assign requested address
child (17) Started
Child (17) said Child starts
Manager got SIGINT
Stopping Child
Child (17) ended
Child (17) said Child dies
Child cleanup complete
bind(): Cannot assign requested address
child (16) Started
Child (16) said Child starts
Manager got SIGINT
Stopping Child
Child (16) ended
Child (16) said Child dies
Child cleanup complete
bind(): Cannot assign requested address
child (16) Started
Child (16) said Child starts
anyone using it on cloudlinux 7.3 with a production wordpress site?
Hello;
You did not mention how we are to add the varnish to docker, i have about 15 here from search
also is it possible to implement this server wide for PHP sites?
Is there no moderator? really disappointed
I am having the below error.
Error: {“message”:”driver failed programming external connectivity on endpoint varnish (4bb8f14f3b3666a64871981347350a65b75dd38c1c482bf1a95229aaab3f7ad3): (iptables failed: iptables –wait -t filter -A DOCKER ! -i docker0 -o docker0 -p tcp -d 172.17.0.2 –dport 80 -j ACCEPT: iptables: No chain/target/match by that name.n (exit status 1))”}
Hello
I followed the configuration but i still have a MISS and bind(): Cannot assign requested address
I checked and the port 7080 is well the port for plesk. Mod security is deactivated for this website.
Thanks in advance
Error: {“message”:”driver failed programming external connectivity on endpoint varnish (b817da0ef5745a3423bb384c9db2a7438ab060d68a1dc8fd85f62398255afc7b): (iptables failed: iptables –wait -t filter -A DOCKER ! -i docker0 -o docker0 -p tcp -d 172.17.0.2 –dport 80 -j ACCEPT: iptables: No chain/target/match by that name.n (exit status 1))”}
You can ignore the bind notification. It seems to be because the docker image has no inet6 local address and varnish tries to bind on all interfaces.
I added an explanation here: https://talk.plesk.com/threads/bind-cannot-assign-requested-address-error-log-while-using-varnish-for-wordpress-in-a-docker.343321/#post-839437
there is no /etc/varnish/default.vcl here
Everything seems to work fine, except for the fact that I can’t seem to purge posts from wordpress. The connection from the domain to Varnish is refused.
If i run: curl -x purge [domain], I get: Failed connect to purge:1080; Connection refused.
Also some ‘purge plugins’ can’t seem to connect. I already tried to add: “0.0.0.0” to the ACL list.
you have varnish in /etc directory?
Yes. I do… I think it’s an ACL thing. But not sure.
i can’t find varnish in /etc/
You need to open the container with the exec command.
how do i do that?
@jaap_veenstra:disqus how did you do it?
Its all in the tutorial. Just follow the steps.
i just did but its not caching… showing red.
I’m not An engineer. There are tons of variables. Take a look at your IP tables config. There was An error there?
NO /etc/varnish/default.vcl
Is know. But there is an ACL rule in the default.vcl.
I followed the complete guide. Varnish is working, except for purging.
Please, I can not install wordpress. Is giving the following error.
Erro: O seguinte erro ocorreu durante o download do aplicativo: ODBC error #42S02: [MySQL][ODBC 5.1 Driver][mysqld-5.1.73]Table ‘apsc.aps_package’ doesn’t exist
works on non ssl and not working on ssl i get too many redirects..
I second what Jaap is saying, with some thinkering but closely following the instructions all kind of WordPress setups will work fine with this Varnish Docker setup. Purging on the other hand is something I am looking into aswell as whatever I do that does not seems to take.
If there is suggestion on getting that working … please I am all ears 😉
This article seems to not be complete as it is missing the detail of how to actually edit the file in the docker contatiner, as it contains no txt editor and you can’t seem to install one, so how do you actually change the port.
Robin, the vi editor is available in the docker image. But you can also just install your own preferred image by running: yum install
But my advise is to use volume mapping to map the file to a file outside your docker image so any changes you make to the file will not be lost if you re-recreate the image. Doing so will erase any changes made inside the image.
Works on non ssl and not working on ssl i get too many redirects..
How we can resolve this issue ?
i’m using wordpress
Same issue here: Works on non ssl and not working on ssl i get too many redirects..
Followed exactly multiple times, and getting the same issues:
– HTTPS site visit looks strange via Varnish – while HTTP is okay.
– HTTPS access to wp-admin gives “too many redirects” error, changing wp-admin to http works okay (but its a security issue).
– I can not restart the docker container as soon as the redirect rule for the domain is in place and default.vcl is edited. Error:
Could not create _.vsm.1: File exists
Happens with centos-release-7-4.1708.el7.centos.x86_64 / Plesk 17.5.3 U#39
Great post, helped me out alot!
I had to open port 7080 in Plesk for Varnish to be able to contact my backend.
How solve this error ?
Erro: {“message”:”driver failed programming external connectivity on endpoint varnish (a2301cf3dd3ada07f83fe84fe5009eae90afcc9fb9e5a18831060181a32e25d3): (iptables failed: iptables –wait -t filter -A DOCKER ! -i docker0 -o docker0 -p tcp -d 172.17.0.2 –dport 80 -j ACCEPT: iptables: No chain/target/match by that name.\n (exit status 1))”}
Everything ok until I changed from http to https. That “It also works and the best part of it is that you don’t have to change anything!” Is NOT true at all.
Everybody with the same error would be nice an explanation on how to do it.
It works perfectly fine with WordPress and HTTPS! You can check a WordPress demo page with the Varnish integration with activated SSL (Let’s Encrypt certificate) here: https://wordpress-varnish.code-sprint.de/
Here is a screenshot with the Header response: https://plesk.com/wp-content/uploads/2018/03/varnish-wordpress-docker.png
What did I do? I just followed my own instruction step-by-step from this article. You only get a redirect issue if you don’t disable the “Permanent SEO-safe 301 redirect from HTTP to HTTPS” option or maybe use strange rules in your .htaccess (only encountered this issue with the option mentioned above).
Regarding the purging process: Easiest thing is to restart the Docker container (from Plesk UI or command line) or sending a PURGE cURL request ($ curl -X PURGE example.com). See manual for more information!
Hi,
your test website https://wordpress-varnish.code-sprint.de/ not working proper…
Also I have problems with the loop with the HTTPS protocol following your tutorial.
Is the problem in the latest version of Onyx?
This tutorial misses something for https to work. Http works fine. Would be nice if you find what is it and tell us
If with 301 redirect is not working how you deal with both http an https sites working? Google will mark your site with duplicate content.
The redirect from HTTP to HTTPS works in this constellation (but without a 301 code). If you check my demo website, then you will see that it is also possible to redirect with a 301 code:
https://plesk.com/wp-content/uploads/2018/03/wordpress-varnish-docker-301-redirect.png
Though, this requires some changes in the nginx.conf and default.vcl files. Since the nginx.conf is created automatically, this can be seen only as a workaround. I can share the solution if somebody is interested in it! 🙂
Yes! I am interested. My testing site pcbxxi.com is working with varnish but both http and https are valid. I don’t want http just https.
Hello.
I have problems to make works in https. I try with the plugin Really Simple SSL but I can’t make to put working. I leave WordPress with http in site URL and WordPress URL. I try it to make the redirection with nginx but didn’t work for me. Can tou share the solution with redirection 301 please.
Thanks.
When I use varnish on HTTP, x-cache = HIT, but with HTTPS, x-cache = MISS.
Followed your instructions, followed every other instruction I could find on Google, nothing seem to work. I would much apreciate if you could post all full step-by-step instruction to enable varnish on HTTPS.
Thank you in advance.
Is varnish that good to loose this time we are loosing on trying to get https working?
I followed the instructions exactly and it does not work. I can not connect to Apache.
I get the following error message:
Error 503 Backend fetch failed
Backend fetch failed
I have the default.vcl with server ip and port 7080 adapted and it does not work.
Hello,
I have followed the instructions exactly, but I get the error:
Error 503 Backend fetch failed
Backend fetch failed
Guru Meditation:
XID: 4947971
Varnish cache server
Any update for Varnish 5.0? Anyway my subdomain keeps loading and nothing shows. I also restarted server and docker also. Initially I got the page:
Error 503 Backend fetch failed
Backend fetch failed
Guru Meditation:
XID: 65541
Varnish cache server
But after putting this, it keeps loading and sometimes get same message with this response:
Request URL: https://mysubdomain/
Request Method: GET
Status Code: 503
Remote Address: 104.28.14.68:443
Referrer Policy: no-referrer-when-downgrade
age: 0
cf-ray: 45ad86be194baa38-SIN
content-type: text/html; charset=utf-8
date: Sat, 15 Sep 2018 19:34:54 GMT
expect-ct: max-age=604800, report-uri=”https://report-uri.cloudflare.com/cdn-cgi/beacon/expect-ct”
retry-after: 5
server: cloudflare
status: 503
strict-transport-security: max-age=15552000; includeSubDomains; preload
via: 1.1 varnish (Varnish/5.0)
x-cache: HIT
x-content-type-options: nosniff
x-varnish: 98306 65546
there is an error in line 50:
# Enable smart refreshing using hash_always_miss if (req.http.Cache-Control ~ “no-cache”) { if (client.ip ~ purge || std.ip(req.http.X-Actual-IP, “1.2.3.4”) ~ purge) { set req.hash_always_miss = true; } }
The correct:
# Enable smart refreshing using hash_always_miss if (req.http.Cache-Control ~ “no-cache”) { if (client.ip ~ purge || !std.ip(req.http.X-Actual-IP, “1.2.3.4”) ~ purge) { set req.hash_always_miss = true; } }
it is possible to have support for a woocommerce configuration?
I’ve tried to follow this step and add code but doesn’t work:
https://docs.woocommerce.com/document/configuring-caching-plugins/
https://wordpress.org/support/topic/varnish-configuration-not-working-in-woocommerce/
Hello, I still have the error 503! I opened putty, I got the ID I make the other order and nothing happens!
docker exec -it xxxxxxxxx bash
nothing is happening.
Unable to edit the file /etc/varnish/default.vcl
For those who can’t find the file, /etc/varnish/default.vcl you are missing this step:
“Copy the Docker ID and use the following command to access the Docker container
$ docker exec -it ID bash // Replace ID with the correct container ID”
Once inside the container, use VI or install Nano (yum install nano) to edit the VCL file
Thanks Chris!
Give me the full command to create and edit vcl files.
One thing this tutorial doesn’t explain is, It will NOT work with Plesk Firewall enabled.
Sure it does, you just need to create a filter opening the ports it uses
Hi all,
in my case i have this error from varnishlog:
BACKEND_FETCH
backend boot.default: fail errno 111 (Connection refused)
Is a problem of NGINX or something wrong on default.vcl
Thanks
Hey Luca,
Best raise a ticket for our support to look into it: https://support.plesk.com/hc/en-us
Thanks
I just successfully installed it for a Magento 2 site.
You must disabled “Permanent SEO-safe 301 redirect from HTTP to HTTPS” in Hosting Settings.
And configure 172.17.0.2 incoming TCP 7080 in the PLESK firewall !
If you use ModSecurity you must deactivate a rule (with help log)
i am getting too many redorects witha magento 2 website.
port 7080 incoming is accepted and Permanent SEO-safe 301 redirect from HTTP to HTTPS diasbled.
iptables -nL | grep 7080
ACCEPT tcp — 172.17.0.0/16 0.0.0.0/0 tcp dpt:7080
ACCEPT tcp — 172.17.0.2 0.0.0.0/0 tcp dpt:7080
ACCEPT tcp — 0.0.0.0/0 0.0.0.0/0 tcp dpt:7080
I cannot get this method working for me because I am NOT using Nginx as a proxy but rather as a full frontline server. What should I do?
In order to have curl -X PURGE domain.com to work. 2 things needed to be done from my end.
1. add the domain on the server /etc/hosts
server_IP domain.com
2. When check on the server ifconfig , should got 1 docker0 network with IP 172.17.0.1 ( I guess all server should have this same IP ) . On the Varnish docker , add this IP onto acl purge portion.
=====
# SET THE ALLOWED IP OF PURGE REQUESTS
# ##########################################################
acl purge {
“localhost”;
“127.0.0.1”;
“172.17.0.1”;
}
======
save the settings and restart the Varnish docker container.
Once done ,
======
[root@Plesk01 ~]# curl -X PURGE domain.com
200 Purged
Error 200 Purged
Purged
Guru Meditation:
XID: 24
Varnish cache server
======
not working plesk / centos 8?
i have plesk / centos 8
Hi Enzo, please direct your question with full details on our forum: https://talk.plesk.com. Thanks! 🙂
Hi Stefan,
I currently have Docker extention installed on CentOS 8 and have also configured Redis and it works fine.
Have you already tried if your Varnish configuration also works with Docker and CentOS 8?
Thanks
Hello! Since Varnish will be installed in a separate Docker container, there should be no interference with Redis. However, as CentOS 8 is going to reach its End of Life in December 2021, the configuration wasn’t tested with it. There should be no obstacles here nonetheless 🙂
I installed the docker extension but I don’t see any catalogs. Why?
Using Ubuntu 20.04
Please help, thanks 🙂
Hello Tobias! The docker catalogs can be viewed only after accessing the extension’s interface. Navigate
to Plesk > Extensions > Docker (Open). Then start typing in the search text box. I hope this helps! 🙂
Thanks for your answer. i find a solution: I am using plesk without root access so i had to add varnish to docker with ssh / root. Then I saw it in the docker list.
Hi, i’ve a WordPress multisite with 2 domains. How can i configure varnish with this configuration? Thanks
Hi Alessandro,
At this point, we cannot provide any recommendations as we did not test such a scenario from our side. We suggest you open a ticket with our support team, as they can have a look at your configuration. I hope this helps you out.