
There is no two ways about it: having your server compromised sucks. Seeing your website defaced or infected with malicious scripts feels like a punch in the gut. Did you know that modern brute force tools can test millions of passwords per second? It takes around 15 minutes to crack an average password (eight symbols in length, consisting of mixed-case letters, numbers, and special symbols). Is there anything you can do to protect yourself?
Luckily, the answer is yes. Plesk 12 comes with a comprehensive set of security tools. We have got the ModSecurity support to protect web applications, and the automatic security hardening for WordPress. But today I would like to tell you about a different tool called Fail2ban. Fail2ban is effective against brute force attacks, and can be used to protect any service running on your server.
Here is how Fail2ban works:
- Fail2ban constantly monitors logs of the services it protects, matching every new log entry against a pre-defined set of rules.
- Once a suspicious entry is found in a log, Fail2ban notes the IP of the potential attacker and starts counting. Every time the IP performs suspicious activity, Fail2ban adds one to the counter.
- Once a pre-defined number of attempts is reached, Fail2ban can do two things:
- Send an email notification, and/or
- Ban the attacker’s IP for a pre-defined length of time.
In this article we will give step-by-step instructions illustrating how you can use Fail2ban to protect your WordPress installation from brute force attacks. To do so, we will need to follow these steps:
- Create a filter, which is a set of one or more regular expressions. The filter is used to search the logs for suspicious activity.
- Create a jail, which is a set of rules covering an individual scenario. The settings of the jail determine what is to be done once an attack is detected.
Step 1: Creating the filter.
To create a filter for WordPress, go to Tools & Settings > IP Address Banning (Fail2Ban), open the Jails tab, and click Manage filters > Add Filter. Give the filter a name, and paste the following into the Content field:
[Definition]

failregex = ^ .* "POST .*wp-login.php HTTP/.*" 200

ignoreregex =
so that it looks like this:
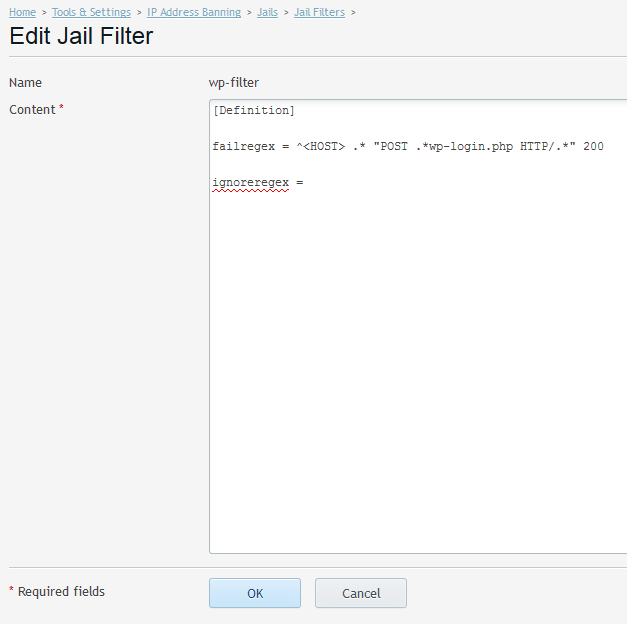
As you can see, the filter contains a single regular expression, and it will trigger every time the WordPress login page is loaded – for example, after a failed authentication attempt.
Step 2: Creating the jail
To create the jail, return to the Jails tab and click Add Jail. Start by naming your jail and selecting the filter you have just created from the Filter menu. Once you are done, it is time to add the most important component of the jail – the actions.
Actions define what happens when a jail is activated. There are four preconfigured actions in Fail2ban:
- Ban the attacker on a single port.
- Ban the attacker on multiple ports.
- Ban the attacker on all ports.
- Send a notification email to a specified email address.
To add an action, select it from the Action menu and click Add. You can add any number of actions to a jail. You may need to customize the action to suit your needs (for example, to provide the desired mail address to send notifications to, or to specify what ports should be closed to the offending IP).
Once the actions are configured, you need to specify one or more log files Fail2ban will check for the signs of an attack – those go in the Log path field. To protect a specific WordPress installation, specify the path to its Apache access log files, found at:
/var/www/vhosts//logs/access_log
and
/var/www/vhosts//logs/access_ssl_log
You can specify more than a single log to protect multiple WordPress installations. Alternatively, you can use the * mask to protect all of them, like this:
/var/www/vhosts/*/logs/access_*log
Finally, there are two optional parameters you can set: the maximum number of failed login attempts and the IP address ban period. The first is the number of “strikes”, unsuccessful login attempts, leading to a ban; the second is the length of the resulting ban in seconds. For example, if you set the value of the first parameter to 3, and the second to 300, after a third unsuccessful login attempt the jail will trigger and ban the attacker for five minutes. If these values are left undefined for a jail, server-level Fail2ban settings are used.
You can see an example of a fully configured jail on the screenshot below:

Note that jails are created on a per-service basis (as in, one for SSH, one for SMTP etc.), but there can be multiple jails for a single service, covering different scenarios.
Once the jail is created, all that remains is to enable Fail2ban:
1. Go to Tools & Settings > Services Management and make sure that the IP Address Banning (Fail2ban) service is running.
2. Go to Tools & Settings > IP Address Banning (Fail2Ban), open the Settings tab and select the Enable intrusion detection checkbox.
3. Finally, open the Banned IP Addresses tab and click Switch On IP Address Banning.
Step 3: Action!
Now it is the time to test Fail2ban to make sure its protection works (let us assume that the settings of your jail match those on the screenshot above). Open the login page of your WordPress install and try logging in with incorrect login and/or password. Then do it again. And one more time for good measure. If you have set up everything correctly, you will not get another chance – the jail you created will activate and ban you for five minutes. And here is what was happening “under the hood” in the meantime:
- You try authenticating with incorrect credentials for the first time. The “POST /wp-login.php HTTP/1.0” entry gets written to the Apache access log. As Fail2ban monitors this log, and the entry matches the regular expression defined in the filter, Fail2ban notices the authentication attempt and starts counting. Okay, maybe you mistyped your password. Mistakes happen.
- You try authenticating for the second time. Same as above, only the counter is now at two. This is getting suspicious, but Fail2ban gives you one more chance.
- You try authenticating for the third time. Okay, now this is getting downright fishy. Three strikes, you are out! Fail2ban creates a temporary rule in the iptables barring you from accessing the server and sends a notification to “[email protected]”.
If you do not actually get banned, it means that there is a misconfiguration somewhere. Here are some troubleshooting steps that may help:
- Make sure that the Fail2ban service is running, that intrusion detection is enabled, and that IP banning is turned on, as described above.
- Make sure that the jail is activated (by the way, all newly created jails are activated by default).
- Make sure that the filter you created actually catches the relevant log entries with the fail2ban-regex command.
The syntax of fail2ban-regex is as follows:
fail2ban-regex /etc/fail2ban/filter.d/
Look for the Failregex value in the output. If it is zero, the filter is configured incorrectly.
Naturally, Fail2ban can be used to protect any service on the server, not just WordPress. Using the examples provided above as reference, you can create custom filters and jails to fit your scenario.
Further information about Fail2ban is available here:
Fail2ban documentation:
http://www.fail2ban.org/wiki/index.php/MANUAL_0_8
Plesk documentation:
http://download1.parallels.com/Plesk/PP12/12.0/Doc/en-US/online/plesk-administrator-guide/73381.htm


25 Comments
Hi,
Great to see this getting promoted – we’ve been using Fail2Ban for WP logins for a while now.
However, there is an issue with your suggested filter regex – that will catch ALL posts to wp-login.php, not just failed logins. Apache will return a 200 code on failed login and a 302 on success, so the filter regex should be:
failregex = .*] “POST /wp-login.php HTTP/.*” 200
Note that this will only work for WP installations in the webroot. I’m not sure how to adapt the regex to allow for installations in a subdirectory. By default, the Plesk Application installer installs WordPress into a subdirectory /wordpress (which is really annoying!).
Also, regarding the log path, your suggestion will only catch non-SSL WP logins, to allow for both SSL and non-SSL you would need to use “access*_log”.
We use this log path to track ALL Plesk domains, both SSL and non-SSL (on CentOS 6):
logpath = /var/www/vhosts/system/*/logs/access*_log
Hope that helps.
Correction … it would be pretty simple to modify the filter regex to accommodate for WordPress installations in a subdirectory — using a wildcard — but the performance hit would be too great to justify it.
Thanks for the comment, Gavin.
Truth be told, the article was meant to give a brief overview of Fail2ban and its capabilities rather than provide comprehensive instructions. Good catch about the HTTP status code and the need to parse both access_log and the access_ssl_log though! As for the regular expression, we will discuss it internally and hopefully come up with a solution (which we will be sure to post in the comments).
We have run a few tests, and it looks like the following regular expression does an admirable job of protecting WordPress installations in subdirectories:
failregex = ^ .* “POST .*wp-login.php HTTP/.*” 200
I updated the article taking your feedback into account – thanks again for sharing!
Hi again,
Great, glad to help.
I just realised we’re not matching in the failregex, as you are — is there any actual need or benefit in matching the in the regex? (Ours seems to work fine without it).
Thanks for the wildcard tip.
The way I understand it, there are no hard and fast rules for writing regular expressions (other than those governing the syntax, obviously). So I see no problem with your failregexp differing from the one we used – as long as it works, I reckon you’re fine.
Just realised that the < and > tags are being stripped out. I do have the <HOST> in my regex. Silly me.
> By default, the Plesk Application installer installs WordPress into a subdirectory /wordpress (which is really annoying!).
Since Plesk 12.1 first app will be installed into webroot by default.
Great news! Thanks.
Although the intention is good here there is something that should be watched with this implementation.
The foremost issue is scanning the access.log which can be a bad thing. Depending on the traffic that the site gets this can become VERY CPU intensive and is not recommended.
During a SYN Flood Attack for example your access log will quickly increase in size. The combination of the attack plus Fail2Ban scanning it can cause issues. In addition, Fail2Ban DOES scan logrotated files. Therefore, if you have had this server for a while and have a lot of rotated files it can make things worse.
The “more” correct way to deal with this would be to hook into the WP login process (wp_authenticate) and write to a custom error log specifically designed for WordPress. Setup your Fail2Ban filters and only scan that log.
If you have a low grade VPS you might bring it to it’s knees under a large scale attack.
Thanks for the comment, Todd.
You are quite correct. However, the purpose of this article was more to give a “Fail2ban 101, out-of-the-box solution” overview, and not to be a comprehensive guide. Your suggestion is perfectly valid, but it demands a certain level of expertise from the user. The steps described in the article are easy to implement and should be sufficient to protect against bots – it goes without saying that a targeted attack presents a whole different challenge, and demands a much more thorough response.
We are a hoster and have setup fail2ban within Plesk to protect wordpress installations of our customers. We have a high volume of break-in attempts, and get mails when they occur. What I can’t seem to get done is to have the logs/mails contain the website on which the attempt has been made. I’ve tried including the logpath= in the action definition and using in the sendmail.conf but that shows the wildcard logpath definition in the jail, rather that the current logfile being processed. So is there an option to include the domain or current logfile being processed?
hmmm.. tags were stripped out… Can I post smallerthan and biggerthan signs here?
Sure, you can use “& lt;” and “& gt;” (sans the space, it’s only there to stop WordPress from converting the tags to symbols) to add the < and > symbols to WordPress comments.
Thanks for the comment, Patrick.
I have ran some tests and, unfortunately, it does not look like Fail2ban has such functionality. I will keep an eye out though, and will be sure to update this comment should I learn of a way to implement this.
HI Alexander, thanks for your <comment> 🙂
Seems very strange that fail2ban doesn’t have the ability to show the domain being ‘attacked’. Seems to me if there are a lot of filtermathes one would like to know which site is ‘attacked’ to see if there is a leak or something or update/harden security. Sounds like an anti-virus program saying ‘there has been a virus in the same location for 50 times now but I won’t tell you where’ 🙂
Always happy to help ) We will look into the lack of the ability to report the name of the website that was attacked and see if there is anything we can do about it.
EDIT:
The two lines are:
^ .* “POST .*wp-login.php HTTP/.*” 200
^ .* “POST .*wp-login.php HTTP/.*” 200
Entered into the same filter?
[Definition]
failregex = ^ .* “POST .*wp-login.php HTTP/.*” 200
^ .* “POST .*wp-login.php HTTP/.*” 200
ignoreregex =
Oh yeah, they are getting stripped out by the blog – nevermind.
Thank you all very much for that.
On my servers:
CentOS 6
(Upgraded according to the standard Plesk-loaded software and repos.)
Plesk 12.5
(standard, out-of-the-box installation with Resellers, Reseller Customers, and Admin subscriptions.)
I run all kinds of configurations: standalone websites that are the root website for the subscription, standalone websites that are installed under an existing subscription, and sometimes blogs in sub directories of both of those types of website. I also have subscription root websites running multisite, where websites are accessible as either sub domains (site.network.com) or mapped domains (site.com). So I’m more than a little confused by the two different lines discussed here and what they will actually cover:
^ .* “POST .*wp-login.php HTTP/.*” 200
^ .* “POST .*wp-login.php HTTP/.*” 200
I initially thought the logs all went to the same log files no matter where the WordPress installation was placed, so the first entry above would catch all wp-login.php errors – like all httpd logs usually go to one place (access_log, error_log, etc). So if that’s not the way fail2ban sees it, should both of these entries be written in one filter?
[Definition]
failregex = ^ .* “POST .*wp-login.php HTTP/.*” 200
^ .* “POST .*wp-login.php HTTP/.*” 200
ignoreregex =
Do you need separate filters for each installation scenario? I currently have the first (corrected) entry running:
[Definition]
failregex = ^ .* “POST .*wp-login.php HTTP/.*” 200
ignoreregex =
It is catching IPs, but there seems to be no way to capture the specific domain name it is working on. And if it is only catching those attacks targeted at the root website of the subscription or something similar, then all the MU subsites are wide open?
I was wondering why everyone says “this isn’t meant to be comprehensive.” It seems like Plesk could provide a checkbox for to add your appropriate fail2ban template or something. I mean, they know all the paths where they put everything and how they load and install everything, and any missing information is given at the time you setup the WordPress installation.
Don’t get me wrong, like I said, I really appreciate you guys sharing tips and insight; but with all the glory of the Odin Plesk interface (which I love, of course) and the new WordPress Server Management Tool, it seems like stopping WordPress login attacks would be more important than almost any other feature. Litterally, a must have.
And Todd, if you get back this way, it would be great to get a couple of your favorite links to fail2ban-specific info where I might learn more about hooking into the WP login process. It sounds like that is definitely the way to go. Is this within the realm of services you provide commercially? I know how to google, but this information seems cryptic and well-camouflaged with uninformed (or possibly outdated?) information. I saw you have a similar post over on xplus3 . net, but it too lacks references or direction. And some stuff, like the idea that “Fail2Ban DOES scan logrotated files” I haven’t seen anywhere – even in the documentation, such as it is – except a note that appeared to indicate additional setup was required in order for that behavior to occur:
/var/log/fail2ban.log {
weekly
rotate 7
missingok
compress
postrotate
/usr/local/bin/fail2ban-client set logtarget /var/log/fail2ban.log >/dev/null
endscript
}
Still, another post complained:
“I have the ban time for postfix spamming IP adresses set to 1 month, but when logrotate does its thing from cron.daily I see that it restarts Fail2ban. This seems to remove all currently banned IPs (for all rulesets) and fire out the usual collection of ‘Stopped…’, ‘Started…’ emails.”
This was answered with “A flushlogs command can be used for logrotate now” with a link to github:
https://github.com/grooverdan/fail2ban/commit/b5d6310d281c1c45112ffb285c77a858da99d6f6
Anyway – fail2ban seems like it could be really powerful and I hope Odin decides to put more work in on its integration with WordPress. Meanwhile additional configuration and strategy tips would be greatly appreciated.
Hello everyone
I have the following log line
100.100.100.100 http://www.example.org – [11/Jul/2016:15:56:33 -0600] “GET //wp-content/themes/twentyeleven/download.php?filename=../../../../../wp-config.php HTTP/1.0” 301 0 “-” “Mozilla/5.0 (Windows NT 6.1) AppleWebKit/537.36 (KHTML, like Gecko) Chrome/41.0.2228.0 Safari/537.36”
How can I write a failregex to block every scan to a *wp-config*.php
Thanks
Hello we have mutiple wordpress sites, is there a way to include the domain of the website that is being attacked when sending email?
Now it seems that one of my clients gets attacked via xmlrpc.php, not wp-login.php
So consider to make another filter with this content:
[Definition]
failregex = ^ .*POST .*xmlrpc.php.*
ignoreregex =
It doesn’t work, instead I found that you should install Wordfence security plugin
Hi , is it ok for me.
Thank you so much.
Regards
Laurent