
Innovative cloud companies like Vultr are revolutionizing how businesses reach their customers today, digitizing painful old processes to allow more time to focus on things that actually matter. And it couldn’t have come at a better time, when the global public cloud market is expected to top $146 billion in 2017, up from $87 billion in 2015, and is growing at a 22% compound annual growth rate, as noted by Clint Boulton (Senior Writer at CIO) in his article 6 trends that will shape cloud computing in 2017.
Clint observes that while the lion’s share of this growth will come from the “mega-cloud providers” Amazon.com, Microsoft, Google and IBM, these big players won’t be able to service every unique request, leaving the door open to companies like Vultr to capture their own unique slice of the pie.
Vultr was formed in 2014 and it is a child firm of Choopa, LLC. Like DigitalOcean, it uses KVM. It is relatively new to the VPS sector but its benchmarks are quite impressive and it offers certain functionalities that will prove handy to some users.
So, if you’re you looking for a global cloud hosting solution with warp-10 fast SSD VPS cloud servers with 100% KVM Virtualization?
Then check out Vultr.com.
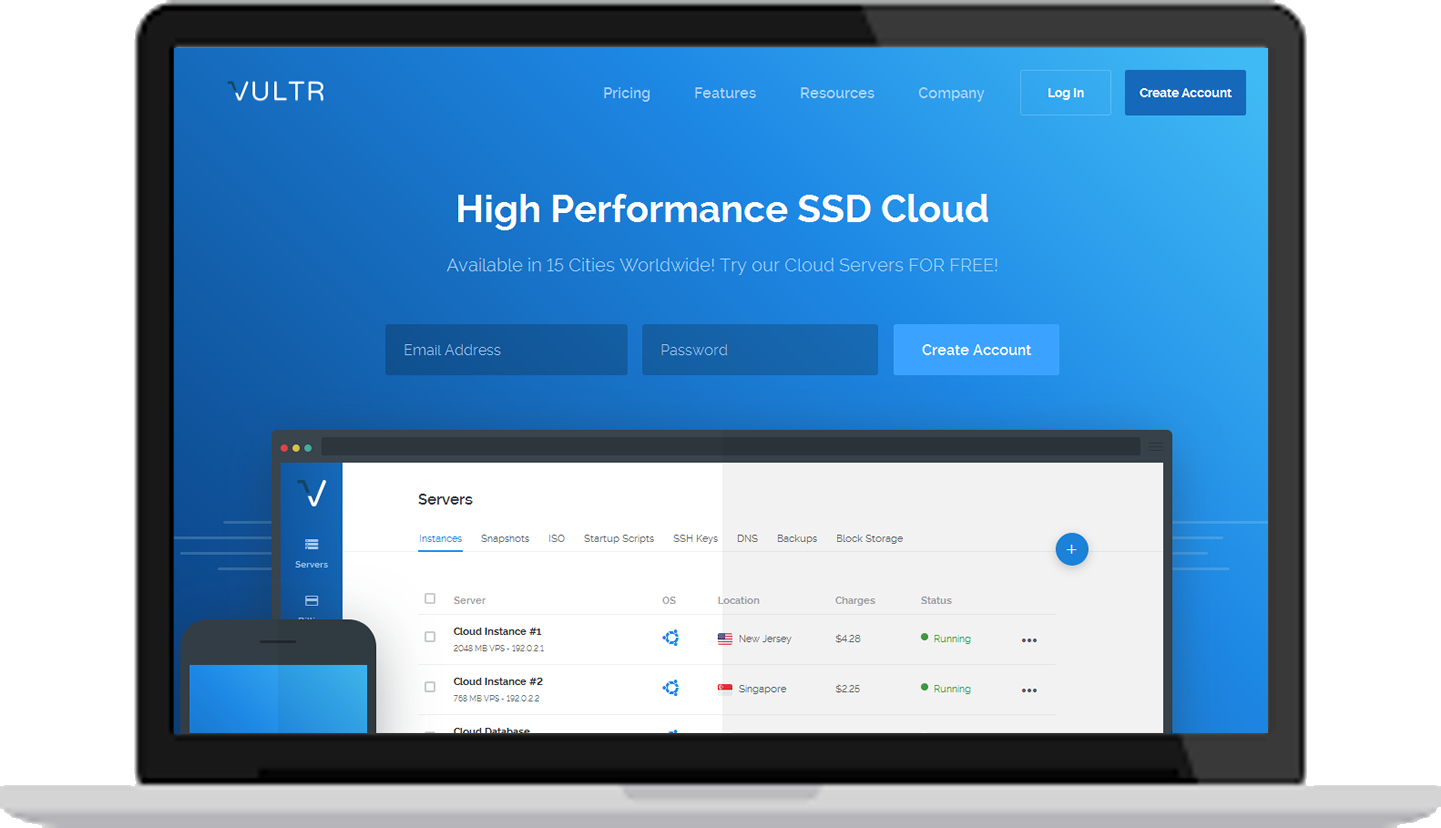 Image: Vultr
What is Vultr?
Vultr is a VPS provider built on high-performance SSD cloud servers with 14 optimized locations worldwide. It aims to create the most reliable and efficient service for developers around the globe. They achieve this by offering a standardized platform for all customers. You get 100% SSD Storage, Ultra-fast Intel CPUs and 14 low latency locations.
Locations
North America: Seattle, Silicon Valley, Los Angeles, Dallas, Chicago, New Jersey, Atlanta, Miami
Europe: London, Amsterdam, Frankfurt, Paris
APAC: Tokyo, Sydney
 Image: Vultr
User Plans
Vultr’s pricing plans are conducted on an hourly basis, meaning you’ll only pay for what you use. With a varied selection of eight plans available, the platform is ready to cater to all needs. The most popular plan offers 1 CPU, but users can have up to 24 CPUs.
Meanwhile, the 2000 GB bandwidth and 1024 MB memory is more than enough for most. However, the largest packages sees those rates raised to 15000 GB and 65536 MB respectively.
Vultr also offers storage (VLS) and dedicated cloud (VDS) services. Again, there is a high degree of flexibility making it possible to tailor a package to suit individual needs.
Try Vultr, and they’ll match up to $100!
Vultr offers extremely simple and transparent pricing. Plans start at $5/month and scale up from there depending on how much storage, memory and bandwidth you need. Simply create an account at Vultr. When you fund your account Vultr will match dollar for dollar up to $100 of your Initial Funding.
This is a limited time promotion, so get off your perch and act now!
Benefits/Features
- Easy to Use
Vultr called they are cloud Hosting on the Largest Worldwide Network. You can easy to deploy your VPS on 4 Continents in 60 seconds!
- Hourly Billing
Pay as you go with our flexible hourly billing policy. Vultr doesn’t lock you in to a long term contact – add, remove or upgrade instances as you need them!
- High-Speed Performance
Vultr will create the fastest and most convenient cloud technology to help you easily and more efficiently manage your infrastructure so you can get back to coding.
And, Vultr provide all of our users with high-performance SSD Hard Drives, flexible API, and the ability to select to nearest data center location.
What is Plesk Onyx?
Plesk Onyx is the new benchmark in web-server management tools, used to simplify website management, application hosting, server management and much more. It includes intuitive web based interfaces for managing domain names, web apps, file management, email accounts, databases and infrastructure, to name a few, to build, secure and run websites and applications in the Cloud!
Plesk Onyx supports multiple Windows and Linux distributions, for example Debian, Ubuntu, CentOS, and many more – meaning you have even less to worry about if you have a customized network setup or if you are unsure about compatibility, and achieve continuous delivery and superior version control by deploying with Git.
Why choose Plesk Onyx?
Invest in apps, not ops. Plesk Onyx manage your infrastructure and security – patching and upgrading, 24/7 ops and security, failovers and more – so you stay focussed on bulding great apps!
- Ready to Code
Plesk helps in building web apps with its ready to use code environment. It supports a multitude of servers and accounts. Thus, helping resellers to easily distribute bandwidth, space, and file permissions using same login panel they use to manage their own website’s files and databases.
- 24/7 Security
Plesk provides complete security to your OS, network, website and applications, something that is always amiss. Plesk will handle all security protocols and take necessary measures for you, automatically.
- Run -Focus on your business
Focus on your business, not on infrastructure management. Save tremendous time by automating all server related tasks and components to run and scale your web applications and websites.
Mass Management
The new Plesk Onyx also includes a tightly integrated set of mass-management and security tools that can be used to protect and automate WordPress. All Plesk-powered systems come with built-in server-to-site security, promising more reliable infrastructure and reduced support costs.
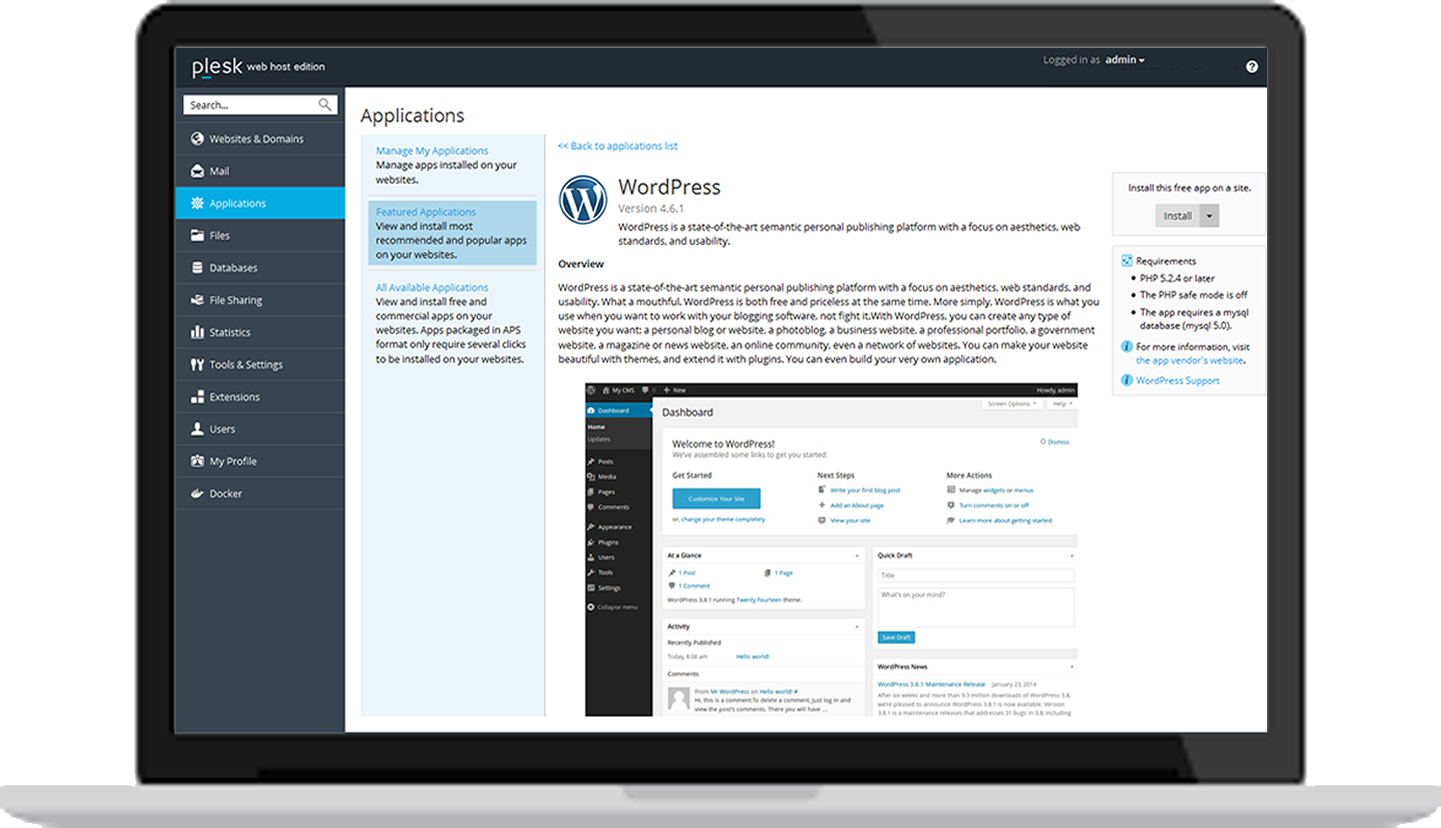 Image: Plesk Onyx
Now that you’re familiar with Vultr and Plesk you’re ready to take the next steps. There’s no better way of finding out about the powerful capabilities of Vultr than by trying out the platform.
Getting started with Plesk and Vultr
Note: Review the Software Requirements for Plesk to find what Linux or Windows distributions are supported by Plesk Onyx.
Quick Start Guide: Create a new instance
After creating an account and navigating to Servers, click on Deploy new instance.
1. Leave the server type on Vultr Cloud Compute (VC2) and choose a location:
 Image: Vultr
2. Next select the Server Type (operating system) from the list available. I have selected Ubuntu 16.04 x64, because it’s a very popular, reliable, and well supported distribution.
 Image: Vultr
3.For the Server Size you can pick a size that is appropriate for you but Plesk Onyx will run great on any of them. In this tutorial, we’ll use the 1 CPU, 1GB memory option, 2000GB Bandwith, 20GB SSD that is currently priced at $10/month.
Select additional features
4. Each of the following features has to be turned on manually.
- Enable IPv6: For no additional cost, Vultr will give your instance an IPv6 IP address. This means your instance can communicate via IPv6.
- Enable Private Network: Add an internal IP to your VM
- Enable Auto Backups: Vultr offers automatic backup as an option on compute instances. Backups are extremely important for mission critical systems and the Vultr backup system adds data-protection with one easy-to-manage feature.
- Enable DDOS Protection: Add an additional layer of protection to keep your hosting infrastructure online and operating optimally even when they are the target of attacks. Currently available in Chicago, Los Angeles, Miami, NY/NJ, Silicon Valley, Amsterdam, Frankfurt, and London.
5. The Startup Scripts feature allows you to configure your newly deployed server by running customizeable scripts on the very first boot of your virtual private server (no login required!). Add software, install SSH keys, and more – the possibilities are endless!
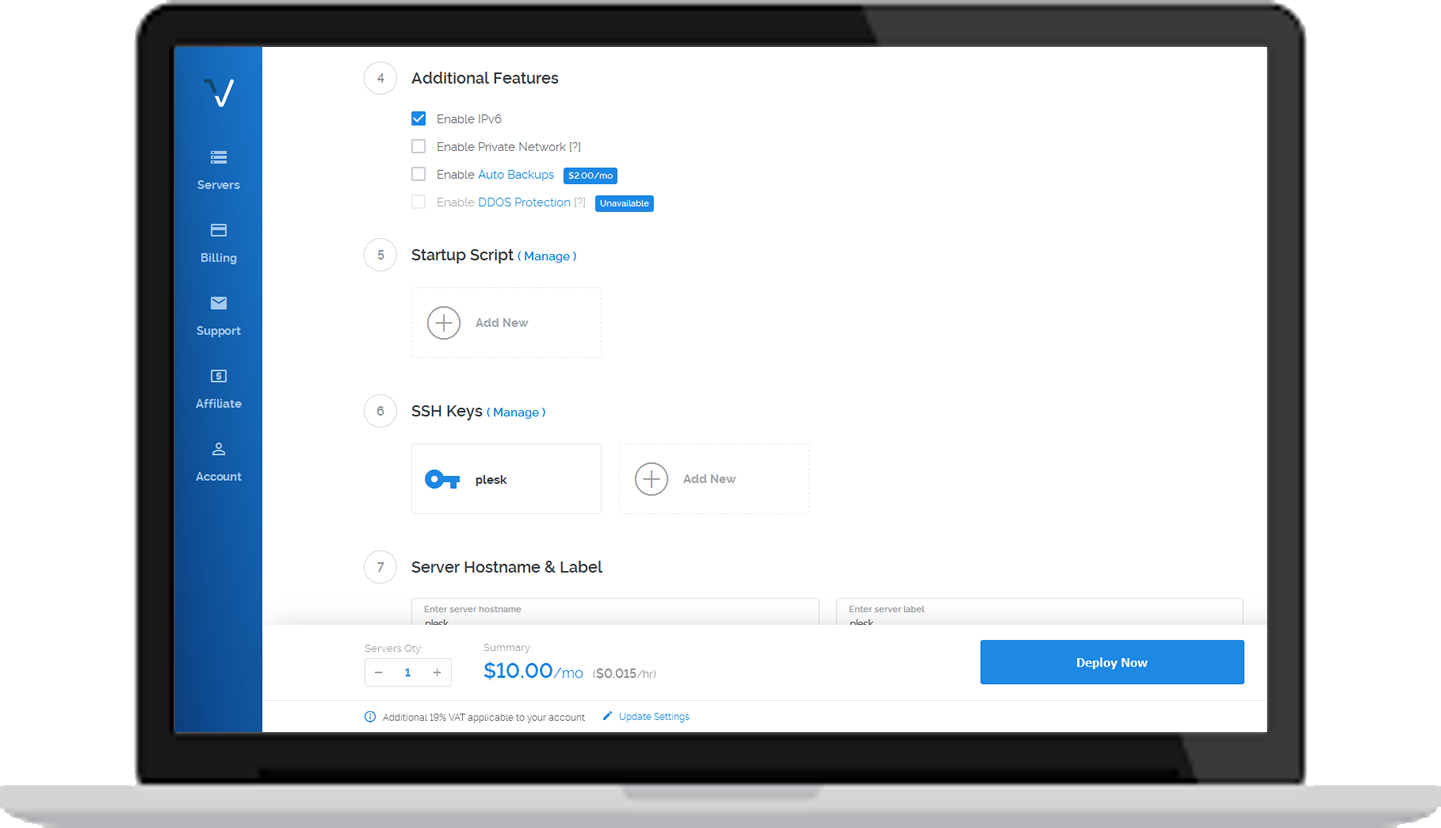 Image: Vultr
SSH Keys
6. Now that you’ve set your features, it’s come time to set up SSH access. If you already have your SSH key setup, great. Otherwise, the information about creation of SSH keys can be found here.
7. The last step in getting your instance create is to give them a simple Server Label to identify the server. We’ll use plesk. Then click Deploy Now to create and install the server.
Your new instance will deploy in a couple of minutes. Once your VPS instance is deployed, it will be automatically started. To find out the Public IP address of the instance, Username, and Password, click on Manage.
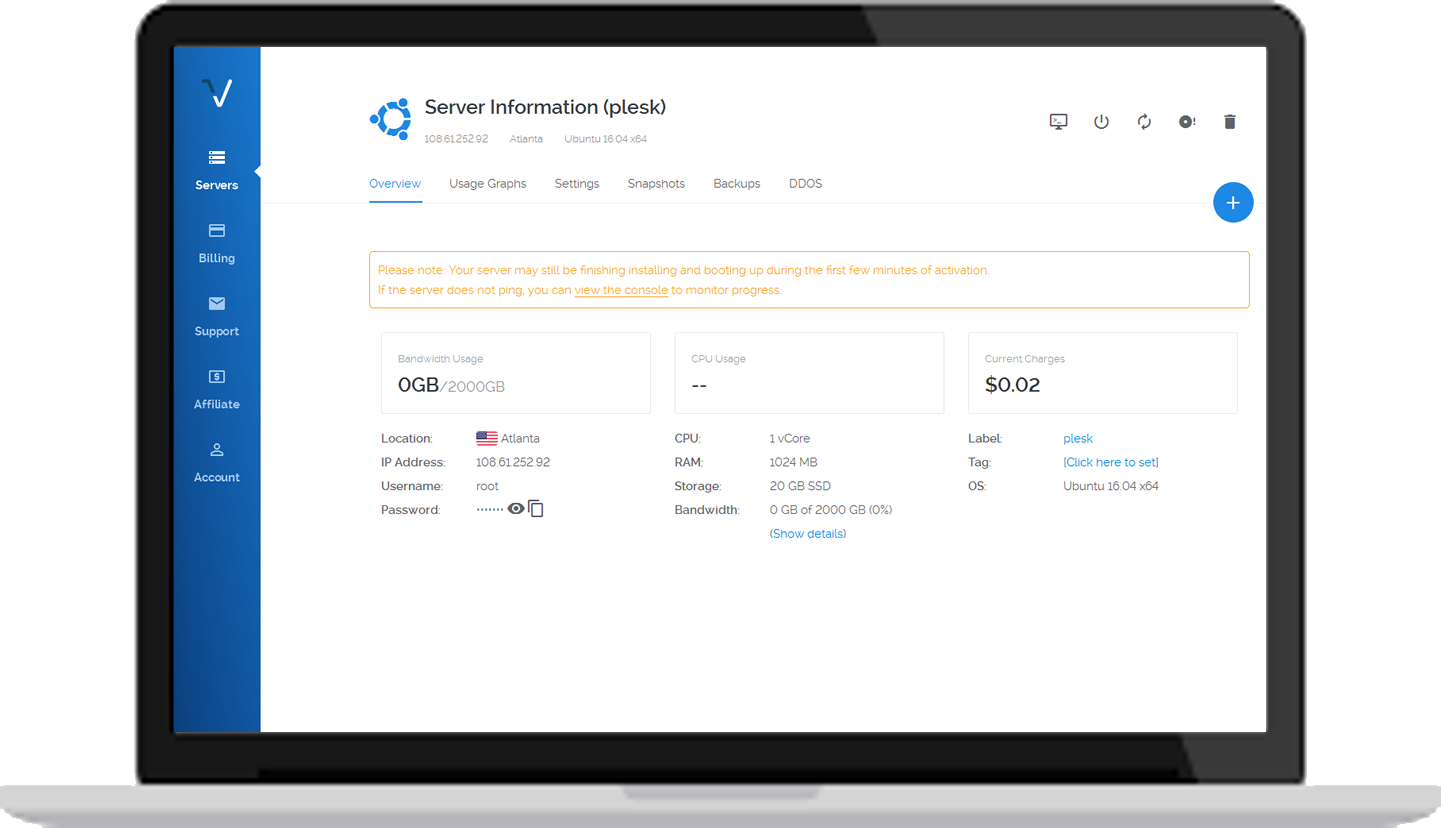 Image: Vultr
Now it’s time to install Plesk and build something with your new server!
Connecting the instance via SSH
1. Open up your favorite SSH client application and connect to the instance utilizing the public IP address assigned to the instance.
- Username: The default admin user is root
- Password: The initial root password to your server can be found in your Server Information page.
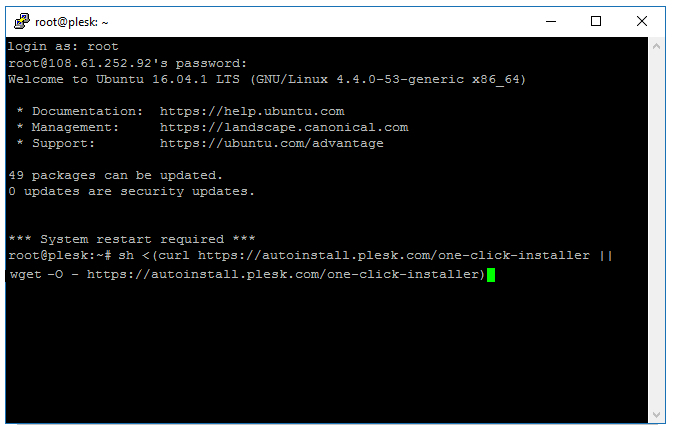
2. Install Plesk using One-Click installer or run through Plesk Installation and Upgrade Wizard to deploy custom installation:
One-Click installer
Run the following command:
# sh ‹(curl https://autoinstall.plesk.com/one-click-installer || wget -O - https://autoinstall.plesk.com/one-click-installer)
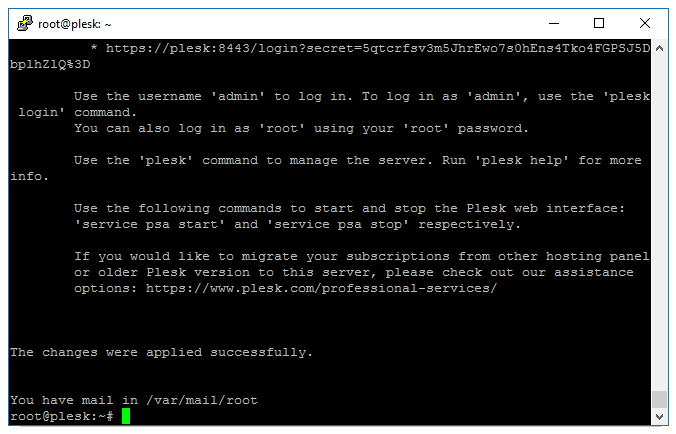
3. Generate a one-time login for logging in to Plesk Onyx
Run the following command:
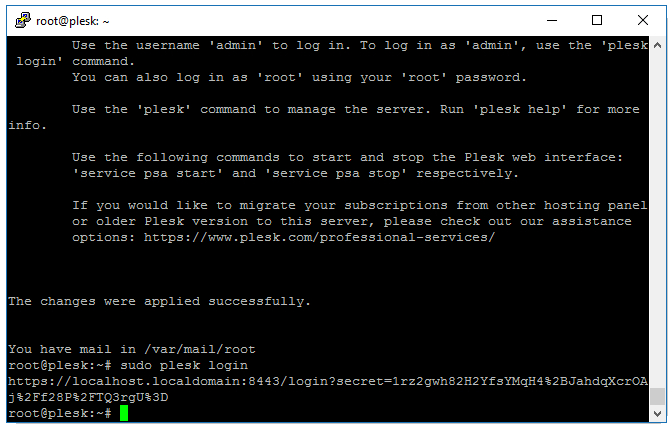
# sudo plesk login
4. Replace the hostname with your IP address to log in to Plesk.
![]()
Note: You cannot use the hostname based on the droplet name the first time you log in because Plesk has not passed the initial configuration and the full hostname has not been created yet.
Running the Installation/Configuration wizard
1. When you log into Plesk Onyx, you will see the View Selector page. On this page, you can choose the appearance of the panel as per your requirements.
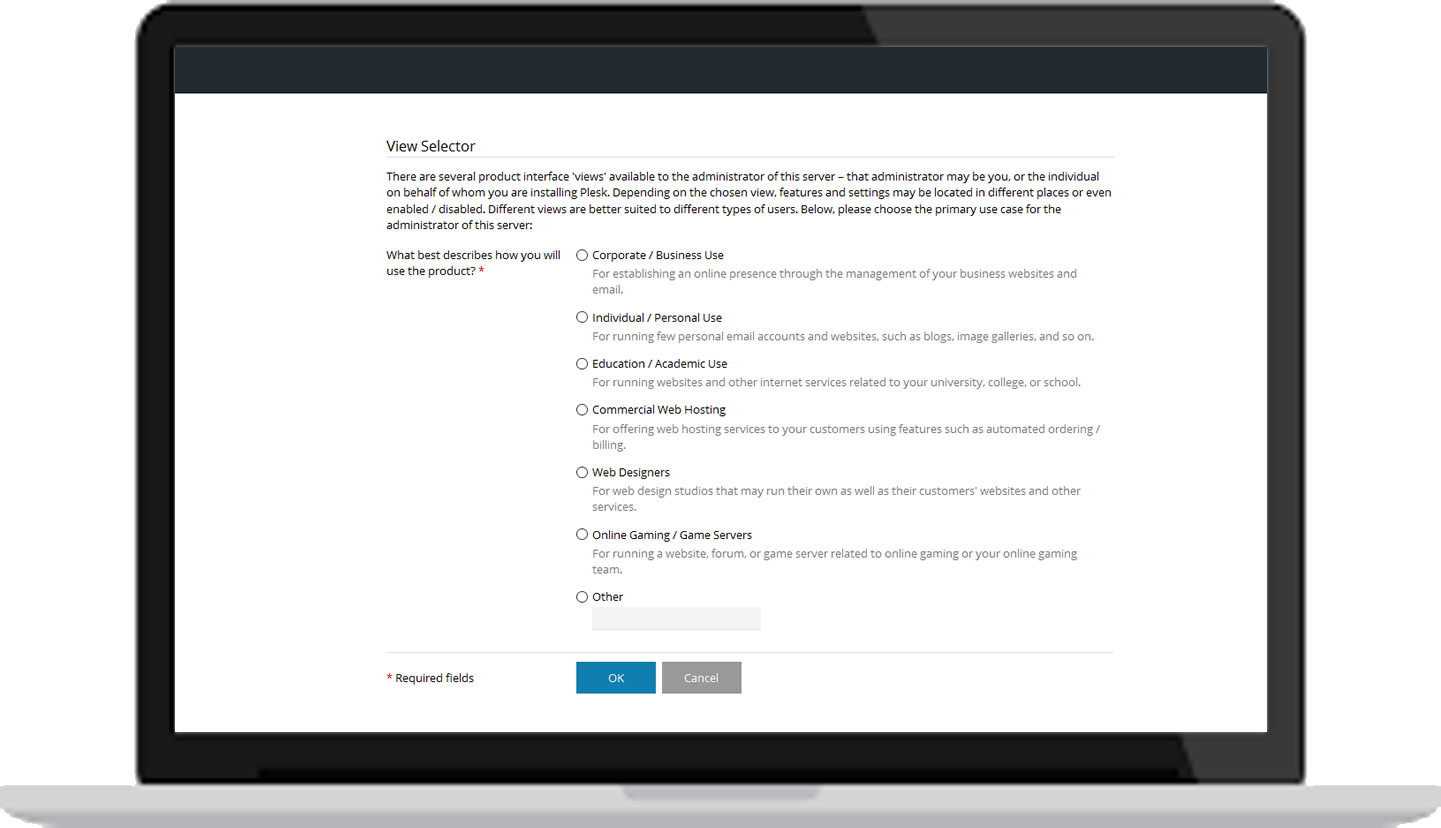 Image: Plesk Onyx
Once your purpose has been identified, a second drop-down menu will emerge asking you select your preferred layout. This can be changed later.
2. Then comes the Settings page. Here you need to fill in your hostname, IP configuration, and admin password.
- New hostname: Fill in your primary domain (i.e. testdomain.com).
- Default IP Address: Leave the IP as default.
- New password: Change the default administrator password.
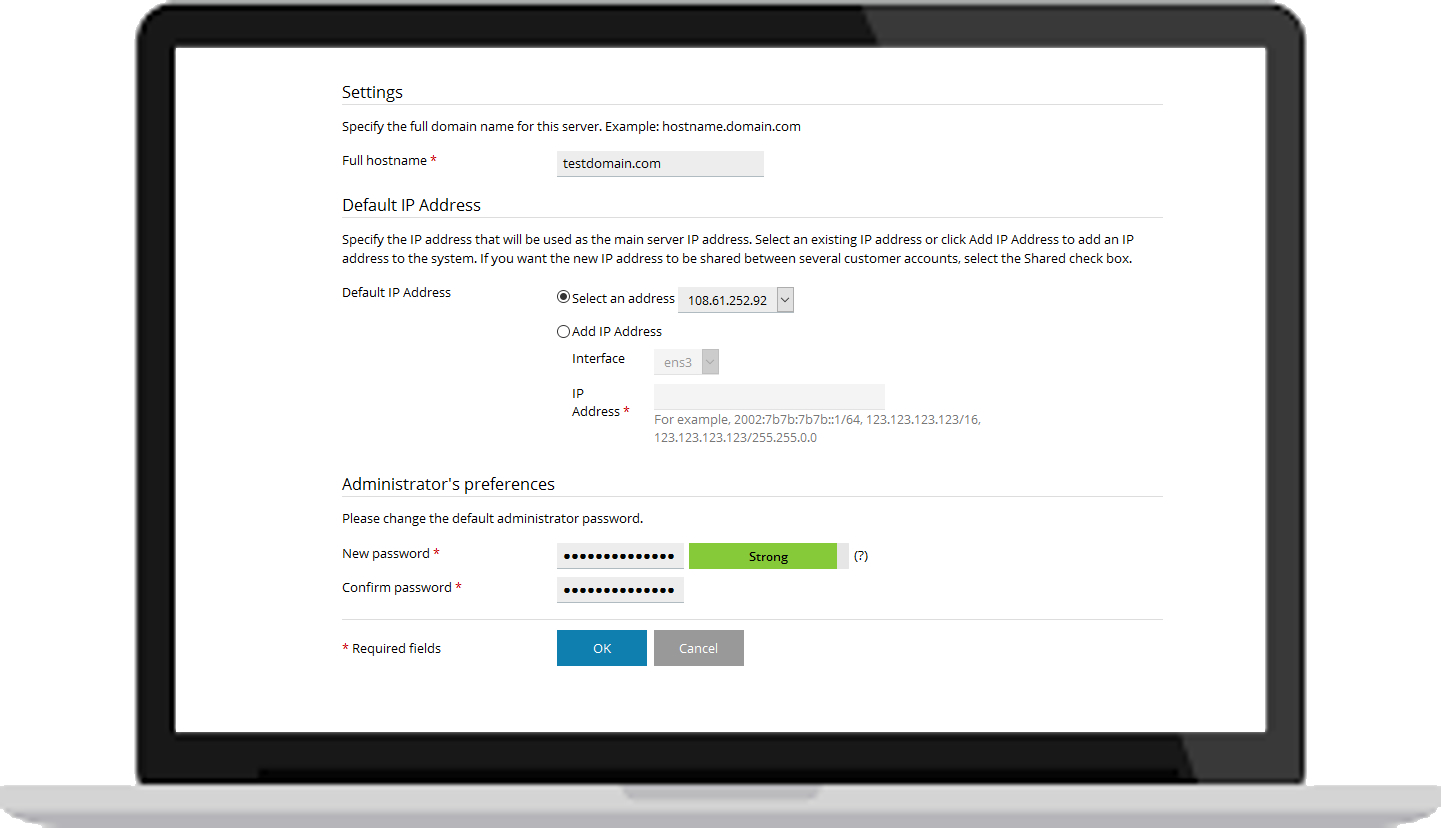 Image: Plesk Onyx
3. Next is the Administrator information page. Just fill in the information asked and proceed to the next page.
4. After that comes the license key install page. You can order, retrieve and install a 14-day full-featured trial license from this page. Since you have already purchased a license key, proceed with installing the license key.
5. On the Create your Webspace page you can specify the domain name of your first subscription, and system user account username and password that you will use to manage it. This will create a subscription for hosting multiple sites.
6. Woohoo! Plesk is now configured!
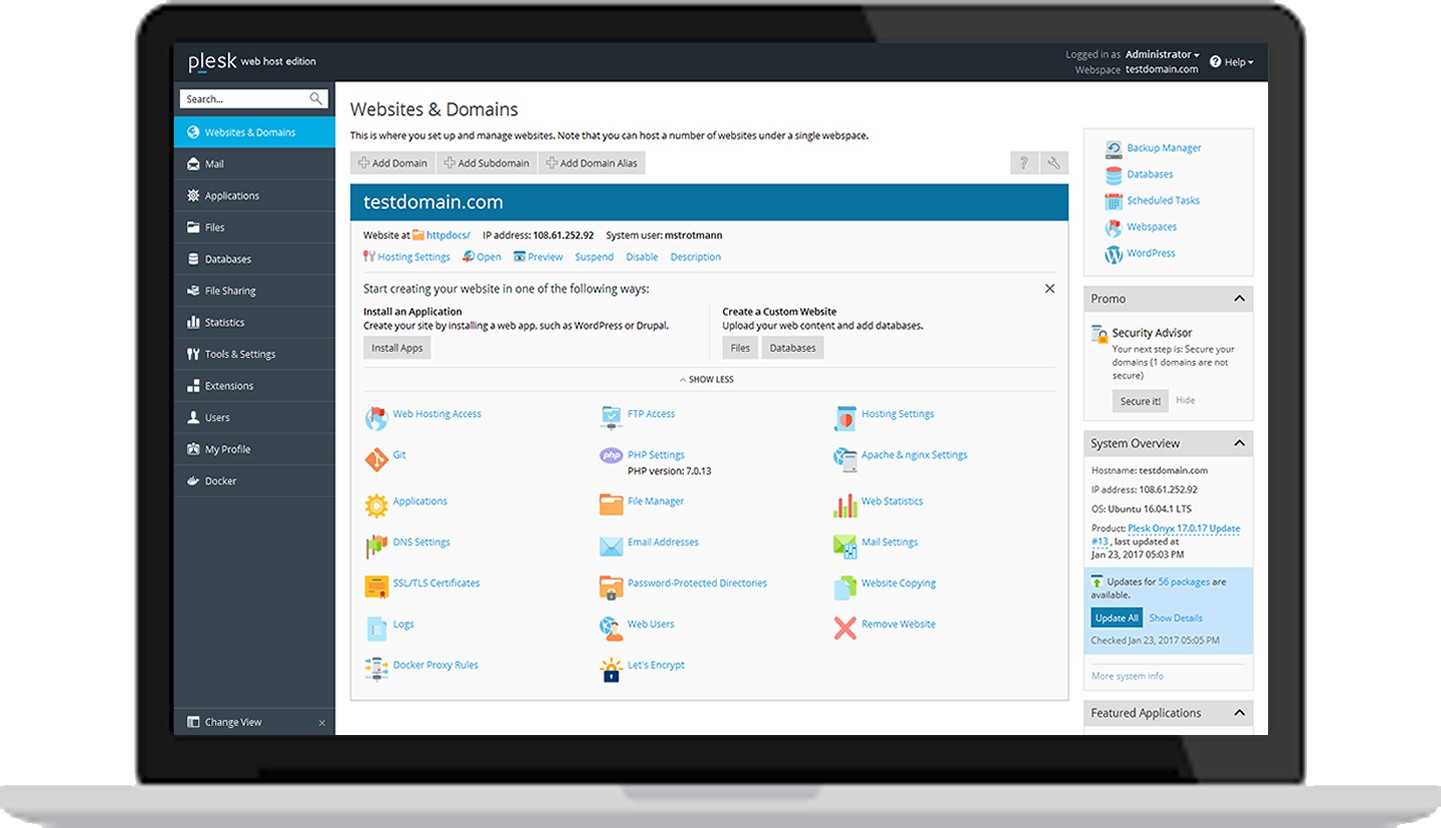 Image: Plesk Onyx
![]()
Thank you to David Aninowsky, Founder and CEO of Vultr for co-authoring to this write-up and for providing feedback and technical insights on vultr.com.
Be well, do good, and stay Plesky!


8 Comments
[ VULTR ]. I tried to install plesk with centos 7 and it took several days, investigating the problem, the installation arrives without errors, after some updates plesk sends errors, the installation is done with the firewall disabled and still with permissions problems.
[ New configuration files for the Apache web server were not created due to the errors in configuration templates: Can not restart web server: ].
[ Detailed error descriptions were sent to you by email. Please resolve the issues and click here to generate broken configuration files once again or here to generate all configuration files. See the details in Configuration Troubleshooter ]
I currently have centos 7 and plesk in other providers clouds vps running
There is a Plesk extension, called “Webserver Configurations Troubleshooter” to help with webserver troubleshooting. It can be installed via Plesk installer as a Plesk component (not via ext.plesk.com). Probably it will shed a light.
Vultur is great – they recently boosted all their configurations so now you get even more for your money. Check out the new features including firewall and DDOS protection!!
Adam, I agree! The Vultr Firewall Service is awesome and… it’s free!
Hello,
Its a great tutorials but now recently i moved to Vultr after reading this post but i am facing problem , i followed every step that you write on the post but after installation completed i am not able to login in web browser using https://my-ip:8443
Something like problem with firewall i am new so can you update me how i can get this works ..
On CentOS-7 (default installation) system firewall (firewalld) blocks all connections except of SSH.
List of network ports that should be opened for Plesk and all controlled services: https://support.plesk.com/hc/en-us/articles/213932745-Which-Ports-Need-To-Be-Opened-for-all-Plesk-Services-to-Work-with-a-Firewall-
As a quick solution you can try to disable firewalld from the VM by command (ssh as root):
# service firewalld stop
the onclick curl was throwing an error for me.
-bash: syntax error near unexpected token `(‘
the command here worked:
https://docs.plesk.com/en-US/onyx/deployment-guide/plesk-installation-and-upgrade-on-single-server/1click-plesk-installation/installing-plesk-for-linux-in-one-click.76444/
Hi
This article was written on the basis of first installing Ubuntu. However, now we have the Plesk Onyx application that we can directly install. My question is; which of the steps in the article do I need to do so as to have Plesk Onyx fully installed?