
Why migrate to Plesk on AWS?
Amazon Web Services is the cloud computing platform by Amazon.com, offering over 90 key infrastructure services such as computing power, storage options, networking, and databases, delivered as on-demand resources with pay-as-you-go pricing.
As part of the hyperscale cloud revolution, increasing numbers of web professionals are now running their instances on AWS, and many Plesk hosting partners have chosen AWS to run their managed-services business. Running your instances, hosting or managed business with Plesk on AWS provides many significant benefits over the traditional hosting infrastructure:
- Scales better than traditional shared or VPS hosting: Plesk on AWS is based on AWS’ latest innovations and integrates smoothly with the Route53 service of AWS. Support for new AWS services are constantly being added as Plesk Extensions to take advantage of the automation and customization features of the Plesk platform. Pass on the value to your website and app customers by including AWS services to their portfolio.
- Improved innovation: Deploy from websites and apps anywhere to everywhere. Tune, secure and optimize images that can be scaled horizontally (for high traffic sites) with ease-of-use through AWS.
- Improved infrastructure: Quick and cost-effective spin up of dedicated multi-server environments.
- Increased security: Intelligent Security Advisor, free SSL with Let’s Encrypt, Fail2ban, configurable firewall, ServerShield by CloudFlare, Security Core w/ ModSecurity by Atomicorp, Patchman (Patches Vulnerabilities in CMS), Datagrid reliability & vulnerability scanner, and much more
- Proven workflow: Deploy a Domain, DNS, SSL and simple PHP application in just a few minutes…or a multi-services multi-stack application in as much time. Improved CMS (WordPress, Drupal, Joomla!) and eCommerce (WooCommerce, Prestashop, others,..) workflows to ensure better development velocity.
- Increased productivity: Move from a release cycle every quarter to deploying changes on a minute-by-minute basis
- Increased agility: Fully integrated deployment capabilities to deploy code more frequently
- Global AWS Infrastructure: Plesk instances through the AWS marketplace are immediately available on any of Amazon’s many data center locations.
To learn more about Plesk on AWS, as well as our plug-and-play Plesk WordPress Server Solution and Plesk Business Server Solution, go to our Plesk on AWS page.
Let’s start the migration to AWS
Here’s what we’ll cover in this tutorial:
- Prepare your Plesk (or cPanel/DirectAdmin) source server
- Install Plesk on AWS as a target server + configure public IP
- Install Plesk Route53 Extension on Plesk on AWS + configure the extension.
- Install Plesk Migrator Extension on Plesk on AWS
- Migrate all the data (Plesk to Plesk), domains will be created in route53 also on this step.
- Use the Plesk feature “Switch DNS” – so that the source server stays a Slave until all domains are switched on the Route53 side (actually on the domain registrar’s), website stay functional during the switching time of 24-48 hours that Route53 needs for DNS sync.
- After that, you need to contact your registrar to delegate your domains to Route53 DNS.
1. Preparing your existing Plesk or cPanel/DirectAdmin server (source)
Note: there are some limitations in case you plan from Linux to a Windows Server and vice versa! In general, we recommend only to migrate from Linux to Linux or Windows to Windows.
To ensure that the migration is successful, a number of TCP and UDP ports need to be opened on the source and destination servers.
Plesk offers a nice Firewall component that needs to be installed in case you don’t want to do this over command line. If you can’t find the firewall in Tools & Settings -> Firewall, then you need to install the component first (click here). Then you can access it over Tools & Settings -> Firewall. More details on the firewall for Linux here and Windows here.
For Unix servers, open the following ports (In case you are migrating form Plesk using the Plesk Firewall Extension, these ports are all configured correctly for you by default!):
- TCP port 22 for SSH connections on source server.
- TCP port 8443 for access to Plesk XML API on the target server and on the source servers, if migrating from Plesk.
- TCP ports 110, 143 for POP3 and IMAP, on the source and target server. These are used for post-migration checks.
For Windows servers, open the following ports:
- TCP ports 135, 139, 445 and UDP ports 137, 138. Be sure to open these ports on the source and on the target server.
- TCP port 1433 for MS SQL, if it is used as the default instance.
- UDP port 1434 and all (or manually selected) TCP ports for MS SQL, if it is used as a named instance.
- TCP port 10155 for a custom Plesk Migrator service performing miscellaneous tasks.
- TCP port 10156 for rsync server.
- TCP port 8443 for access to Plesk XML API on the target server and on the source servers, if migrating from Plesk.
- TCP ports 110, 143 for POP3 and IMAP, on source and target servers. These are used for post-migration checks.
Also, make sure that https://installer.plesk.com is accessible from the destination server.
We recommend that you install and configure all the necessary services and settings on the destination server before performing the transfer. For example, if you plan on migrating MySQL databases, make sure that the MySQL server is installed and running on the destination server, and so forth.
Make sure that Plesk on the destination server has a separate license. Otherwise, you may experience problems with the license validation during migration. The possible ways of obtaining a license are described in the Administrator Guide.
2. Preparing your AWS Plesk instance (target server)
Follow this guide to set up Plesk on AWS. Note: be absolutely sure that your AWS instance is configured running with a public IP address as described in the installation tutorial, otherwise you might have issues with the DNS parts later.
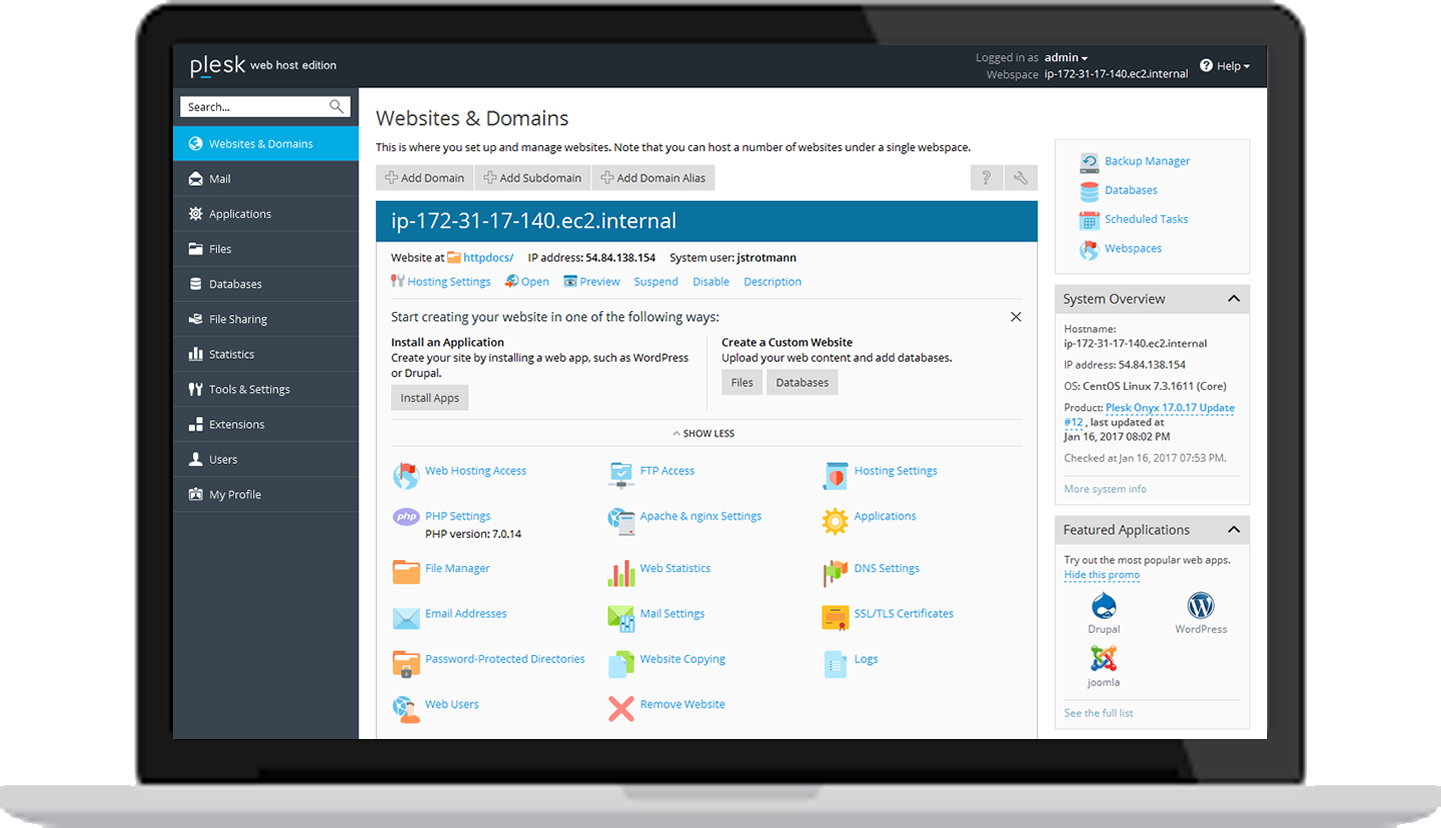 Image: Plesk Onyx
3. Installing the Plesk Migrator Extension
To install Plesk Migrator using the Plesk interface
- Log in as administrator to Plesk on the target server.
- Go to Extensions -> Server Tools -> Plesk Migrator
- Select Install on the Plesk Migrator detail page.
4. Installing the AWS Route53 Extension inside Plesk
In case you plan to use the DNS features of Plesk (what is highly recommended!), you need to make sure that you have the Route53 Extension installed.
- Log in as administrator to Plesk on the target server.
- Go to Extensions -> DNS -> Amazon Route 53
- Select Install on the Amazon Route53 detail page.
Just for reference – here the guide for Route53 from AWS: http://docs.aws.amazon.com/Route53/latest/DeveloperGuide/MigratingDNS.html
- Step 1: Create a Hosted Zone (No action needed at all – Plesk does it all for you – using the Route53 extension)
- Step 2: Get Your Current DNS Configuration from Your DNS Service Provider
- Step 3: Create Resource Record Sets (No action needed at all – Plesk does it all for you – using the Route53 extension)
- Step 4: Check the Status of Your Changes (API Only) (No action needed at all – Plesk does it all for you – using the Route53 extension)
- Step 5: Update Your Registrar’s Name Servers (No action needed now, only after the migration – further below)
- Step 6: Wait 48 Hours for Your Changes to Take Effect (No action needed now, only after the migration – further below. And the DNS will continue to work due to Plesk’s “switch DNS” feature during migrations).
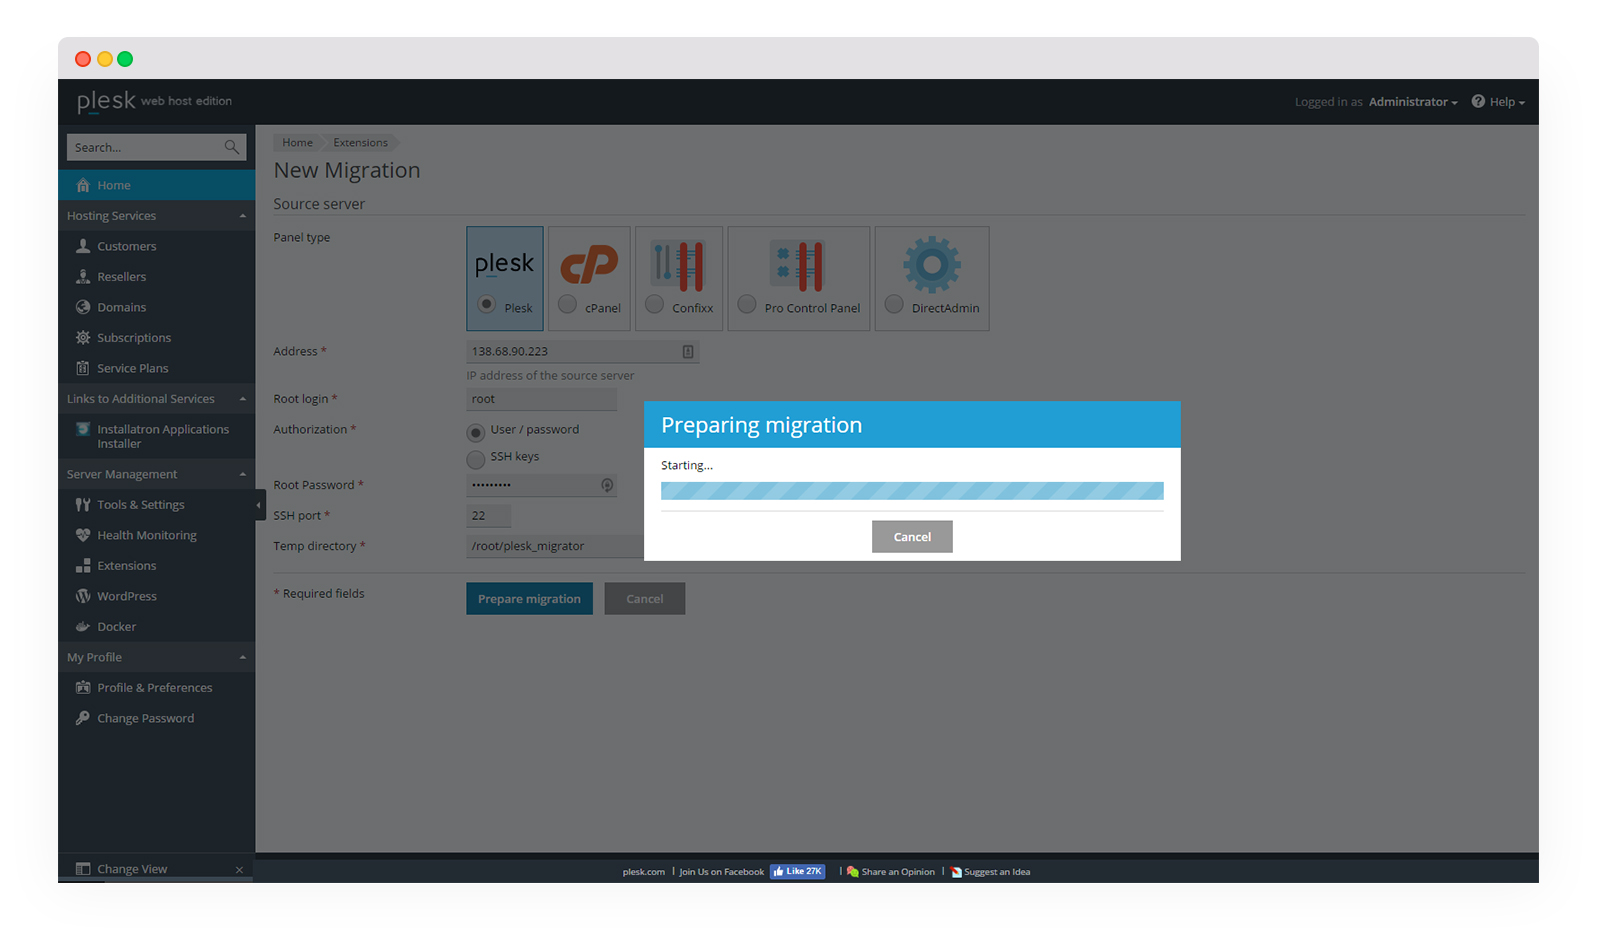
5. Initiating the migration on your AWS Plesk instance (target server)
- Log in to Plesk on the destination server as the Plesk administrator.
- Go to Server Management > Extensions > Plesk Migrator > Start a New Migration. If Plesk Migrator is unavailable, install it following the instructions here.
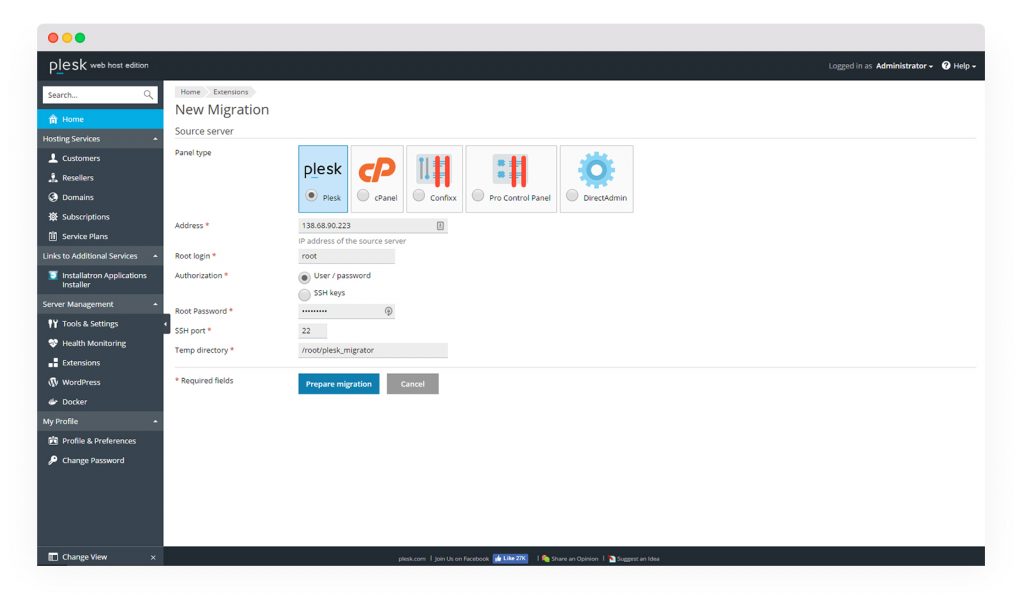
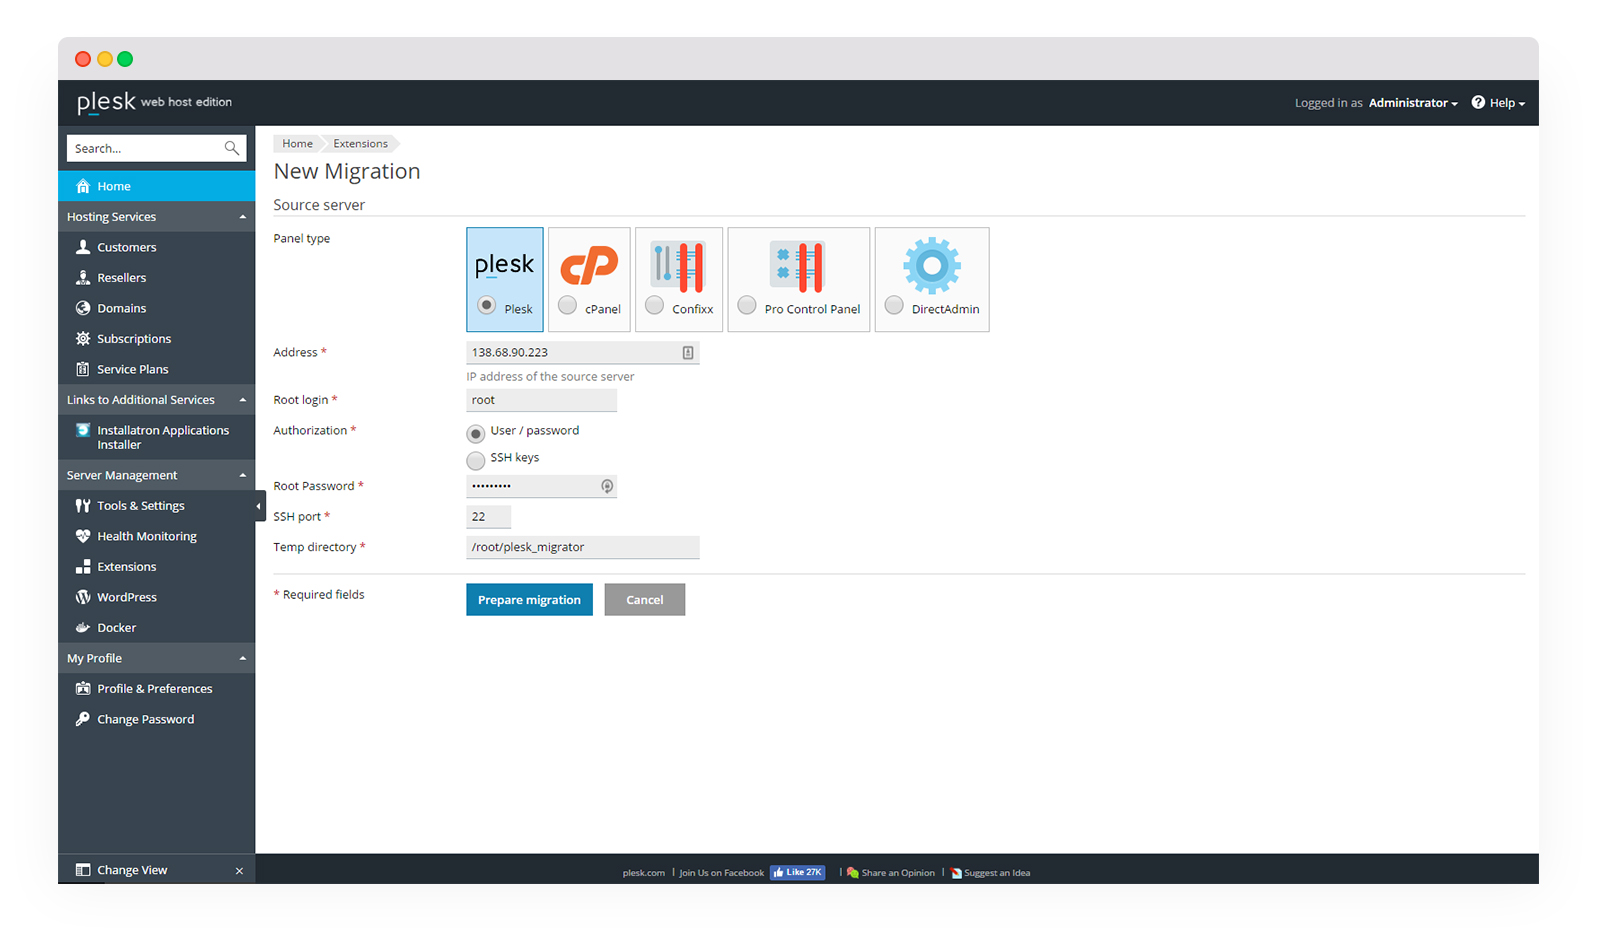
- Select the hosting panel installed on the source server from the Panel type menu.
- Specify the following:
- The source server’s IP address. If migrating from a Linux server, specify the SSH port as well (22 by default).
- (Plesk for Linux) The login and password of a root user on the source server. Alternatively, you can choose to authenticate via SSH keys. For details, refer to Authentication by SSH (Linux).
- (Plesk for Windows) The login and password of the built-in administrator accounts on both the source and the destination servers.
- The directory for storing temporary files on the source server (make sure there is enough free disk space available to store the dump of the largest database that will be migrated).
- If migrating from a Windows-based server, specify the method for installing the RPC agent (an application enabling Plesk Migrator to gather data):
- Automatic (recommended). Plesk Migrator will try to deploy and start RPC agent on the source server using the built-in administrator account. In some cases, automatic deployment may fail (for example, due to firewall settings, or because the File and Printer Sharing or RPC services are disabled). If this happens, deploy the agent manually.
- Manual. A link to download the RPC agent package will be provided. Download the package and install the agent on the source server manually.
- Click Prepare Migration to proceed to the next step. Plesk Migrator will attempt to fetch the data about the different objects (domains, subscriptions, customer/reseller accounts, and hosting plans) found on the source server. If the connection fails, double-check the source server information, make sure that the connection is not blocked by firewall, and try again.

Note that from this point onwards, you can leave the Migrator interface without losing your progress – the migration will remain in progress until you finish it explicitly. To continue from where you left off, click Server Management > Extensions > Plesk Migrator and then click the corresponding migration in the list.
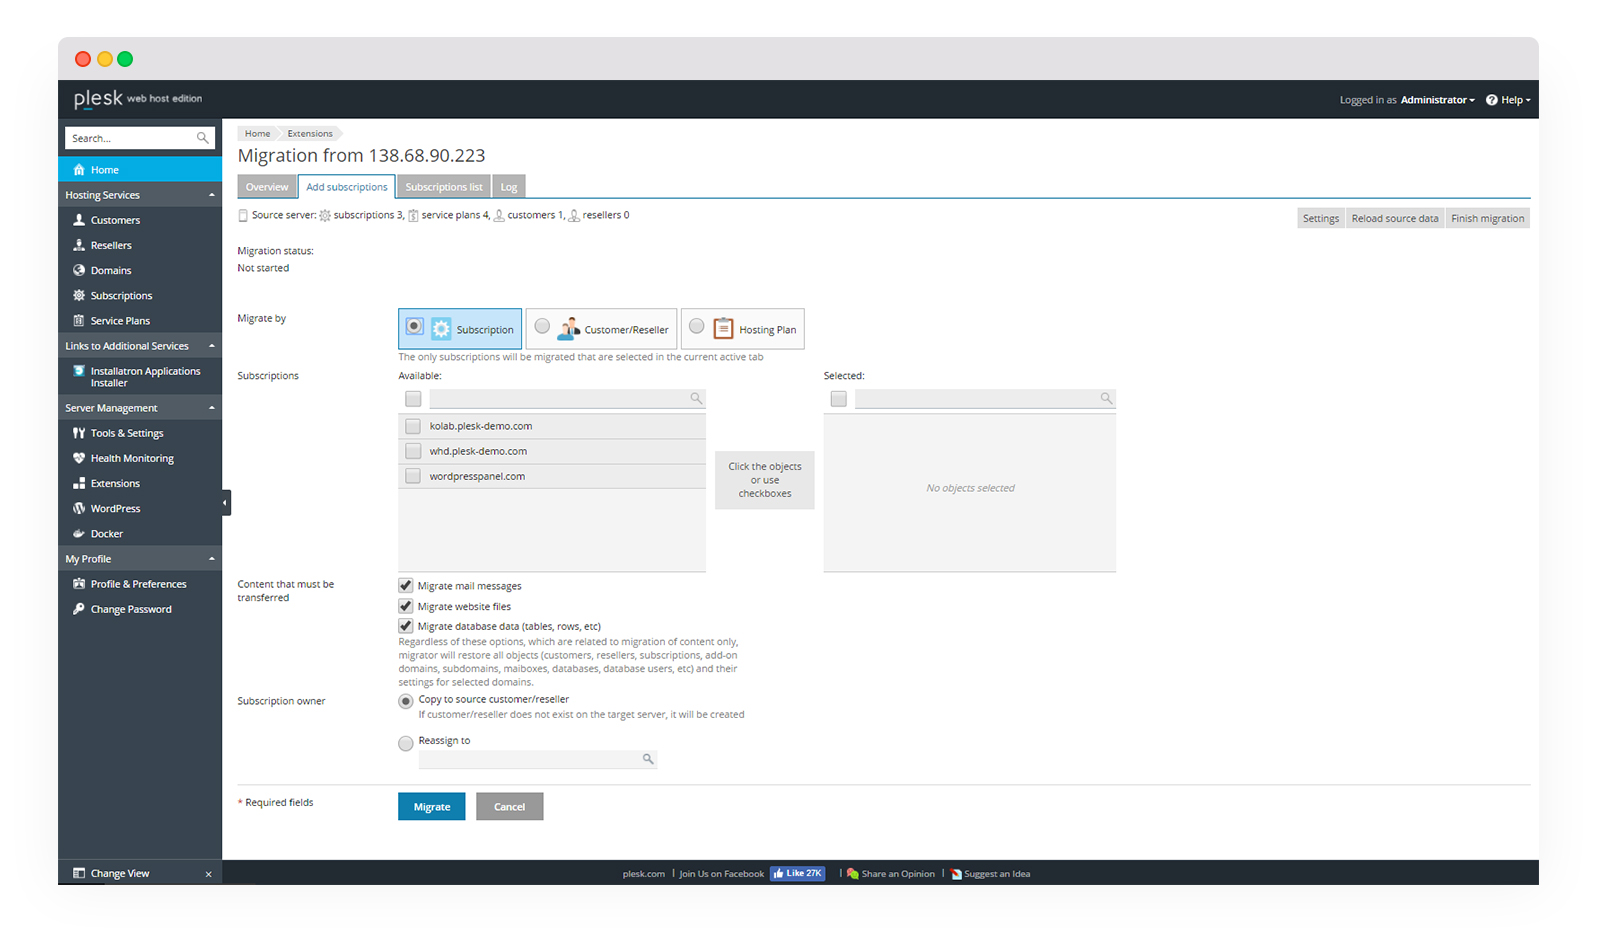
- You now find yourself on the Add subscriptions tab.

-
Here you must select the subscriptions to be migrated (note that you cannot migrate individual domains, the fewest number of objects you can migrate is a single subscription and all its domains). You can use one of the three available filters:
- By Subscription. If you migrate a subscription owned by a customer or a reseller, the corresponding customer/reseller account will be migrated as well (unless a custom subscription owner is specified – see below). The hosting plan the subscription is based on will also be migrated.
- By Customer/Reseller. If you migrate a customer or reseller account, all subscriptions owned by the account will be migrated together with the hosting plans they are based on. Note that migrating a reseller account does not automatically migrate the customer accounts owned by the reseller. If you select a reseller account and one or more customer accounts owned by that reseller for migration, the reseller’s ownership of the customer accounts will be preserved on the destination server.
- By Hosting Plan. If you migrate a hosting plan, all subscriptions based on the said plan will be migrated as well. If you migrate a hosting plan belonging to a reseller, said reseller will be migrated as well, plus all subscriptions based on the selected hosting plan together with the customers who own those subscriptions.
- Select what types of content (mail content, web content, and databases) will be migrated.
- Select a custom subscription owner. By default, whenever a subscription owned by a customer or reseller is migrated, the corresponding customer or reseller account is created on the destination server as well. If you select a different subscription owner, the ownership of all subscriptions being migrated will be assigned to that account.
- To change the migration settings, click Settings in the upper-right corner.

-
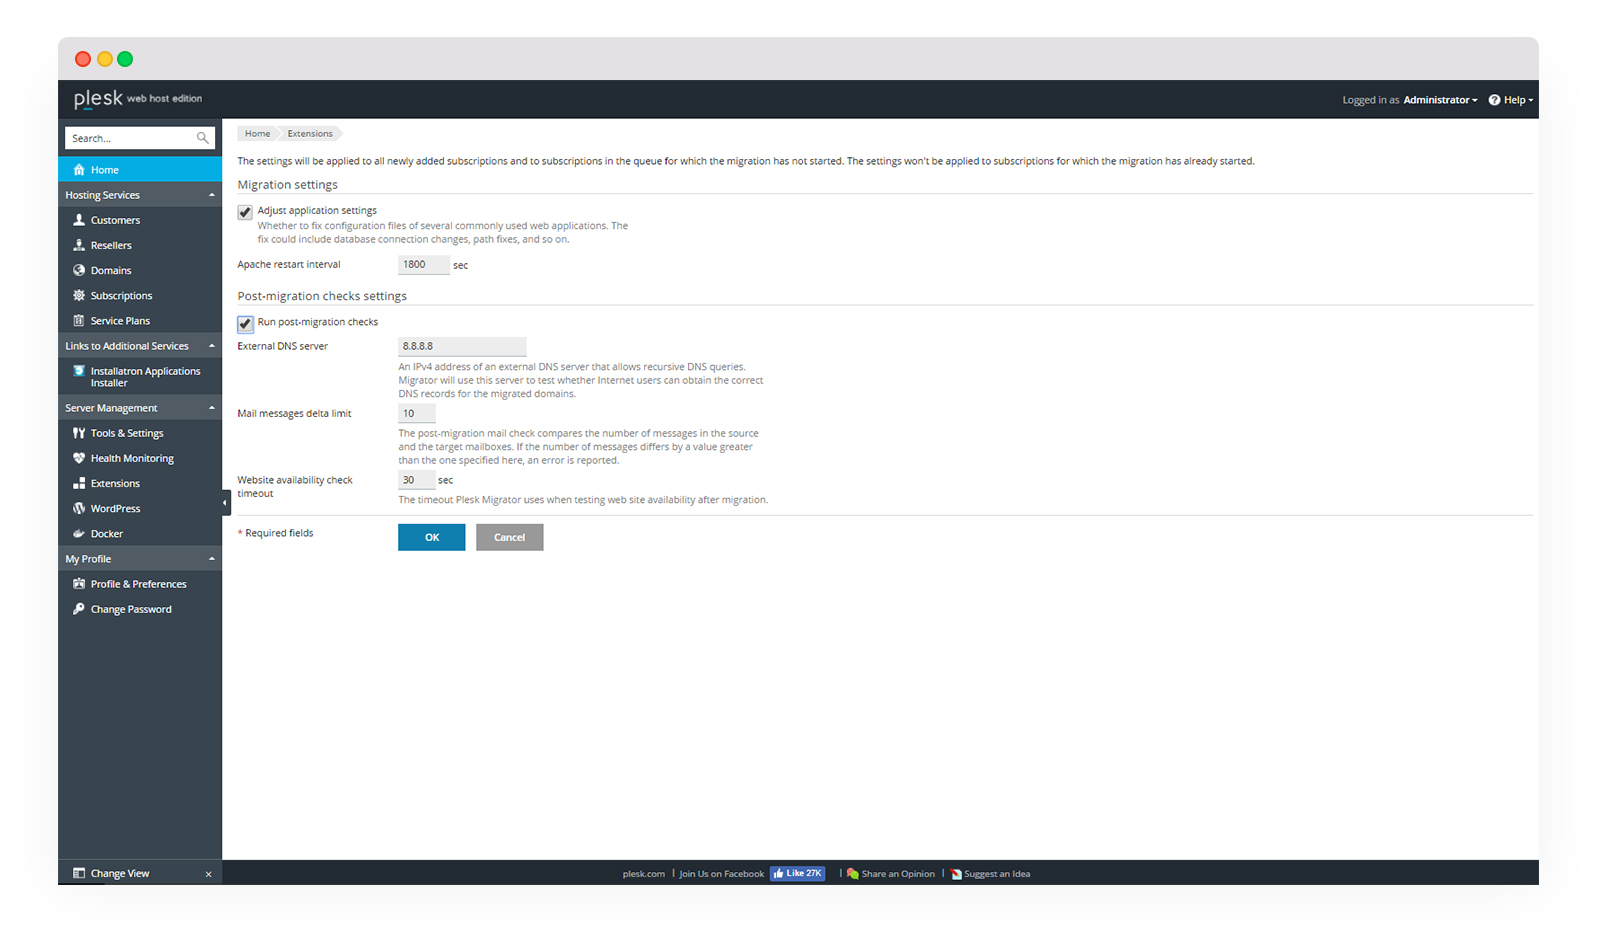
Here, the following controls are available:
- Adjust application settings. By default, during migration Plesk attempts to make changes to the configuration files of a number of popular web applications to make them operable on the destination server. Clear the checkbox if you want to make the changes manually. Leaving this option enabled will increase the migration time.
- Apache restart interval (Plesk for Linux only). Restarting the web server on the destination server is necessary for the migrated domains to become available over the network. Make sure not to set this value too low (less than 300 seconds is not recommended), as all hosted domains become temporarily unavailable every time the web server is restarted.
- Run post-migration checks. By default, after the migration is finished, Plesk performs a number of automated tests to identify potential issues with the migrated domains. Clear the checkbox if you do not want the tests to be run. Leaving this option enabled will increase the migration time.
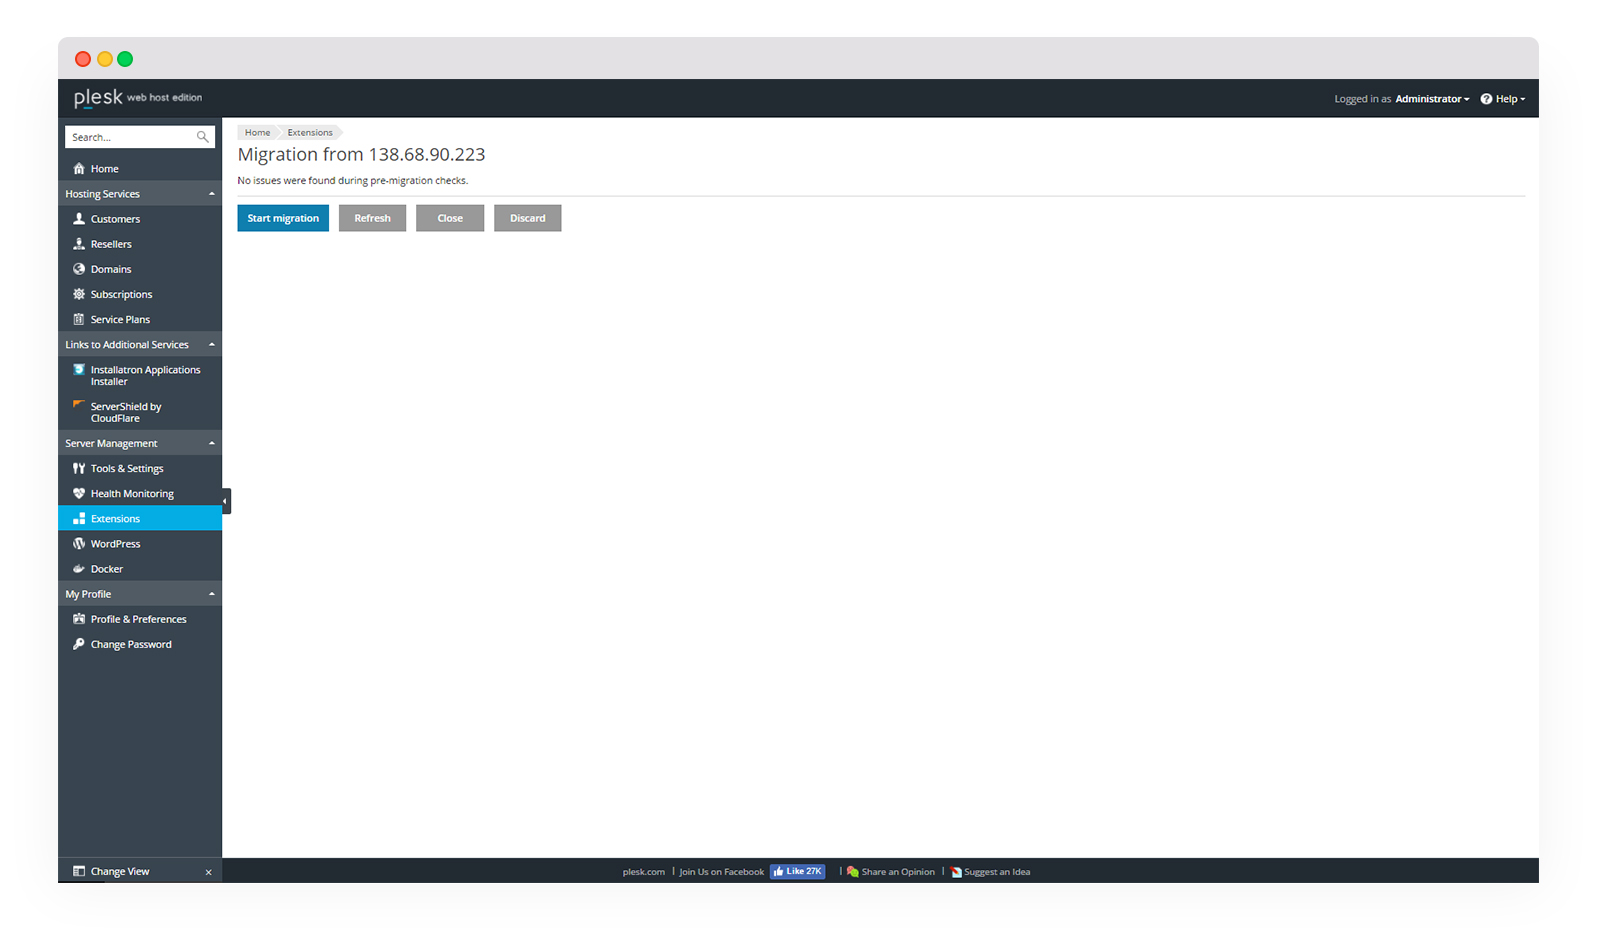
- When you are satisfied with the list of subscriptions to migrate and the migration options, click Migrate to proceed. Plesk will run pre-migration checks to detect potential issues and display a report.
-
We advise you to fix the detected issues (if any) before continuing with the migration. Make the necessary configuration changes, then click Refresh to re-run the tests.

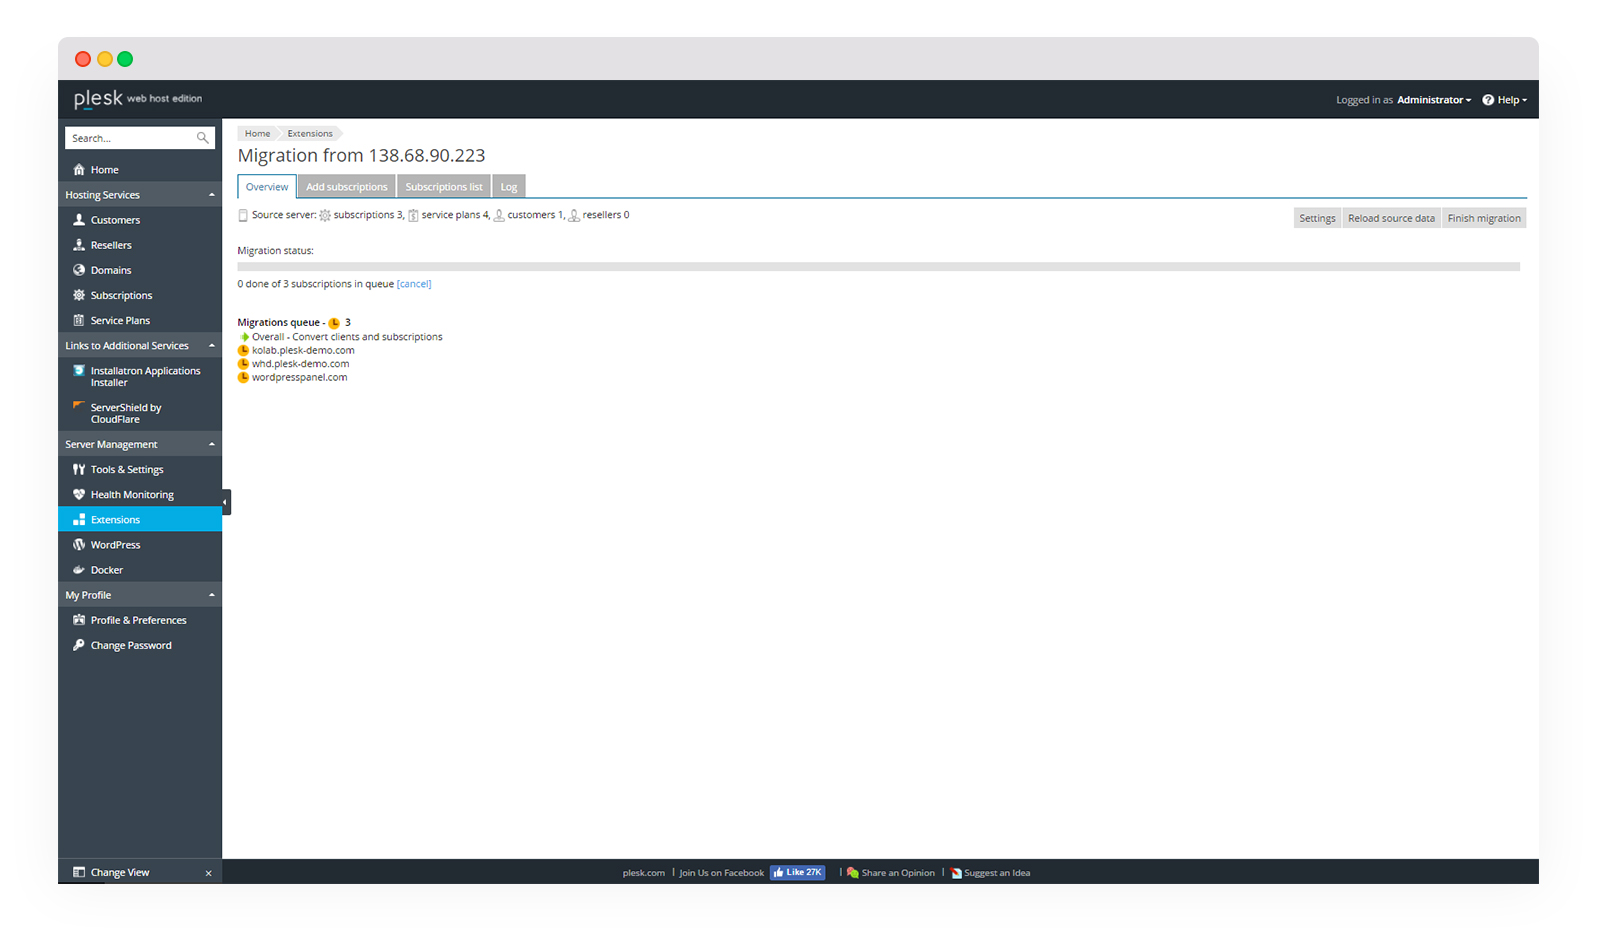
- When the pre-migration check returns a clean result, click Start migration to begin migrating. Once a migration is underway, you can monitor its progress on the Overview tab.

- As subscriptions are being migrated, status reports will be displayed for every subscription for which the migration was either completed successfully or failed.
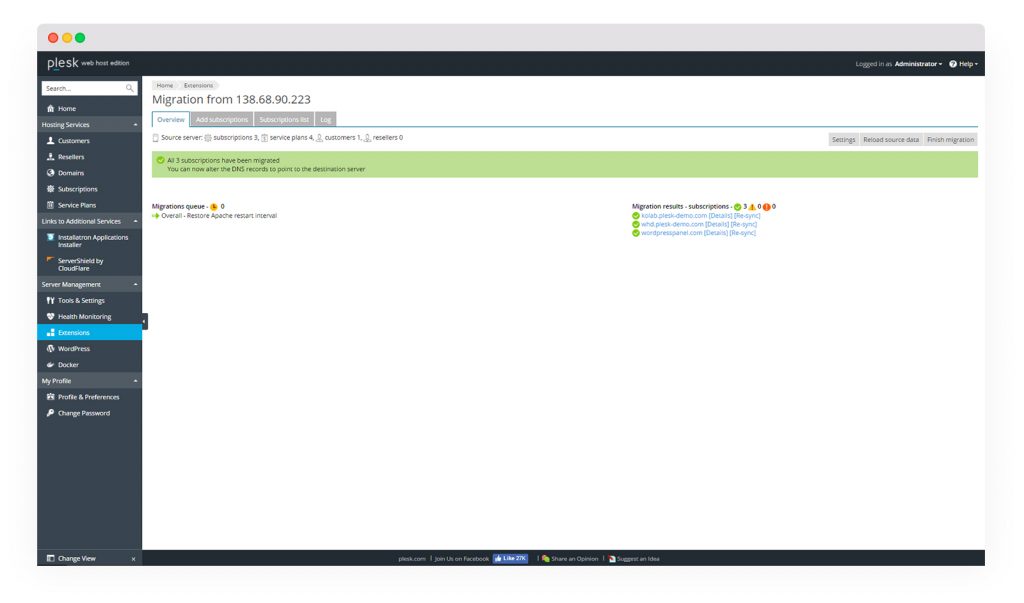
- The
 icon indicates that the migration was completed successfully.
 - The
 icon indicates that the migration was completed with errors. Click [Details] to see the list of issues that occurred during the migration.
 - The
 icon indicates that the migration failed. Click [Details] to see the list of issues that occurred during the migration.
- The
- If you want to perform an additional sync of a subscription’s content after the migration is finished, click [Re-sync] next to the subscription’s name.
- If you want to migrate additional subscriptions from the source server, return to step number seven. Otherwise, unless you plan to migrate from the same source server again in the near future, you can click Finish migration to remove it from the list of ongoing migrations.

6. Going into production: switch DNS
- Any DNS zones (domains) will be transferred to the configured Route53 correctly when using a public IP address on your Plesk server on AWS, without any manual interventions.
- After the migration, AWS need some time to propagate new DNS records/domains inside their infrastructure.
- IF on source server DNS was handled by Plesk, then the migrated domains continue to work on old DNS but points to new IP’s because of “switch DNS” feature described earlier.
7. Request at your domain registrar or registries to switch DNS to route53
After your changes to Amazon Route 53 resource record sets have propagated to Amazon Route 53 DNS servers (see Step 4: Check the Status of Your Changes (API Only)), update your registrar’s name server (NS) records to refer to the Amazon Route 53 name servers.
migration with no downtime – woohoo!
8. Additional tips
In case you are not ready to migrate your whole server yet, there is also an option to just migrate 1 site to a server with Plesk on AWS or one WordPress instance into Plesk’s all new WP Toolkit. For that, please refer to separate documentation available here.
Thanks to the whole AWS team for co-authoring this write-up and for providing feedback and technical insights to optimize this tutorial.
Be well, do good, and stay Plesky!


3 Comments
does migration will hit the site’s position at search results?
Thank Plesk Support!
Regarding the search results, this is a difficult question. Whenever you are changing your IP address, then potentially yes. But I suggest to engage with a SEO specialist upfront to analyze your situation and do the migration afterwards based on his audit.